ChevyParts
My Garage
My Account
Cart
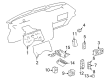
OEM Chevrolet Transfer Case Seal
Transfer Case Output Shaft Seal- Select Vehicle by Model
- Select Vehicle by VIN
Select Vehicle by Model
orMake
Model
Year
Select Vehicle by VIN
For the most accurate results, select vehicle by your VIN (Vehicle Identification Number).
54 Transfer Case Seals found


Chevrolet Output Shaft Seal, Rear Part Number: 24233898
$35.91 MSRP: $62.67You Save: $26.76 (43%)Ships in 1-3 Business DaysProduct Specifications- Other Name: Seal, Rear Bearing Retaining; Automatic Transmission Extension Housing Seal; Output Shaft Seal; Transfer Case Gasket.
- Position: Rear
- Replaces: 19133150, 24207336


Chevrolet Output Shaft Seal, Rear Part Number: 12547638
$81.05 MSRP: $141.44You Save: $60.39 (43%)Ships in 1-2 Business DaysProduct Specifications- Other Name: Seal, Transfer Case Rear Output Shaft; Automatic Transmission Seal; Gasket; Extension Seal; Seal, Transfer Case
- Position: Rear


Chevrolet Extension Housing Seal, Rear Part Number: 24232324
$12.61 MSRP: $20.78You Save: $8.17 (40%)Ships in 1-2 Business DaysProduct Specifications- Other Name: Seal, Rear Bearing Retaining; Automatic Transmission Extension Housing Seal; Transmission Seal
- Position: Rear
- Replaces: 24204540


Chevrolet Extension Housing Seal, Rear Part Number: 24232325
$15.01 MSRP: $24.72You Save: $9.71 (40%)Ships in 1-2 Business DaysProduct Specifications- Other Name: Seal, Rear Bearing Retaining; Automatic Transmission Extension Housing Seal; Transmission Seal
- Position: Rear
- Replaces: 24201470


Chevrolet Output Shaft Seal Part Number: 14095609
$15.66 MSRP: $25.79You Save: $10.13 (40%)Ships in 1-2 Business DaysProduct Specifications- Other Name: Seal, Transfer Case Input Shaft; Automatic Transmission Transfer Shaft Seals; Transfer Case Output Shaft Seal; Seal, Transfer Case


Chevrolet Input Shaft Seal Part Number: 19299082
$15.79 MSRP: $26.03You Save: $10.24 (40%)Ships in 1-3 Business DaysProduct Specifications- Other Name: Seal, Transfer Case Input Shaft; Automatic Transmission Input Shaft Seal.; Seal, Transfer Case
- Replaces: 19257407


Chevrolet Input Shaft Seal Part Number: 19299084
$17.27 MSRP: $28.45You Save: $11.18 (40%)Ships in 1-2 Business DaysProduct Specifications- Other Name: Seal, Transfer Case Input Shaft; Automatic Transmission Input Shaft Seal.
- Replaces: 19133156


Chevrolet Output Shaft Seal Part Number: 12474423
$24.43 MSRP: $40.24You Save: $15.81 (40%)Ships in 1-2 Business DaysProduct Specifications- Other Name: Seal, Transfer Case Input Shaft; Automatic Transmission Transfer Shaft Seals; Transfer Case Input Shaft Seal; Input Shaft Seal; Seal, Transfer Case


Chevrolet Extension Seal, Rear Part Number: 15661460
$26.67 MSRP: $43.93You Save: $17.26 (40%)Ships in 1-2 Business DaysProduct Specifications- Other Name: Seal, Transfer Case Rear Output Shaft; Transfer Case Gasket; Seal, Transfer Case
- Position: Rear


Chevrolet Extension Housing Seal Part Number: 24228876
$28.56 MSRP: $47.07You Save: $18.51 (40%)Ships in 1-2 Business DaysProduct Specifications- Other Name: Seal, Transmission Input And Turbine Shaft; Automatic Transmission Extension Housing Seal; Transmission Seal; Seal, Universal Joint Sleeve Yoke
- Replaces: 24238075


Chevrolet Output Shaft Seal Part Number: 88984501
$29.06 MSRP: $47.88You Save: $18.82 (40%)Ships in 1-2 Business DaysProduct Specifications- Other Name: Seal, Transfer Case Front Output Shaft; Automatic Transmission Transfer Shaft Seals; Transfer Case Output Shaft Seal; Seal, Transfer Case


Chevrolet Extension Housing Seal, Front Part Number: 24226707
$34.12 MSRP: $56.21You Save: $22.09 (40%)Ships in 1-2 Business DaysProduct Specifications- Other Name: Seal Assembly-Propeller Shaft Front Slip Yoke Oil; Automatic Transmission Extension Housing Seal; Transmission Seal
- Position: Front
- Replaces: 19133151


Chevrolet Output Shaft Seal Part Number: 89059495
$43.89 MSRP: $72.29You Save: $28.40 (40%)Ships in 1-3 Business DaysProduct Specifications- Other Name: Seal, Transfer Case Rear Output Shaft; Automatic Transmission Transfer Shaft Seals; Transfer Case Output Shaft Seal; Seal, Transfer Case
- Replaces: 88984500


Chevrolet Extension Housing Seal Part Number: 89059483
$51.50 MSRP: $84.84You Save: $33.34 (40%)Ships in 1-2 Business DaysProduct Specifications- Other Name: Seal, Main Shaft Rear; Manual Transmission Extension Housing Seal; Manual Transmission Gasket Set; Transmission Seal


Chevrolet Extension Seal, Rear Part Number: 88935685
$73.42 MSRP: $120.93You Save: $47.51 (40%)Ships in 1-2 Business DaysProduct Specifications- Other Name: Seal, Transfer Case Rear Output Shaft; Transfer Case Gasket; Seal, Transfer Case
- Position: Rear


Chevrolet Extension Housing Seal, Front Part Number: 8673526
$6.74 MSRP: $10.80You Save: $4.06 (38%)Ships in 1 Business DayProduct Specifications- Other Name: Seal, Propeller Shaft Front Slip Yoke Oil; Automatic Transmission Extension Housing Seal; Transmission Seal
- Position: Front


Chevrolet Seal, Universal Joint Sleeve Yoke Part Number: 24228886
$6.15 MSRP: $9.56You Save: $3.41 (36%)Ships in 1-2 Business DaysProduct Specifications- Other Name: Seal, Transmission Input And Turbine Shaft; Seal, Transmission Extension; Extension Housing Seal


Chevrolet Extension Seal Part Number: 97238997
$19.00 MSRP: $29.75You Save: $10.75 (37%)Ships in 1-3 Business DaysProduct Specifications- Other Name: Seal, Transfer Case Rear Output Shaft; Transfer Case Gasket; Seal, Transfer Case


Chevrolet Output Shaft Seal, Front Part Number: 12384477
$19.36 MSRP: $30.33You Save: $10.97 (37%)Ships in 1-3 Business DaysProduct Specifications- Other Name: Seal, Transfer Case Front Output Shaft; Automatic Transmission Transfer Shaft Seals; Transfer Case Output Shaft Seal; Seal, Transfer Case
- Position: Front


Chevrolet Extension Housing Seal Part Number: 8681168
$9.14 MSRP: $12.51You Save: $3.37 (27%)Ships in 1-2 Business DaysProduct Specifications- Other Name: Seal, Automatic Transmission Case Extension; Automatic Transmission Extension Housing Seal; Transmission Seal
| Page 1 of 3 |Next >
1-20 of 54 Results
Chevrolet Transfer Case Seal
Choose OEM Transfer Case Seal, you're making the optimal decision for superior quality and perfect performance. You can feel confident because each component goes through stringent quality checks. Every part is carefully built to comply with Chevrolet's factory specifications. You'll enjoy a smooth, worry-free installation that fits just right. At ChevyPartsDeal.com, you'll find it easy to get top-quality OEM Chevrolet Transfer Case Seal. You can shop at highly competitive prices and protect your budget. All our genuine Chevrolet parts include a dependable manufacturer's warranty. You'll also appreciate our straightforward return policy and swift delivery services for extra convenience.
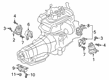
Chevrolet Transfer Case Seal ensures that the fluid of the drivetrain is in the right place and protects the integrity of the power flow. Chevy has earned the trust by producing cars since 1911 that combine daily usability with aggressive acceleration. Drivers like the fact that the lineup does not view comfort as a secondary feature to both city runabouts and full-size trucks. It is the gold bowtie and a straightforward pricing strategy that make Chevrolet recognizable across the globe. With small electric vehicles and snarling V8 icons, Chevrolet provides a choice that appeals to both the learning teenage community and the advanced road warrior. Chevy models can resist long distances, short trips and muddy routes all without being expensive to maintain. The company integrates technology into real-life utility through contemporary safety devices such as hands-free highway cruise. Transfer Case Seal is an interlocking piece between transfer case housing and driveshaft output, which provides lubricating oil on which the gearset relies when shifting constant torque on snow, mud, or dry pavements. Once the seal goes, all Chevy that have all-wheel grunt risk grinding gears and unintended attachment. Early replacement of the Transfer Case Seal reduces the expense of having to tear everything apart later, increases the life cycle of the various parts, and also makes the steering responsive due to the lack of driveline chatter. Its rough elastomer prevents heat, salts on the road, and cruel vibration such that the driveline remains sure-footed throughout its miles so that even when it carries heavy loads.
Chevrolet Transfer Case Seal Parts and Q&A
- Q: How to replace the input transfer case seal on Chevrolet S10?A:Vehicle elevation serves as a first step before starting Transfer Case input shaft seal replacement work. After lifting the vehicle begin by removing the Transfer Case from its position followed by removing the Transfer Case input shaft seal. When installing the new input shaft seal position the part numbers to be visible toward the technician. After installation position the Transfer Case input shaft seal perfectly straight along the input shaft and verify its evenness with the Transfer Case surface. The j 42738 seal installer (J 42738) serves to properly install the Transfer Case input shaft seal. Reinstall the Transfer Case into the vehicle before checking fluid levels followed by vehicle lowering.
- Q: How to replace the front output transfer case seal on Chevrolet Colorado?A:The replacement of the front transfer case output shaft seal starts with draining transfer case fluid followed by removing the front propeller shaft after bending out all staked areas on the yoke flange nut. Bend out the stakes on the yoke flange nut using a suitable punch tool so you can loosen the yoke flange nut by placing it in the flange and pulley holding tool (J 8614-01). The installation process requires removal of the yoke flange nut along with its o-ring and front output yoke flange. Discard the used flange nut and o-ring after removing them. A flat-bladed screwdriver should be tapped gently along the boundaries of the front output shaft seal before using it to pry the seal free from the transfer case. The front output shaft seal installer (J 37212) together with a hammer allows you to install the new front output shaft seal properly into the transfer case. The installation process starts with attaching the yoke flange to the front output shaft followed by lubricating the new yoke flange o-ring seal using transfer case fluid. After this fitting the yoke flange and new nut are secured. Use the flange and pulley holding tool (J 8614-01) to clamp the yoke flange before torquing the yoke flange nut to 137 nm (1101 ft. Lbs.). As a conclusion install the front propeller shaft followed by filling the transfer case with fluid.


Related Chevrolet Parts
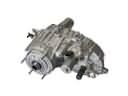 Chevrolet Transfer Case
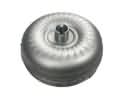 Chevrolet Torque Converter
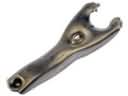 Chevrolet Clutch Fork
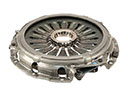 Chevrolet Pressure Plate
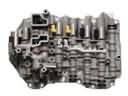 Chevrolet Valve Body
 Chevrolet Automatic Transmission Seal
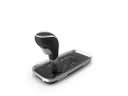 Chevrolet Automatic Transmission Shifter
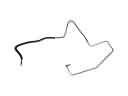 Chevrolet Clutch Hydraulic Lines
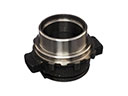 Chevrolet Clutch Release Bearing
 Chevrolet Output Shaft Seal
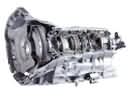 Chevrolet Transmission Assembly
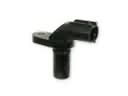 Chevrolet Transmission Sensor
Browse Chevrolet Transfer Case Seal by Models
S10 Colorado C10 Tahoe Camaro Equinox Impala SS SSR Silverado 1500 Silverado 2500 HD Caprice Suburban Traverse Blazer K10 Trax Trailblazer Astro Corvette C20 C1500 C2500 C30 C3500 Express 1500 Express 2500 Express 3500 G10 G20 G30 K1500 K20 K2500 K30 K3500 K5 Blazer S10 Blazer Silverado 2500 Silverado 3500 Suburban 1500 Trailblazer EXT Avalanche 1500 Avalanche 2500 C10 Suburban C1500 Suburban C20 Suburban C2500 Suburban K10 Suburban K1500 Suburban K20 Suburban K2500 Suburban R10 R10 Suburban R1500 Suburban R20 R20 Suburban R2500 R2500 Suburban R30 R3500 Silverado 1500 Classic Silverado 1500 HD Silverado 1500 HD Classic Silverado 1500 LTD Silverado 2500 HD Classic Silverado 3500 Classic Silverado 3500 HD Suburban 2500 V10 V10 Suburban V1500 Suburban V20 V20 Suburban V2500 Suburban V30 V3500