ChevyParts
My Garage
My Account
Cart
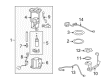
OEM Chevrolet Fuel Injector
Gas Injector- Select Vehicle by Model
- Select Vehicle by VIN
Select Vehicle by Model
orMake
Model
Year
Select Vehicle by VIN
For the most accurate results, select vehicle by your VIN (Vehicle Identification Number).
223 Fuel Injectors found


Chevrolet Injector Part Number: 12582219
$36.74 MSRP: $117.46You Save: $80.72 (69%)Ships in 1-2 Business DaysProduct Specifications- Other Name: Injector, Fuel Injection; Fuel Injector


Chevrolet Injector Part Number: 19244619
$62.96 MSRP: $201.38You Save: $138.42 (69%)Ships in 1-2 Business DaysProduct Specifications- Other Name: Injector Kit, Fuel Injection; Fuel Injector; Injector, Fuel Injection
- Replaces: 17112632, 17122509, 17059402, 17102747, 17111799


Chevrolet Injector Part Number: 12609418
$56.26 MSRP: $162.42You Save: $106.16 (66%)Ships in 1-2 Business DaysProduct Specifications- Other Name: Injector, Multiport Fuel; Gasoline Injector; Fuel Injector; Injector, Fuel Injection


Chevrolet Injector Part Number: 12606110
$60.28 MSRP: $169.72You Save: $109.44 (65%)Ships in 1 Business DayProduct Specifications- Other Name: Injector Kit, Fuel Injection; Fuel Injector; Injector, Fuel Injection
- Replaces: 12582704


Chevrolet Injector Part Number: 12576341
$83.30 MSRP: $177.74You Save: $94.44 (54%)Ships in 1-2 Business DaysProduct Specifications- Other Name: Injector Assembly-Sequential Multiport Fuel; Gasoline Injector; Fuel Injector; Injector, Fuel Injection


Chevrolet Injector Part Number: 19256590
$346.18 MSRP: $734.24You Save: $388.06 (53%)Ships in 1-3 Business DaysProduct Specifications- Other Name: Injector Kit, Fuel Injection; Common Rail Injector; Fuel Injector


Chevrolet Injector Part Number: 12613412
$41.08 MSRP: $85.52You Save: $44.44 (52%)Ships in 1-2 Business DaysProduct Specifications- Other Name: Injector Assembly-Sequential Multiport Fuel; Fuel Injector; Injector, Fuel Injection
- Replaced by: 12738849


Chevrolet Injector Part Number: 12613163
$48.56 MSRP: $101.09You Save: $52.53 (52%)Ships in 1-2 Business DaysProduct Specifications- Other Name: Injector, Fuel Injection; Fuel Injector


Chevrolet Injector Part Number: 12598646
$63.65 MSRP: $132.52You Save: $68.87 (52%)Ships in 1-2 Business DaysProduct Specifications- Other Name: Injector Assembly-Multiport Fuel (W/Fuel Rail); Gasoline Injector; Fuel Injector; Injector, Fuel Injection


Chevrolet Injector Part Number: 19420316
$68.70 MSRP: $143.00You Save: $74.30 (52%)Ships in 1 Business DayProduct Specifications- Other Name: Injector Kit, Multiport Fuel (Nominal Flow); Fuel Injector
- Replaces: 12710475, 12684126, 12661026, 12668651, 12656931, 12672370, 12690933, 12692520, 12698483


Chevrolet Injector Part Number: 12594512
$69.70 MSRP: $145.10You Save: $75.40 (52%)Ships in 1-2 Business DaysProduct Specifications- Other Name: Injector Assembly-Sequential Multiport Fuel; Fuel Injector; Injector, Fuel Injection


Chevrolet Injector Part Number: 12609749
$73.20 MSRP: $152.40You Save: $79.20 (52%)Ships in 1-2 Business DaysProduct Specifications- Other Name: Injector Assembly-Sequential Multiport Fuel; Fuel Injector; Injector, Fuel Injection


Chevrolet Injector Part Number: 12662564
$90.84 MSRP: $189.14You Save: $98.30 (52%)Ships in 1-2 Business DaysProduct Specifications- Other Name: Injector Assembly-Direct Fuel; Fuel Injector; Injector, Fuel Injection
- Replaces: 12627093, 12633913, 12662570


Chevrolet Injector Part Number: 12608362
$94.78 MSRP: $197.34You Save: $102.56 (52%)Ships in 1-2 Business DaysProduct Specifications- Other Name: Injector Assembly-Direct Fuel; Fuel Injector; Injector, Fuel Injection


Chevrolet Injector Part Number: 12633789
$98.37 MSRP: $204.78You Save: $106.41 (52%)Ships in 1-2 Business DaysProduct Specifications- Other Name: Injector Assembly-Direct Fuel; Fuel Injector; Injector, Fuel Injection


Chevrolet Injector Part Number: 12634126
$105.04 MSRP: $218.70You Save: $113.66 (52%)Ships in 1-2 Business DaysProduct Specifications- Other Name: Injector Assembly-Direct Fuel; Fuel Injector; Injector, Fuel Injection


Chevrolet Injector Part Number: 55577403
$105.79 MSRP: $220.24You Save: $114.45 (52%)Ships in 1-2 Business DaysProduct Specifications- Other Name: Injector Assembly-Direct Fuel; Fuel Injector; Injector, Fuel Injection
- Replaces: 12644767


Chevrolet Injector Part Number: 12580426
$107.23 MSRP: $223.22You Save: $115.99 (52%)Ships in 1-2 Business DaysProduct Specifications- Other Name: Injector Assembly-Sequential Multiport Fuel; Fuel Injector; Injector, Fuel Injection
- Replaces: 88894361


Chevrolet Injector Part Number: 19244616
$118.27 MSRP: $246.20You Save: $127.93 (52%)Ships in 1 Business DayProduct Specifications- Other Name: Injector Kit, Fuel Injection; Fuel Injector
- Replaces: 17113124, 17113197


Chevrolet Injector Part Number: 12633784
$119.14 MSRP: $248.03You Save: $128.89 (52%)Ships in 1-2 Business DaysProduct Specifications- Other Name: Injector Assembly-Direct Fuel; Fuel Injector; Injector, Fuel Injection
| Page 1 of 12 |Next >
1-20 of 223 Results
Chevrolet Fuel Injector
Choose OEM Fuel Injector, you're making the optimal decision for superior quality and perfect performance. You can feel confident because each component goes through stringent quality checks. Every part is carefully built to comply with Chevrolet's factory specifications. You'll enjoy a smooth, worry-free installation that fits just right. At ChevyPartsDeal.com, you'll find it easy to get top-quality OEM Chevrolet Fuel Injector. You can shop at highly competitive prices and protect your budget. All our genuine Chevrolet parts include a dependable manufacturer's warranty. You'll also appreciate our straightforward return policy and swift delivery services for extra convenience.
Chevrolet Fuel Injector provides accurate spray of fuel that enhances power and efficiency thus making all the drives of the vehicles smoother and economical to the drivers. Over one hundred years Chevrolet has built a reputation of combining daring style with reliability, providing sedans, trucks, and SUVs that can be driven to work on a daily basis and to adventure on a long journey. New Chevy cars have lightweight frames, intelligent infotainment displays, and optional Super Cruise, which is capable of doing miles of highway with you behind the wheel. The reason why people prefer Chevy is that its models strike a balance between price and the very recent safety packages, fast acceleration, and the comfort of the interior that makes long trips a fun adventure. Craving a small runabout or a trail-ready pickup, Chevy engineers all of them to make them feel right behind the steering wheel, keep family cargo safe, and burn fuel in a responsible manner without losing excitement. The Fuel Injector is one such essential universal element inside this forward-thinking ecosystem. Each Fuel Injector collaborates with the engine control unit to introduce gasoline in milliseconds to match air flow to ensure a clean and robust combustion. It is a system which is returnless and there are fewer opportunities to leak fuel and there is a constant pressure at the speed of any velocity. Its system provides more precise throttle response, improved cold start, and mileage compared to older models and gives the Chevrolet the entire fleet a reliable and high-tech throttle system.
Chevrolet Fuel Injector Parts and Q&A
- Q: How to service the fuel injector on Chevrolet S10?A:Service of the Fuel Injector starts with disconnecting the negative Battery Cable and reducing fuel system pressure. The service technician must remove both the upper intake manifold assembly with the fuel meter body assembly. The system requires removal of the injector assembly retainer along with its lock nuts. The stopper nozzle tube must be carefully lowered as a small tip punch gently pushes down between the injector terminals for injector removal to avoid terminal damage. The complete injector assembly requires service without liquid immersion because liquid cleaners can cause harm; cleaning procedures should be avoided. Before placing a new injector into position, apply engine oil to its o-ring seals before installing these rings on the entire assembly. Attach the Fuel Injector assembly to the fuel meter body injector socket by installing the injector assembly retainer followed by tightening its lock nuts to 3 n.m (27 lb in). Put back the fuel meter body with upper intake manifold while tightening the fuel filler cap and connecting the negative Battery Cable. To check for leaks turn on the ignition for 2 seconds, let it sit off for 10 seconds, reapply power to on state and then check for any fuel leak indicators.
- Q: How to replace a fuel injector on Chevrolet Colorado?A:The replacement process starts by taking out the Fuel Rail assembly and breaking the Fuel Injector harness electrical connector from its connection to the Fuel Injector. Separate the Fuel Injector retainer clip before uninstalling the Fuel Injector from the Fuel Rail while discarding both Fuel Injector O-Ring seals (2 and 3). Check for the correct Fuel Injector before ordering since the injector features identification stamps with part numbers and 4-digit date codes indicating month, day and year of production together with shift information. The Fuel Injector O-Ring seals (2 and 3) need mineral oil gm p/n 9981704 for light lubrication before their installation on the Fuel Injector. The Fuel Rail injector socket requires a new retainer clip before the injector fits into position while the electrical connector should point outward and the clip must engage the socket flange. Install the Fuel Rail assembly with the completed step of connecting the Fuel Injector harness electrical connector to its target Fuel Injector.


Related Chevrolet Parts
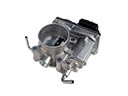 Chevrolet Throttle Body
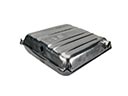 Chevrolet Fuel Tank
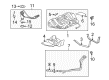
 Chevrolet Accelerator Cable
 Chevrolet Air Filter Box
 Chevrolet Daytime Running Light Relay
 Chevrolet Fuel Filler Hose
 Chevrolet Fuel Filler Housing
 Chevrolet Fuel Injector O-Rings
 Chevrolet Fuel Rail
 Chevrolet Fuel Tank Lock Ring
 Chevrolet Fuel Tank Strap
 Chevrolet Throttle Body Gasket
Browse Chevrolet Fuel Injector by Models
Nova S10 Colorado C10 Tahoe Cruze Malibu Camaro Equinox Impala SS SSR Avalanche Silverado 1500 Silverado 2500 HD Caprice Classic Cobalt Suburban Traverse Blazer HHR Sonic Tracker Volt El Camino K10 Spark Trax Trailblazer Astro Cavalier Corvette C20 Aveo Beretta C1500 C2500 C30 C3500 Celebrity City Express Corsica Express 1500 Express 2500 Express 3500 G10 G20 G30 K1500 K20 K2500 K30 K3500 K5 Blazer Lumina Metro Monte Carlo Prizm S10 Blazer Silverado 2500 Sprint Uplander Venture Lumina APV Silverado 3500 Suburban 1500 Trailblazer EXT Avalanche 1500 Avalanche 2500 Aveo5 C10 Suburban C1500 Suburban C20 Suburban C2500 Suburban Captiva Sport Citation II Cruze Limited Impala Limited K10 Suburban K1500 Suburban K20 Suburban K2500 Suburban R10 R10 Suburban R1500 Suburban R20 R20 Suburban R2500 R2500 Suburban R30 R3500 Silverado 1500 Classic Silverado 1500 HD Silverado 1500 HD Classic Silverado 1500 LTD Silverado 2500 HD Classic Silverado 3500 Classic Silverado 3500 HD Spectrum Suburban 2500 Suburban 3500 HD Traverse Limited V10 V10 Suburban V1500 Suburban V20 V20 Suburban V2500 Suburban V30 V3500