ChevyParts
My Garage
My Account
Cart
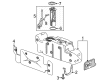
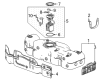
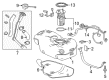
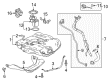
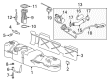
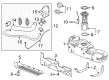
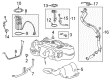
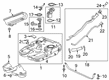
OEM Chevrolet Fuel Tank
Gas Tank- Select Vehicle by Model
- Select Vehicle by VIN
Select Vehicle by Model
orMake
Model
Year
Select Vehicle by VIN
For the most accurate results, select vehicle by your VIN (Vehicle Identification Number).
286 Fuel Tanks found

Chevrolet Fuel Tank Part Number: 84637953
$117.39 MSRP: $175.45You Save: $58.06 (34%)Ships in 1-3 Business DaysProduct Specifications- Other Name: Tank Assembly-Fuel (W/Sender); Tank, Fuel
- Replaced by: 84878510


Chevrolet Fuel Tank Part Number: 23389920
$2370.62 MSRP: $3746.83You Save: $1376.21 (37%)Ships in 1-3 Business DaysProduct Specifications- Other Name: Tank, Fuel
- Replaces: 19258093

Chevrolet Fuel Tank Part Number: 23389918
$2902.21 MSRP: $4587.02You Save: $1684.81 (37%)Ships in 1-3 Business DaysProduct Specifications- Other Name: Tank, Fuel
- Replaces: 19258379

Chevrolet Fuel Tank Part Number: 19352362
$2195.12 MSRP: $3469.44You Save: $1274.32 (37%)Ships in 1-3 Business DaysProduct Specifications- Other Name: Tank Assembly, CNG; Tank, Fuel
- Replaces: 19258363


Chevrolet Fuel Tank Part Number: 95102145
$153.04 MSRP: $228.77You Save: $75.73 (34%)Ships in 1-3 Business DaysProduct Specifications- Other Name: Tank, Fuel
- Replaces: 95051129

Chevrolet Fuel Tank Part Number: 85112832
$784.14 MSRP: $1177.41You Save: $393.27 (34%)Ships in 1-3 Business DaysProduct Specifications- Other Name: Tank, Fuel
- Replaced by: 85563732

Chevrolet Fuel Tank Part Number: 42622694
$144.69 MSRP: $216.30You Save: $71.61 (34%)Ships in 1-3 Business DaysProduct Specifications- Other Name: Tank, Fuel
Chevrolet Fuel Tank Part Number: 12382992
$276.75 MSRP: $413.68You Save: $136.93 (34%)Ships in 1-3 Business DaysProduct Specifications- Other Name: Tank Assembly, Fuel; Tank

Chevrolet Fuel Tank Part Number: 84574976
$250.75 MSRP: $374.82You Save: $124.07 (34%)Ships in 1-3 Business DaysProduct Specifications- Other Name: Tank Kit, Fuel
- Replaces: 23406966, 23150673
Chevrolet Fuel Tank Part Number: 85538364
$1505.14 MSRP: $2259.97You Save: $754.83 (34%)Ships in 1-3 Business DaysProduct Specifications- Other Name: Tank, Fuel
- Replaces: 84515282

Chevrolet Fuel Tank Part Number: 23360477
$903.36 MSRP: $1356.40You Save: $453.04 (34%)Ships in 1-3 Business DaysProduct Specifications- Other Name: Tank, Fuel
- Replaces: 25901671

Chevrolet Fuel Tank Part Number: 95367339
$942.80 MSRP: $1415.60You Save: $472.80 (34%)Product Specifications- Other Name: Tank, Fuel
- Replaces: 95297328, 95080131

Chevrolet Fuel Tank Part Number: 85633466
$937.31 MSRP: $1407.36You Save: $470.05 (34%)Ships in 1-2 Business DaysProduct Specifications- Other Name: Tank, Fuel
- Replaced by: 85743893

Chevrolet Fuel Tank Part Number: 85531335
$707.11 MSRP: $1061.73You Save: $354.62 (34%)Ships in 1-2 Business DaysProduct Specifications- Other Name: Tank, Fuel
- Replaces: 84820665

Chevrolet Fuel Tank Part Number: 84009042
$734.80 MSRP: $1103.31You Save: $368.51 (34%)Product Specifications- Other Name: Tank, Fuel
- Replaces: 15826971, 23315309, 20935353
Chevrolet Fuel Tank Part Number: 23406969
$269.43 MSRP: $402.74You Save: $133.31 (34%)Ships in 1-3 Business DaysProduct Specifications- Other Name: Tank Kit, Fuel
- Replaced by: 84507510
Chevrolet Fuel Pump Part Number: 87848344
$2369.94 MSRP: $3558.44You Save: $1188.50 (34%)Product Specifications- Other Name: Tank, Fuel; Fuel Tank
- Replaces: 19122202, 84277467, 20969743, 84082482

Chevrolet Fuel Tank Part Number: 84164752
Product Specifications- Other Name: Tank, Fuel
- Replaces: 84009046

Chevrolet Fuel Tank Part Number: 84055540
Product Specifications- Other Name: Tank, Fuel
- Replaces: 19258364


Chevrolet Fuel Tank Part Number: 22990929
Product Specifications- Other Name: Tank, Fuel; Tank
| Page 1 of 15 |Next >
1-20 of 286 Results
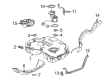
Chevrolet Fuel Tank
Choose OEM Fuel Tank, you're making the optimal decision for superior quality and perfect performance. You can feel confident because each component goes through stringent quality checks. Every part is carefully built to comply with Chevrolet's factory specifications. You'll enjoy a smooth, worry-free installation that fits just right. At ChevyPartsDeal.com, you'll find it easy to get top-quality OEM Chevrolet Fuel Tank. You can shop at highly competitive prices and protect your budget. All our genuine Chevrolet parts include a dependable manufacturer's warranty. You'll also appreciate our straightforward return policy and swift delivery services for extra convenience.
Chevrolet Fuel Tank stores the energy in a secure manner, allowing every drive to be made longer without vapor leaks. Chevrolet has earned its road trust since 1911 with the construction of cars that start every morning and drill through weekend miles. Chevy makes updates not too problematic, introductions that add more powerful engines and vivid driver assistances rather than doe-eyed triggers. Families such as the spacious cabins, solo commuters such as the narrow steering and road trippers such as the consistent fuel figures. With the Spark to the bulky pickup Chevy drives the same point: practical power and yet affordable. The interstate trips are painless since the wind can be isolated by sound, and the seats are comfortable throughout the hours. The parking in the city is not dramatic with the reason of small turning circles and cameras that demonstrate the curbs before the wheels are on the right spot. Each Fuel Tank includes the electric pump which forces gasoline forward, a level sender indicating to the dash how much is left in the tank and a sealed chamber containing vapor which vapes back to the EVAP system, all without paying attention to cold starts, hitting potholes or excessive heat at idle. The metal components might rust due to adhesion of road salt, plastic ones might crack under the changes of heat, and owners should smell of leakage and replace them as soon as possible. The cell-style tanks applied by racers do not burst and polymer add-ons provide more distance to a long haul. Chevy drivers drive on a Fuel Tank that is like a rolling reservoir and pressure manager which supplies the engine with not a single drop.
Chevrolet Fuel Tank Parts and Q&A
- Q: Should all repairs to the fuel tank or filler neck be performed by an experienced professional due to potential dangers on Chevrolet Beretta?A:All works done on or around the fuel tank or the filler neck should be done by a professional due to the risks that come with the work. Although, there may still be explosive fumes in the fuel system after the cleaning and flushing and these may explode particularly during repair of tanks. In case of removal of the fuel tank from the vehicle, one should not store it in a place that may cause explosion as a result of spark or flames in presence of the fuel fumes. Special care has to be taken where there are natural gas type appliances; the pilot light may cause an explosion.
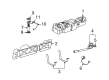
- Q: How to remove and install the fuel tank on Chevrolet El Camino?A:The fuel tank, located between the frame rails and behind the rear axle, is held in place by two steel straps. These straps are hinged at either the front or the rear end, with a bolt through the hinge, and secured at the opposite end with a bolt and nut assembly. Before performing any servicing operations involving the fuel supply, disconnect the battery. Also, disconnect the fuel gauge wiring to the top of the tank. On early models, the wire should be disconnected from inside the trunk and then fed through the trunk floorpan with the rubber grommet pushed out of place. The vehicle should be raised for access underneath the car. All fuel from the tank should be drained into a clean container. Since there are no drain plugs for the Chevelle, it is necessary to siphon the fuel through the filler neck, or drain the fuel through the fuel feed line running to the carburetor. Do not start the siphoning process with your mouth as serious personal injury could result. Also, ensure that no open flames, lighted cigarettes or sparks are in the area as they could ignite the fuel vapor. Disconnect the fuel hose or vapor return hose at the top of the tank. Remove the gauge ground wire attached to the underbody. Disconnect the filler neck at the tank. Support the bottom of the tank using an adjustable jack and a piece of wood to spread the load. Remove the tank strap bolts and carefully lower the tank, checking that all connections are free of the tank as it is lowered. Installation is a reversal of the removal process. Make sure all electrical connections are clean and properly installed and all hoses are tightened securely to the tank.

Related Chevrolet Parts
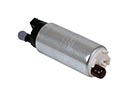 Chevrolet Fuel Pump
 Chevrolet Intake Manifold
 Chevrolet Air Filter
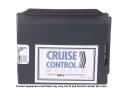 Chevrolet Cruise Control Module
 Chevrolet Air Hose
 Chevrolet Fuel Filler Housing
 Chevrolet Fuel Pressure Sensor
 Chevrolet Fuel Pump Gasket
 Chevrolet Fuel Tank Lock Ring
 Chevrolet Idle Control Valve
 Chevrolet Throttle Body Gasket
 Chevrolet Vapor Pressure Sensor
Browse Chevrolet Fuel Tank by Models
Nova S10 Colorado C10 Tahoe Cruze Malibu Camaro Equinox Impala SS SSR Avalanche Silverado 1500 Silverado 2500 HD Caprice Classic Cobalt Suburban Traverse Blazer HHR Sonic Tracker Volt El Camino K10 Spark Trax Trailblazer Astro Cavalier Corvette C20 Aveo Beretta C1500 C2500 C30 C3500 Celebrity City Express Corsica Express 1500 Express 2500 Express 3500 G10 G20 G30 K1500 K20 K2500 K30 K3500 K5 Blazer Lumina Metro Monte Carlo P30 S10 Blazer Silverado 2500 Sprint Uplander Venture Lumina APV Silverado 3500 Suburban 1500 Trailblazer EXT Avalanche 1500 Avalanche 2500 Aveo5 C10 Suburban C1500 Suburban C20 Suburban C2500 Suburban Captiva Sport Cruze Limited Impala Limited K10 Suburban K1500 Suburban K20 Suburban K2500 Suburban Malibu Limited P20 R10 R10 Suburban R1500 Suburban R20 R20 Suburban R2500 R2500 Suburban R30 R3500 Silverado 1500 Classic Silverado 1500 HD Silverado 1500 HD Classic Silverado 1500 LD Silverado 1500 LTD Silverado 2500 HD Classic Silverado 3500 Classic Silverado 3500 HD Spark EV Suburban 2500 Suburban 3500 HD V10 V10 Suburban V1500 Suburban V20 V20 Suburban V2500 Suburban V30 V3500