ChevyParts
My Garage
My Account
Cart
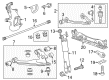
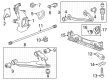
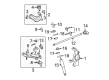
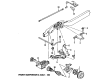
OEM GMC Torsion Bar
Suspension Torsion Bar- Select Vehicle by Model
- Select Vehicle by VIN
Select Vehicle by Model
orMake
Model
Year
Select Vehicle by VIN
For the most accurate results, select vehicle by your VIN (Vehicle Identification Number).
63 Torsion Bars found


GMC Torsion Bar, Front Passenger Side Part Number: 15750720
$74.00 MSRP: $115.91You Save: $41.91 (37%)Product Specifications- Other Name: Bar-Front Torsion; Bar, Front Chassis
- Position: Passenger Side


GMC Torsion Bar, Front Part Number: 15048312
$257.64 MSRP: $405.40You Save: $147.76 (37%)Ships in 1-3 Business DaysProduct Specifications- Other Name: Bar, Front Torsion
- Position: Front
- Replaced by: 19332932


GMC Torsion Bar, Front Driver Side Part Number: 19330060
$320.53 MSRP: $504.33You Save: $183.80 (37%)Product Specifications- Other Name: Bar, Front Torsion; Ball Joint; Lower Ball Joint; Bar, Front Chassis
- Position: Driver Side
- Replaces: 15528965

GMC Torsion Bar, Front Passenger Side Part Number: 19330059
$320.53 MSRP: $504.33You Save: $183.80 (37%)Ships in 1-3 Business DaysProduct Specifications- Other Name: Bar, Front Torsion; Ball Joint; Lower Ball Joint; Bar, Front Chassis
- Position: Passenger Side
- Replaces: 15528966


GMC Torsion Bar, Front Driver Side Part Number: 19330058
$320.58 MSRP: $504.42You Save: $183.84 (37%)Product Specifications- Other Name: Bar, Front Torsion; Bar, Front Chassis
- Position: Driver Side
- Replaces: 15528963


GMC Torsion Bar, Front Passenger Side Part Number: 19330057
$320.58 MSRP: $504.42You Save: $183.84 (37%)Product Specifications- Other Name: Bar, Front Torsion; Bar, Front Chassis
- Position: Passenger Side
- Replaces: 15528964

GMC Torsion Bar, Front Driver Side Part Number: 23377387
$212.92 MSRP: $381.92You Save: $169.00 (45%)Ships in 1-3 Business DaysProduct Specifications- Other Name: Bar-Front Torsion; Bar, Front Chassis
- Position: Driver Side
- Replaced by: 84301247

GMC Torsion Bar, Front Passenger Side Part Number: 84301246
$259.43 MSRP: $465.34You Save: $205.91 (45%)Product Specifications- Other Name: Bar-Front Torsion; Bar, Front Chassis
- Position: Passenger Side
- Replaces: 20883357, 23377386

GMC Torsion Bar, Front Driver Side Part Number: 84745477
$265.18 MSRP: $459.80You Save: $194.62 (43%)Product Specifications- Other Name: Bar-Front Torsion; Bar, Front Chassis
- Position: Driver Side
GMC Torsion Bar, Front Passenger Side Part Number: 84745491
$266.45 MSRP: $462.00You Save: $195.55 (43%)Ships in 1-3 Business DaysProduct Specifications- Other Name: Bar-Front Torsion; Bar, Front Chassis
- Position: Passenger Side
GMC Torsion Bar, Front Passenger Side Part Number: 84745479
$268.92 MSRP: $466.27You Save: $197.35 (43%)Ships in 1-3 Business DaysProduct Specifications- Other Name: Bar-Front Torsion; Bar, Front Chassis
- Position: Passenger Side


GMC Torsion Bar, Front Passenger Side Part Number: 19332946
$257.82 MSRP: $405.67You Save: $147.85 (37%)Product Specifications- Other Name: Bar, Front Torsion; Bar, Front Chassis
- Position: Passenger Side
- Replaces: 15528958

GMC Torsion Bar, Front Driver Side Part Number: 19332945
$257.82 MSRP: $405.67You Save: $147.85 (37%)Product Specifications- Other Name: Bar, Front Torsion; Bar, Front Chassis
- Position: Driver Side
- Replaces: 15528957


GMC Torsion Bar, Front Passenger Side Part Number: 20784587
Product Specifications- Other Name: Bar-Front Torsion
- Position: Passenger Side
- Replaces: 15167960

GMC Torsion Bar, Front Driver Side Part Number: 15750719
Product Specifications- Other Name: Bar-Front Torsion
- Position: Driver Side

GMC Torsion Bar, Front Driver Side Part Number: 15945637
Product Specifications- Other Name: Bar-Front Torsion
- Position: Driver Side


GMC Torsion Bar, Front Driver Side Part Number: 15990701
Product Specifications- Other Name: Bar, Front Torsion; Bar, Front Chassis
- Position: Driver Side


GMC Torsion Bar, Front Driver Side Part Number: 15956503
Product Specifications- Other Name: Bar, Front Torsion; Bar, Front Chassis
- Position: Driver Side


GMC Torsion Bar, Front Passenger Side Part Number: 19332928
Product Specifications- Other Name: Bar, Front Torsion; Bar, Front Chassis
- Position: Passenger Side
- Replaces: 15048308

GMC Torsion Bar, Front Driver Side Part Number: 19332927
Product Specifications- Other Name: Bar, Front Torsion; Bar, Front Chassis
- Position: Driver Side
- Replaces: 15048307
| Page 1 of 4 |Next >
1-20 of 63 Results
GMC Torsion Bar
Choose OEM Torsion Bar, you're making the optimal decision for superior quality and perfect performance. You can feel confident because each component goes through stringent quality checks. Every part is carefully built to comply with GMC's factory specifications. You'll enjoy a smooth, worry-free installation that fits just right. At ChevyPartsDeal.com, you'll find it easy to get top-quality OEM GMC Torsion Bar. You can shop at highly competitive prices and protect your budget. All our genuine GMC parts include a dependable manufacturer's warranty. You'll also appreciate our straightforward return policy and swift delivery services for extra convenience.
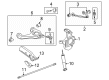
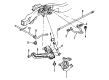
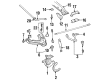
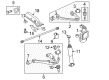
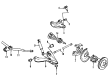
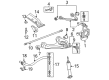
GMC Torsion Bar undergoes rotation in order to maintain the level of rides and steer sharp in various weight conditions. GMC makes trucks and SUVs that take the weight of the world in stride and matches the robust frames with engines that torque in such a way that drivers haul, tow, and commute without making a fuss. The brand began in the year 1901 and expanded through pushing reliability tests, incorporating smart trailering aids as well as sealing cabins to dampen road sounds. They include customers such as the MultiPro, which is an intuitive tailgate, clear hitch guidance, and easy dash controls that reduced distraction at busy job sites. GMC continues updating materials and electronics to keep pace with rust, wear, and changing trends in technology. There are long test tracks, harsh climate chambers, and mountain climbs, some of which give the lessons back to drive trains that travel further. Checks of the factory are done on all the bolts hence owners waste more time in moving loads than pursuing repairs. Torsion Bar suspension replaces the heavy coils with a steel rod that is fixed on the frame, which rotates as the wheels lift to provide variable ride height, uniform wheel position, and additional ground clearance during snow and gravel or loaded bed use without additional unwanted weight. Torsion Bar responds faster than leaf springs as well and steering is tight and body roll is minimal on winding roads. Frequent visual inspections see rust or worn out splines before rides get rough and tires prematurely worn out and anyone catches an unwanted surprise of a clunk because the bar is at its productive when it is under load.
GMC Torsion Bar Parts and Q&A
- Q: How to replace the torsion bar anchor in the front suspension on GMC Canyon?A:You need to start by taking out the Torsion Bar in order to replace the anchor in the front suspension. Take off the nuts and bolts from the lower Control Arm, and then take off the Torsion Bar anchor. At installation, the Torsion Bar anchor should be installed first, and fasteners must be used carefully so the car is not harmed. Attach the nuts and bolts to the lower Control Arm tightening them to 80 nm (59 lb ft), and after that, put the Torsion Bar back in.
- Q: How to replace the torsion bar and support assembly (bushing style) on GMC Sierra 1500?A:To replace the Torsion Bar and support assembly (Bushing style) first raise and support the vehicle by the frame and avoid the front suspension. Use the j 36202 (Torsion Bar Unloading/Loading Tool) to attach to the adjustment arm and crossmember, take up the tension of the adjustment arm until the load ends on the adjustment bolt and adjuster nut and mark the adjustment bolt and count the turns for unloading. Then, remove the adjustment bolt and adjustment nut from the crossmember, and then remove the j 36202 to unload the Torsion Bar. Slide the Torsion Bar forward to pull the adjustment part, then, take out the bolt of the Torsion Bar crossmember bolt form the weld nut as well as remove the crossmember from the crossmember mount. Lastly, remove the Torsion Bar from the crossmember, which is the left and right Torsion Bar are not interchangeable. For installation, mount the Torsion Bar in a lower Control Arm and bolt it on the cross member in cross member mount. Put in the Torsion Bar crossmember bolt through the weld nut and tighten it to 110 nm (81 lb ft). Then, fix the adjustment arm in the crossmember, then drill fixing holes for adjuster bolt and adjuster nut. Make sure that the Torsion Bar is completely seated in the adjustment arm and then use the j 36202 to load the Torsion Bar by tightening the adjustment arm with some tension. Turn the adjuster bolt to the same number of turns required in turning it to disengage it, then remove the j 36202 from the crossmember. Finally, take off the safety stands and lower the vehicle, and get the z height measurement.


Related GMC Parts
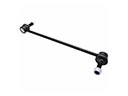 GMC Sway Bar Link
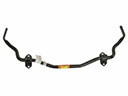 GMC Sway Bars
 GMC Axle Beam Mount
 GMC Bump Stop
 GMC Control Arm Bushing
 GMC CV Boot
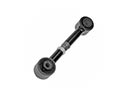 GMC Lateral Link
 GMC Leaf Spring Plate
 GMC Leaf Spring Shackle
 GMC Ride Height Sensor
 GMC Shock and Strut Boot
 GMC Strut Mounts
Browse GMC Torsion Bar by Models
Sierra 1500 Yukon Canyon Sierra 2500 HD Sonoma Typhoon Syclone C1500 Jimmy K1500 S15 S15 Jimmy Safari Savana 2500 Savana 3500 Sierra 2500 Sierra 3500 C2500 C3500 K2500 K3500 Savana 1500 Yukon XL 1500 C1500 Suburban C2500 Suburban K1500 Suburban K2500 Suburban Sierra 1500 Classic Sierra 1500 HD Sierra 1500 HD Classic Sierra 2500 HD Classic Sierra 3500 Classic Sierra 3500 HD Yukon XL 2500