ChevyParts
My Garage
My Account
Cart
OEM Chevrolet Universal Joint
U-Joint- Select Vehicle by Model
- Select Vehicle by VIN
Select Vehicle by Model
orMake
Model
Year
Select Vehicle by VIN
For the most accurate results, select vehicle by your VIN (Vehicle Identification Number).
32 Universal Joints found


Chevrolet Universal Joints Part Number: 19121436
$120.37 MSRP: $292.45You Save: $172.08 (59%)Ships in 1-2 Business DaysProduct Specifications- Other Name: Joint Kit, Propeller Shaft Universal; U Joint; Joint Kit, Propeller Shaft Universal Joint
- Replaces: 15515792, 19256890, 15898097, 88935919, 88934794


Chevrolet Universal Joints Part Number: 23104840
$52.27 MSRP: $91.21You Save: $38.94 (43%)Product Specifications- Other Name: Joint Kit, Propeller Shaft Universal Joint; U Joint
- Replaces: 12471502, 26042371, 12479126


Chevrolet Universal Joints Part Number: 89040243
$107.64 MSRP: $184.13You Save: $76.49 (42%)Ships in 1-2 Business DaysProduct Specifications- Other Name: Joint Kit, Propeller Shaft Front Universal; U Joint; Joint Kit, Propeller Shaft Universal Joint
- Replaces: 12476135, 12543573, 12473124


Chevrolet Universal Joints Part Number: 89040245
$108.35 MSRP: $185.34You Save: $76.99 (42%)Ships in 1-2 Business DaysProduct Specifications- Other Name: Joint Kit, Propeller Shaft Rear Universal; U Joint; Joint Kit, Propeller Shaft Universal Joint
- Replaces: 12543576, 12472402, 15577432, 12476136


Chevrolet Universal Joints Part Number: 94772179
$163.83 MSRP: $280.26You Save: $116.43 (42%)Ships in 1-3 Business DaysProduct Specifications- Other Name: Joint Kit-Front Axle Propeller Shaft Front Universal *Outside Snap; U Joint; Joint Kit, Propeller Shaft Universal Joint
- Replaced by: 89059111


Chevrolet Universal Joints Part Number: 89059111
$163.83 MSRP: $280.26You Save: $116.43 (42%)Ships in 1-2 Business DaysProduct Specifications- Other Name: Joint Kit, Front Axle Propeller Shaft Universal *Outside Snap
- Replaces: 12476231, 12471503, 12522048, 12472409, 12476230, 26049843, 88982758, 94772179, 88964507


Chevrolet Universal Joints Part Number: 88964413
$196.62 MSRP: $336.39You Save: $139.77 (42%)Ships in 1-2 Business DaysProduct Specifications- Other Name: Joint Kit, Front Axle Propeller Shaft Universal *Outside Snap; U Joint; Joint Kit, Propeller Shaft Universal Joint
- Replaces: 12471510, 12385742, 12472406, 12478057, 12476310, 15599179, 19256729, 88982759


Chevrolet Universal Joints Part Number: 19256729
$196.62 MSRP: $336.39You Save: $139.77 (42%)Ships in 1-2 Business DaysProduct Specifications- Other Name: Joint Kit, Propeller Shaft Universal (1415 Serie*Outside Snap; U Joint; Joint Kit, Propeller Shaft Universal Joint
- Replaced by: 88964413

Chevrolet Universal Joints Part Number: 84922957
$104.03 MSRP: $260.16You Save: $156.13 (61%)Ships in 1-3 Business DaysProduct Specifications- Other Name: Joint Kit, Propeller Shaft Universal Joint; CV Joint; U Joint; U-Joint
- Replaces: 84272144
Chevrolet Universal Joints Part Number: 91173316
$57.09 MSRP: $114.62You Save: $57.53 (51%)Product Specifications- Other Name: Joint Kit, Propeller Shaft Universal; Joint Kit, Propeller Shaft Universal Joint
- Replaces: 96069180

Chevrolet Universal Joints Part Number: 84807275
$124.76 MSRP: $217.72You Save: $92.96 (43%)Ships in 1-2 Business DaysProduct Specifications- Other Name: Joint Kit, Propeller Shaft Universal Joint; U-Joint
- Replaces: 84712242, 23471515

Chevrolet Universal Joints Part Number: 84712242
$124.76 MSRP: $217.72You Save: $92.96 (43%)Ships in 1 Business DayProduct Specifications- Other Name: Joint Kit, Propeller Shaft Universal Joint; CV Joint; U Joint; U-Joint
- Replaced by: 84807275


Chevrolet Universal Joints Part Number: 84555910
$45.20 MSRP: $74.45You Save: $29.25 (40%)Ships in 1-3 Business DaysProduct Specifications- Other Name: Joint Kit, Propeller Shaft Universal Joint; CV Joint; U Joint; U-Joint

Chevrolet Universal Joints Part Number: 84679948
$58.42 MSRP: $96.24You Save: $37.82 (40%)Ships in 1-3 Business DaysProduct Specifications- Other Name: Joint Kit, Propeller Shaft Universal Joint; CV Joint; U Joint; U-Joint
Chevrolet Universal Joints Part Number: 84922956
$145.07 MSRP: $238.99You Save: $93.92 (40%)Ships in 1-3 Business DaysProduct Specifications- Other Name: Joint Kit, Propeller Shaft Universal Joint; CV Joint; U Joint; U-Joint
- Replaces: 84272143

Chevrolet Joint Kit, Front Wheel Drive Axle Part Number: 42697385
$207.53 MSRP: $341.85You Save: $134.32 (40%)Ships in 1-2 Business DaysProduct Specifications- Position: Driver Side
- Replaces: 95394780

Chevrolet Universal Joints Part Number: 84679955
$47.00 MSRP: $74.61You Save: $27.61 (38%)Ships in 1-3 Business DaysProduct Specifications- Other Name: Joint Kit, Propeller Shaft Universal Joint; CV Joint; U Joint; U-Joint

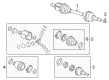
Chevrolet Inner Joint, Front Part Number: 84392111
$80.30 MSRP: $127.50You Save: $47.20 (38%)Ships in 1-3 Business DaysProduct Specifications- Other Name: Joint Kit, Front Wheel Drive Axle; CV Joint; Joint Kit, Front Axle U Joint
- Position: Front Inner

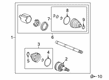
Chevrolet Inner CV Joint Part Number: 84666185
$79.35 MSRP: $124.29You Save: $44.94 (37%)Ships in 1-3 Business DaysProduct Specifications- Position: Inner

Chevrolet Inner CV Joint Part Number: 84443364
$79.56 MSRP: $124.65You Save: $45.09 (37%)Ships in 1-3 Business DaysProduct Specifications- Other Name: CV Joint
- Position: Inner
- Replaced by: 84444358
| Page 1 of 2 |Next >
1-20 of 32 Results
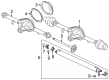
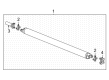
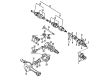
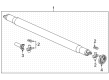
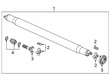
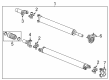
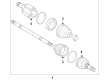
Chevrolet Universal Joint
Choose OEM Universal Joint, you're making the optimal decision for superior quality and perfect performance. You can feel confident because each component goes through stringent quality checks. Every part is carefully built to comply with Chevrolet's factory specifications. You'll enjoy a smooth, worry-free installation that fits just right. At ChevyPartsDeal.com, you'll find it easy to get top-quality OEM Chevrolet Universal Joint. You can shop at highly competitive prices and protect your budget. All our genuine Chevrolet parts include a dependable manufacturer's warranty. You'll also appreciate our straightforward return policy and swift delivery services for extra convenience.
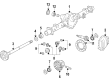
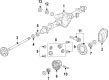
At the center of the drive line is the Chevrolet Universal Joint, which is a small cross bearing that allows the prop shaft to bend but transmits torque without stutter. Pick Chevrolet and you have not just badge glitz; you have a frame that can absorb potholes, engines that can pull off in a low-end manner and calmly power over the highway, steering that lets you actually know what the tires are grabbing, and cabins that have a clear infotainment system that does not yell at you. The recent Chevy models cruise with adaptive cruise that makes traffic flow less of a burden, lane keep that does not pull it, and forward cameras that are displayed on a high-quality screen to the dash, making parking look like a computer game. Even base trims also provide phone mirroring, smart cargo boxes, and seats designed to fit the backs of the world rather than Chevy bodies. Long gearing retards without robbing spirit and stout cooling maintains temperatures in check even when the summer asphalt glitters. When it is time to change a worn-out Universal Joint, park level, chock wheels, and make the transmission stay in neutral. Draw a line with chalk on the shaft, unbolt the yoke, slide the tube, pop out snap rings, and push the battered cross loose. Rinse the yokes, half insert the new Universal Joint caps, place the cross in, place the caps in place and with needles erect. Install new clips, pump grease till new. Adjust the chalk, check straps to spec, turn the shaft to bind, and then get on the highway with your Chevrolet and feel the vibration-free ride on that smooth quiet road.
Chevrolet Universal Joint Parts and Q&A
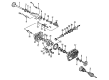
- Q: How to Properly Service a Universal Joint with an External Snap Ring on Chevrolet Colorado?A:Mount the propeller shaft on a press table to change the Universal Joint without the risk of harm. Set up the propeller shaft horizontally at the beginning. Indicate on the propeller shaft the positions where transmission and rear axle connections will be made. When the snap rings resist being removed use pliers, and then lightly hit the cup's end with a hammer to ease pressure. Press the lower bearing cup out of the yoke ear by placing j 9522-3 on the open horizontal bearing cups. Support this side of the yoke its 30 mm hex socket fixture or 27 mm socket. Use j 9522-5 between the seal and bearing cup to complete removal when the cup remains stuck. Turn the propeller shaft to push the opposite bearing cup toward the Slip Yoke while keeping note of its alignment with the tube for assembly. Take off the cross and all Universal Joint components from the yoke. Also remove bearing cups from the Slip Yoke if replacing its front Universal Joint unit. Check the sealing ring slots and bearing cup bores for residue and signs of damage then remove it through cleaning methods. Put one bearing cup into the yoke first by placing the yoke ear down and the cup into one side of the assembly. Set the cross into the yoke and push bearing cup down to rest on its associated trunnion space. Works the bearing cup half way into the yoke ear while aligning the trunnions to straight entrance for both bearing cups. Use the opposite bearing cup to test trunnion movement; check the needle bearings if trunnions become stuck when pushed. Push the bearing cup straight into position while watching until the bearing cup retainer notch becomes visible. Afterward, insert the bearing retainer into the groove and push until it clicks into place on both retainer sides. A stroke from a dead blow hammer followed by smeared grease on the snap ring can assist with retaining unit installation.
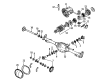
- Q: What tools are required to service and repair the universal joint, and what are the steps involved in the process on Chevrolet S10?A:To service nylon injected and external snap ring universal joints requires using U Joint Bearing Separator (J 9522-3) plus U Joint Bearing Spacer Remover (J 9522-5). Set the propeller shaft into the press table with minimum contact that might harm the tubing. Tag the shaft surface at the transmission and rear axle positions. Secure the lower yoke end on a 1 1/8 inch socket stand while using the U Joint Bearing Separator (J 9522-3) to push the bottom bearing cup from the yoke cavity. When the bearing cup proves difficult to remove use the U Joint Bearing Spacer Remover (J 9522-5) by inserting it into the yoke ear. Follow the propeller shaft rotation to take off the opposite bearing cup from the slip yoke then write down its orientation for reassembly. Check for any damage or foreign materials in the bores and grooves of both retaining rings and bearing cups after extracting them. After making sure the trunnion seat fits properly you can push the bearing cup at one end of the yoke all the way until it stops. Fit the second bearing cup in the yoke and match its trunnion positions. Use the press to move the bearing retainer until its groove shows then fit both retainers into place. A basic hammer tool should be used briefly on the yoke if it does not fit properly while grease on the retainer snap ring makes insertion simpler.


Related Chevrolet Parts
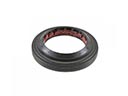 Chevrolet Wheel Seal
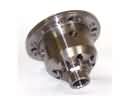 Chevrolet Differential
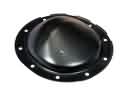 Chevrolet Differential Cover
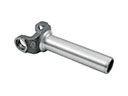 Chevrolet Slip Yoke
 Chevrolet CV Joint Companion Flange
 Chevrolet Differential Bearing
 Chevrolet Differential Pinion Bearing
 Chevrolet Differential Seal
 Chevrolet Driveshaft Yokes
 Chevrolet Output Shaft Seal
 Chevrolet Pinion Bearing
 Chevrolet Pinion Washer
Browse Chevrolet Universal Joint by Models
S10 Colorado Tahoe Camaro Equinox Impala SSR Avalanche Silverado 1500 Silverado 2500 HD Caprice Suburban Traverse Blazer Tracker Volt K10 Spark Trailblazer Astro Corvette C1500 C2500 C3500 Express 1500 Express 2500 Express 3500 G10 G20 G30 K1500 K20 K2500 K30 K3500 K5 Blazer S10 Blazer Silverado 2500 Silverado 3500 Suburban 1500 Trailblazer EXT Avalanche 1500 Avalanche 2500 C1500 Suburban C2500 Suburban K10 Suburban K1500 Suburban K20 Suburban K2500 Suburban Silverado 1500 Classic Silverado 1500 HD Silverado 1500 LD Silverado 1500 LTD Silverado 2500 HD Classic Silverado 3500 Classic Silverado 3500 HD Suburban 2500 Suburban 3500 HD V10 V10 Suburban V1500 Suburban V20 V20 Suburban V2500 Suburban V30 V3500