ChevyParts
My Garage
My Account
Cart
OEM Chevrolet Pitman Arm
Steering Pitman Arm- Select Vehicle by Model
- Select Vehicle by VIN
Select Vehicle by Model
orMake
Model
Year
Select Vehicle by VIN
For the most accurate results, select vehicle by your VIN (Vehicle Identification Number).
48 Pitman Arms found


Chevrolet Idler Arm Part Number: 19149615
$90.68 MSRP: $158.24You Save: $67.56 (43%)Ships in 1-2 Business DaysProduct Specifications- Other Name: Arm Kit, Steering Linkage Idler; Pitman Arm
- Replaced by: 85819770


Chevrolet Pitman Arm Part Number: 12471379
$90.68 MSRP: $158.24You Save: $67.56 (43%)Ships in 1-2 Business DaysProduct Specifications- Other Name: Arm Kit, Pitman; Idler Arm
- Replaced by: 85819770


Chevrolet Idler Arm Part Number: 15891516
$144.36 MSRP: $251.93You Save: $107.57 (43%)Ships in 1-2 Business DaysProduct Specifications- Other Name: Arm Kit, Steering Linkage Idler; Steering Idler Arm; Pitman Arm
- Replaced by: 19435543


Chevrolet Pitman Arm Part Number: 12479051
$65.91 MSRP: $115.00You Save: $49.09 (43%)Ships in 1-2 Business DaysProduct Specifications- Other Name: Arm Kit, Pitman; Steering Pitman Arm; Idler Arm
- Replaced by: 85819774

Chevrolet Idler Arm Part Number: 19461033
$94.20 MSRP: $168.22You Save: $74.02 (44%)Ships in 1-3 Business DaysProduct Specifications- Other Name: Arm Assembly, Steering Linkage Idler
- Replaces: 14002551, 88911335


Chevrolet Pitman Arm Part Number: 19434290
$65.91 MSRP: $115.00You Save: $49.09 (43%)Ships in 1-2 Business DaysProduct Specifications- Other Name: Arm Kit, Pitman
- Replaced by: 85819774


Chevrolet Idler Arm Part Number: 26054932
Product Specifications- Other Name: Arm Kit, Steering Linkage Idler; Steering Idler Arm; Pitman Arm; Arm Kit, Steering Idler
- Replaces: 31022859, 26033093


Chevrolet Pitman Arm Part Number: 26047288
Product Specifications- Other Name: Arm Kit, Pitman; Idler Arm; Arm Kit, Steering Pitman


Chevrolet Idler Arm Part Number: 26048558
Product Specifications- Other Name: Arm Kit, Steering Linkage Idler; Steering Idler Arm; Pitman Arm; Arm, Steering Idler
Chevrolet Pitman Arm Part Number: 7837646
Product Specifications- Other Name: Arm Kit, Pitman; Reservoir; Arm Kit, Steering Pitman
Chevrolet Pitman Arm Part Number: 7837632
Product Specifications- Other Name: Arm Kit, Pitman; Idler Arm; Arm Kit, Steering Pitman
Chevrolet Pitman Arm Part Number: 96063558
Product Specifications- Other Name: Arm-Pitman; Idler Arm; Arm, Steering Pitman
Chevrolet Pitman Arm Part Number: 96059580
Product Specifications- Other Name: Arm, Steering Pitman

Chevrolet Pitman Arm Part Number: 26056102
Product Specifications- Other Name: Arm Kit, Pitman; Idler Arm; Arm Kit, Steering Pitman
- Replaces: 26023690

Chevrolet Pitman Arm Part Number: 26057019
Product Specifications- Other Name: Arm Kit, Pitman; Idler Arm; Arm Kit, Steering Pitman
- Replaces: 26015460

Chevrolet Idler Arm, Passenger Side Part Number: 26056096
Product Specifications- Other Name: Arm Kit, Steering Linkage Idler; Steering Idler Arm; Pitman Arm; Arm Kit, Steering Idler
- Position: Passenger Side
- Replaces: 26034473
Chevrolet Pitman Arm Part Number: 7837645
Product Specifications- Other Name: Arm Kit, Pitman; Idler Arm; Arm Kit, Steering Pitman
Chevrolet Pitman Arm Part Number: 7837644
Product Specifications- Other Name: Arm Kit, Pitman; Idler Arm
Chevrolet Pitman Arm Part Number: 7837648
Product Specifications- Other Name: Arm Kit, Pitman; Idler Arm; Arm Assembly, Steering Pitman
Chevrolet Pitman Arm Part Number: 7832199
Product Specifications- Other Name: Arm Service Kit-Pitman; Idler Arm; Arm Kit, Steering Pitman
| Page 1 of 3 |Next >
1-20 of 48 Results
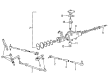
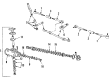
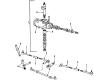
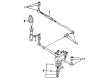
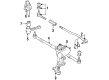
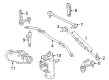
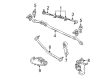
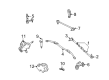
Chevrolet Pitman Arm
Choose OEM Pitman Arm, you're making the optimal decision for superior quality and perfect performance. You can feel confident because each component goes through stringent quality checks. Every part is carefully built to comply with Chevrolet's factory specifications. You'll enjoy a smooth, worry-free installation that fits just right. At ChevyPartsDeal.com, you'll find it easy to get top-quality OEM Chevrolet Pitman Arm. You can shop at highly competitive prices and protect your budget. All our genuine Chevrolet parts include a dependable manufacturer's warranty. You'll also appreciate our straightforward return policy and swift delivery services for extra convenience.
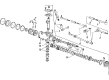
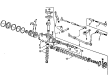
Chevrolet Pitman Arm has made steering wheel rotation straight into the push that leads your wheels. Since 1911, Chevrolet has expanded through the manufacture of vehicles which common drivers can afford and drive anywhere. Chevy combines spirited engines with a cabin that remains silent at highway velocity to ensure that families converse without yelling. The company maintains weight levels low to such an extent that even its spacious crossovers fly away out of lights and consume less fuel. Chevy also implements such driver aids as Super Cruise which allows the car to hold a lane and slow down in traffic. The weekend outings are nonchalant since the trunks are wide and absorb the vehicles, coolers, and bulky strollers without leaving any space. The steering gearbox sector shaft is connected to the drag link and snaps wheel angle by the Pitman Arm that connects to your hand input. Tight ball joints and steel forgings are not flexing but potholes over the years may cause the joint to soften and result in steering play. Replace a damaged Pitman Arm, lanes become more than a nuisance, they are hazardous. Osama Chevy owners can simply have it done with a few tools and re-deliver sharp feedback in an afternoon. When Chevrolet drivers are in the car, they can observe the wheel keeping the car in the straight tracks and confidence jumps.
Chevrolet Pitman Arm Parts and Q&A
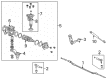
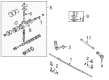
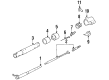
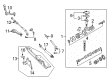
- Q: How to service and repair the pitman arm on Chevrolet Tahoe?A:First, lift the vehicle and make sure it is supported by jack stands to work on the Pitman Arm. Use the right tool to remove the ball joints. Clean the relay rod nut off the Pitman Arm ball stud and never reattach it for use again. Remove the relay rod from the Pitman Arm ball stud by following the (J 24319-01). Next, detach the nut on the Pitman Arm (8) and discard the washer since it is not necessary to use it again. Properly place the Pitman Arm (2) and shaft by aligning them and never try to drive or hammer them during assembly. With the use of the tool (J 29107-A), lift the Pitman Arm, inspect the ball stud for damage and test the seals on it. Install the Pitman Arm by putting it on the pitman shaft and align its marks with the marks on the shaft. Fit in the Pitman Arm washer and nut (8), then tighten them to 250 nm (184 ft. Lbs.). Apply the relay rod (9) to the Pitman Arm ball stud and check that the seal is present. Put in the (J 29193) and tighten to 62 nm (46 ft. Lbs.) to press the tapers until they are in place and afterwards, remove the (J 29193). In the end, replace the torque nut and tighten it to 62 nm (46 ft. Lbs.), after which you should lower the car.
- Q: How to replace the Pitman Arm on a 4WD on Chevrolet S10?A:You must start Pitman Arm replacement by removing the power steering gear and fastening it to a vise. Begin by disassembling the Pitman Arm shaft components which includes the washer and nut after which you must avoid hammering these parts or the Pitman Arm and Pitman Arm shaft to prevent failures. You can detached the Pitman Arm from the pitman shaft by employing either the Pitman Arm puller (J 6632-01) or the Pitman Arm puller (J 29107-A). Look for damage on the ball stud threads and check the ball stud seals for wear before cleaning the ball stud threads. The installation procedure begins by uniting the Pitman Arm with its shaft then adding the washer followed by the nut which needs to be tightened up to 250 nm (185 ft. Lbs.). Terminate the power steering gear installation by taking it out from the vise before reattaching it.


Related Chevrolet Parts
 Chevrolet Steering Wheel
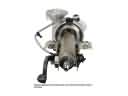 Chevrolet Steering Column
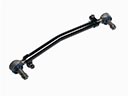 Chevrolet Drag Link
 Chevrolet Rack And Pinion
 Chevrolet Steering Angle Sensor
 Chevrolet Steering Shaft
 Chevrolet Power Steering Pressure Switch
 Chevrolet Rack & Pinion Bushing
 Chevrolet Rack and Pinion Boot
 Chevrolet Shift Interlock Solenoid
 Chevrolet Steering Column Cover
 Chevrolet Steering Column Seal
Browse Chevrolet Pitman Arm by Models
S10 C10 Tahoe Camaro Impala Silverado 1500 Silverado 2500 HD Caprice Blazer Tracker El Camino K10 Astro C20 C1500 C2500 C30 C3500 Express 1500 Express 2500 Express 3500 G10 G20 G30 K1500 K20 K2500 K30 K3500 K5 Blazer Monte Carlo P30 S10 Blazer Silverado 2500 Silverado 3500 Suburban 1500 Avalanche 1500 Avalanche 2500 C10 Suburban C1500 Suburban C20 Suburban C2500 Suburban K10 Suburban K1500 Suburban K20 Suburban K2500 Suburban P20 R10 R10 Suburban R1500 Suburban R20 R20 Suburban R2500 R2500 Suburban R30 R3500 Silverado 1500 Classic Silverado 1500 HD Silverado 1500 HD Classic Silverado 2500 HD Classic Silverado 3500 Classic Silverado 3500 HD Suburban 2500 V10 V10 Suburban V1500 Suburban V20 V20 Suburban V2500 Suburban V30 V3500