ChevyParts
My Garage
My Account
Cart
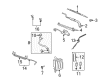
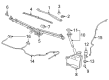
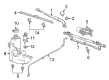
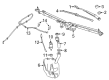
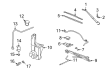
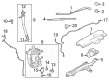
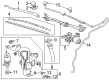
OEM Chevrolet Washer Reservoir
Windshield Washer Reservoir- Select Vehicle by Model
- Select Vehicle by VIN
Select Vehicle by Model
orMake
Model
Year
Select Vehicle by VIN
For the most accurate results, select vehicle by your VIN (Vehicle Identification Number).
162 Washer Reservoirs found


Chevrolet Washer Reservoir Part Number: 19256391
$68.23 MSRP: $143.72You Save: $75.49 (53%)Ships in 1-2 Business DaysProduct Specifications- Other Name: Container Kit, Windshield Washer
- Replaces: 19167135


Chevrolet Washer Reservoir Part Number: 84298425
$45.07 MSRP: $84.64You Save: $39.57 (47%)Ships in 1-2 Business DaysProduct Specifications- Other Name: Container Kit, Windshield Washer; Reservoir; Container, Windshield Washer
- Replaces: 23365276, 84046779


Chevrolet Washer Reservoir Part Number: 84030306
$47.09 MSRP: $88.44You Save: $41.35 (47%)Ships in 1-3 Business DaysProduct Specifications- Other Name: Container, Windshield Washer; Reservoir


Chevrolet Washer Reservoir Part Number: 84454003
$32.88 MSRP: $61.75You Save: $28.87 (47%)Ships in 1-3 Business DaysProduct Specifications- Other Name: Container Kit, Windshield Washer; Container, Windshield Washer
- Replaces: 84168359, 52027826


Chevrolet Washer Reservoir Part Number: 23434243
$50.56 MSRP: $91.52You Save: $40.96 (45%)Ships in 1-3 Business DaysProduct Specifications- Other Name: Container Kit, Windshield Washer; Container, Windshield Washer


Chevrolet Washer Reservoir Part Number: 12365363
$22.14 MSRP: $40.10You Save: $17.96 (45%)Ships in 1-2 Business DaysProduct Specifications- Other Name: Container, Windshield Washer Solvent
- Replaced by: 12494846


Chevrolet Washer Reservoir Part Number: 95229337
$24.62 MSRP: $46.23You Save: $21.61 (47%)Ships in 1-2 Business DaysProduct Specifications- Other Name: Container Kit, Windshield Washer; Container, Windshield Washer

Chevrolet Reservoir Part Number: 42742507
$47.90 MSRP: $85.54You Save: $37.64 (44%)Ships in 1-3 Business DaysProduct Specifications- Other Name: Container, Windshield Washer

Chevrolet Washer Reservoir Part Number: 42734789
$38.81 MSRP: $72.88You Save: $34.07 (47%)Product Specifications- Other Name: Container, Windshield Washer
- Replaced by: 42940408

Chevrolet Washer Reservoir Part Number: 84991494
$43.67 MSRP: $89.74You Save: $46.07 (52%)Ships in 1-3 Business DaysProduct Specifications- Other Name: Container, Windshield Washer; Reservoir
- Replaces: 84458191

Chevrolet Washer Reservoir Part Number: 85530679
$50.24 MSRP: $94.34You Save: $44.10 (47%)Ships in 1-2 Business DaysProduct Specifications- Other Name: Container, Windshield Washer


Chevrolet Washer Reservoir Part Number: 85594063
$46.33 MSRP: $87.00You Save: $40.67 (47%)Ships in 1-2 Business DaysProduct Specifications- Other Name: Container, Windshield Washer
- Replaced by: 86538837

Chevrolet Washer Reservoir Part Number: 15942521
$43.44 MSRP: $91.52You Save: $48.08 (53%)Ships in 1-2 Business DaysProduct Specifications- Other Name: Reservoir Assembly; Reservoir
- Replaced by: 20999339
Chevrolet Washer Reservoir Part Number: 85594064
$43.11 MSRP: $90.82You Save: $47.71 (53%)Ships in 1-2 Business DaysProduct Specifications- Other Name: Container, Windshield Washer
- Replaced by: 86518445

Chevrolet Washer Reservoir Part Number: 23338935
$50.15 MSRP: $94.19You Save: $44.04 (47%)Ships in 1-2 Business DaysProduct Specifications- Other Name: Container Kit, Windshield Washer; Reservoir; Container, Windshield Washer

Chevrolet Washer Reservoir Part Number: 84968436
$93.70 MSRP: $175.96You Save: $82.26 (47%)Ships in 1-2 Business DaysProduct Specifications- Other Name: Container, Windshield Washer; Reservoir
- Replaced by: 85684399

Chevrolet Reservoir Assembly Part Number: 15076408
$96.96 MSRP: $173.13You Save: $76.17 (44%)Ships in 1-3 Business Days
Chevrolet Washer Reservoir Part Number: 42741878
$68.51 MSRP: $128.66You Save: $60.15 (47%)Ships in 1-3 Business DaysProduct Specifications- Other Name: Container Kit, Windshield Washer; Reservoir; Container, Windshield Washer
- Replaces: 42527787

Chevrolet Washer Reservoir Part Number: 84176929
$43.11 MSRP: $90.82You Save: $47.71 (53%)Ships in 1-3 Business DaysProduct Specifications- Other Name: Container, Windshield Washer; Reservoir
- Replaced by: 86518445


Chevrolet Washer Reservoir Part Number: 23184107
Product Specifications- Other Name: Container, Windshield Washer Solvent; Container, Windshield Washer
- Replaces: 22850079
| Page 1 of 9 |Next >
1-20 of 162 Results
Chevrolet Washer Reservoir
Choose OEM Washer Reservoir, you're making the optimal decision for superior quality and perfect performance. You can feel confident because each component goes through stringent quality checks. Every part is carefully built to comply with Chevrolet's factory specifications. You'll enjoy a smooth, worry-free installation that fits just right. At ChevyPartsDeal.com, you'll find it easy to get top-quality OEM Chevrolet Washer Reservoir. You can shop at highly competitive prices and protect your budget. All our genuine Chevrolet parts include a dependable manufacturer's warranty. You'll also appreciate our straightforward return policy and swift delivery services for extra convenience.
Chevrolet Washer Reservoir ensures that the windshield fluid is always on tap so that you can spray off road dirt whenever you want. Over the course of over a century, Chevrolet has demonstrated that ordinary vehicles can hustle, haul and hold up without making any noise. Since early V8 icons, Chevy manages to rely on no-frills designs, solid materials and quick repairs to make ownership pain-free. Every model year safety equipment is increasing but the dashboards remain uncluttered and the controls are easy to predict to allow new drivers to feel comfortable. It is on road trips that the folded seats are optimal, the engines are less fuel-thirsty, and the noise system is louder than the wind, everything that Chevy perfected during years of road tests rather than slick advertising claims. That forward-thinking philosophy translates to the fact that even the neglected components under the hood are expected to perform diligently without creating noise. The Washer Reservoir is a mold of hard plastic designed to fit in the engine bay and a size that can hold a trip worth of fluid that isn't going to vibrate, heat, or cold and therefore the pump will never go hungry and the spray pattern will be good when your glass gets slapped by mud or salt. Chevy positions Washer Reservoir so the fill caps are located at a high level to allow quick filling but at the same time at a low place to avoid being spilled under the fenders to enable quick checks and rare spills. All Chevrolet vehicles that come off the assembly line are beneficiaries of the fact that the wiper fluid moves when demanded since the glass is clear therefore able to react faster.
Chevrolet Washer Reservoir Parts and Q&A
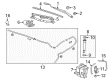
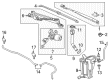
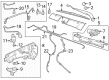
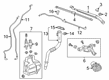
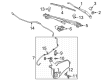
- Q: How to replace the windshield washer reservoir on Chevrolet Colorado?A:When replacing the windshield washer solvent container you need to detach both the air cleaner assembly and washer container fasteners to the fender flange while also removing the Coolant Reservoir fastener to the wheelhouse. Untwine the Washer Pump electrical connector from the system and loosen the bolt that holds the washer container to its top bracket. Securely detach the bolt that links the Washer Reservoir to the j-clip. Move the coolant tank away from its position, take the washer hose off the pump, collect washer solvent into a suitable receptacle before taking out the washer solvent tank from the vehicle. After you remove the pump grommet cap and lower container grommet you can discard the washer solvent container. To install the new pump grommet place it into the container, put back the cap and lower grommet, then push the old pump into the new grommet using washer solvent to help the process. Fit the top part of the pump to its base and put the washer solvent container onto the fender flange meeting area. Install bolts loosely at this point. Secure the top of the pump to the container then position the Coolant Reservoir on top of the washer solvent container before installing all connecting brackets with loose bolts. Apply 9 n.m (81 lb in) of torque to the fender flange bolts of the washer container and the washer solvent container bracket bolt. Also tighten the bolt that attaches both washer/coolant containers plus the Coolant Reservoir to wheelhouse bolt to 9 n.m (81 lb in). First plug the washer hose into the Washer Pump before linking the electrical connector to the Washer Pump. Then put back the air cleaner assembly and pour washer solvent into the washer solvent container. After that test the washer system for leaks and lower the hood.
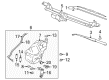
- Q: How to replace the Washer Pump and Washer Reservoir on Chevrolet S10?A:Start replacing the washer unit by draining the solvent from the solvent reservoir and taking off electrical connections and hoses from the washer pumps. Take off both the washer screws from the vehicle and the solvent container before removing the washer pumps and grommets from their housing space. Fit washer pumps and grommets onto the solvent container while following the fastener notice under service precautions. Refasten the solvent container to its mounting location with the screw while tightening it to 3 n.m (27 lb in). Plug back the washer hoses and electrical connections after that. Also refill the washer solvent into the solvent reservoir.


Related Chevrolet Parts
 Chevrolet Emblem
 Chevrolet Bumper
 Chevrolet Door Handle
 Chevrolet Tailgate Latch
 Chevrolet Door Hinge
 Chevrolet Tailgate Lock
 Chevrolet Wiper Arm
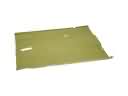 Chevrolet Floor Pan
 Chevrolet Mirror Cover
 Chevrolet Trunk Latch
 Chevrolet Windshield Wiper
 Chevrolet Wiper Blade
Browse Chevrolet Washer Reservoir by Models
Nova S10 Colorado C10 Tahoe Cruze Malibu Camaro Equinox Impala SS Avalanche Silverado 1500 Silverado 2500 HD Caprice Classic Cobalt Suburban Traverse Blazer HHR Sonic Tracker Volt El Camino K10 Spark Trax Trailblazer Astro Cavalier Corvette C20 Aveo Beretta Bolt EUV Bolt EV C1500 C2500 C30 C3500 Celebrity City Express Corsica Express 1500 Express 2500 Express 3500 G10 G20 G30 K1500 K20 K2500 K30 K3500 K5 Blazer Lumina Metro Monte Carlo P30 Prizm S10 Blazer Silverado 2500 Sprint Uplander Venture Lumina APV Silverado 3500 Suburban 1500 Trailblazer EXT Avalanche 1500 Avalanche 2500 Aveo5 C10 Suburban C1500 Suburban C20 Suburban C2500 Suburban Captiva Sport Cruze Limited Impala Limited K10 Suburban K1500 Suburban K20 Suburban K2500 Suburban Malibu Limited P20 R10 R10 Suburban R1500 Suburban R20 R20 Suburban R2500 R2500 Suburban R30 R3500 Silverado 1500 Classic Silverado 1500 HD Silverado 1500 HD Classic Silverado 1500 LD Silverado 1500 LTD Silverado 2500 HD Classic Silverado 3500 Classic Silverado 3500 HD Spark EV Suburban 2500 Suburban 3500 HD V10 V10 Suburban V1500 Suburban V20 V20 Suburban V2500 Suburban V30 V3500