ChevyParts
My Garage
My Account
Cart
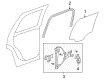
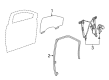
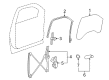
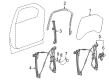
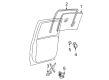
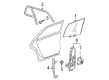
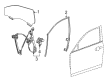
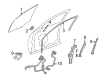
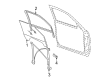
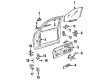
OEM Cadillac Window Regulator
Electric Power Window Regulator- Select Vehicle by Model
- Select Vehicle by VIN
Select Vehicle by Model
orMake
Model
Year
Select Vehicle by VIN
For the most accurate results, select vehicle by your VIN (Vehicle Identification Number).
199 Window Regulators found


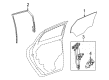
Cadillac Window Regulator, Rear Passenger Side Part Number: 22847912
$79.38 MSRP: $157.92You Save: $78.54 (50%)Ships in 1-2 Business DaysProduct Specifications- Other Name: Regulator Assembly-Rear Side Door Window (Right-Hand); Regulator, Rear Door Window Regulator
- Position: Passenger Side
- Replaces: 20906008, 20841502, 15883169


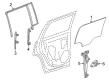
Cadillac Window Regulator, Rear Driver Side Part Number: 84043806
$85.52 MSRP: $170.12You Save: $84.60 (50%)Ships in 1-2 Business DaysProduct Specifications- Other Name: Regulator Assembly-Rear Side Door Window (Left-Hand); Regulator; Regulator, Door And End Gate Window
- Position: Driver Side
- Replaces: 22921496, 23274660


Cadillac Window Regulator, Rear Passenger Side Part Number: 23227001
$130.04 MSRP: $258.68You Save: $128.64 (50%)Ships in 1-3 Business DaysProduct Specifications- Other Name: Regulator Assembly-Rear Side Door Window (Right-Hand); Power Window Motor and Regulator Assembly; Regulator; Regulator, Door And End Gate Window
- Position: Passenger Side
- Replaces: 15883002, 25885883


Cadillac Window Regulator, Rear Driver Side Part Number: 23227000
$131.27 MSRP: $261.14You Save: $129.87 (50%)Ships in 1-2 Business DaysProduct Specifications- Other Name: Regulator Assembly-Rear Side Door Window (Left-Hand); Power Window Motor and Regulator Assembly; Regulator; Regulator, Door And End Gate Window
- Position: Driver Side
- Replaces: 15883001, 25885882


Cadillac Window Regulator, Front Passenger Side Part Number: 23257823
$134.63 MSRP: $267.85You Save: $133.22 (50%)Ships in 1-3 Business DaysProduct Specifications- Other Name: Regulator, Front Door Window Regulator; Regulator, Door Lock Remote Control
- Position: Passenger Side
- Replaces: 15883167, 20941207, 22883543, 22847914, 22918656, 20859664


Cadillac Window Regulator, Front Driver Side Part Number: 23257824
$154.54 MSRP: $307.45You Save: $152.91 (50%)Ships in 1-2 Business DaysProduct Specifications- Other Name: Regulator, Front Door Window Regulator; Regulator, Door Lock Remote Control
- Position: Driver Side
- Replaces: 15883166, 20859663, 20941206, 22883542, 22918655, 22847913


Cadillac Window Regulator, Front Passenger Side Part Number: 20945139
$157.94 MSRP: $314.20You Save: $156.26 (50%)Ships in 1-2 Business DaysProduct Specifications- Other Name: Regulator, Front Door Window Regulator; Power Window Motor and Regulator Assembly; Window Motor
- Position: Passenger Side
- Replaces: 15880567, 25885879, 20914718, 25866184


Cadillac Window Regulator, Front Driver Side Part Number: 20945138
$157.94 MSRP: $314.20You Save: $156.26 (50%)Ships in 1-2 Business DaysProduct Specifications- Other Name: Regulator, Front Door Window Regulator; Power Window Motor and Regulator Assembly; Window Motor
- Position: Driver Side
- Replaces: 15880566, 20914717, 25885878


Cadillac Window Regulator, Front Driver Side Part Number: 84621036
$167.93 MSRP: $334.07You Save: $166.14 (50%)Ships in 1-2 Business DaysProduct Specifications- Other Name: Regulator, Front Door Window Regulator; Regulator, Door And End Gate Window
- Position: Driver Side
- Replaces: 23422490, 23453653, 23118067


Cadillac Window Regulator, Rear Passenger Side Part Number: 84043807
$192.74 MSRP: $383.42You Save: $190.68 (50%)Ships in 1-2 Business DaysProduct Specifications- Other Name: Regulator Assembly-Rear Side Door Window (Right-Hand); Regulator; Regulator, Door And End Gate Window
- Position: Passenger Side
- Replaces: 22921497, 23274661


Cadillac Window Regulator, Rear Driver Side Part Number: 19301981
$244.22 MSRP: $485.82You Save: $241.60 (50%)Ships in 1-2 Business DaysProduct Specifications- Other Name: Regulator Assembly, Rear Side Door Window (W/O Motor) (Left-Hand); Regulator; Regulator, Door And End Gate Window
- Position: Driver Side
- Replaces: 15071219, 15077722, 15135970, 15757400, 15206912


Cadillac Window Regulator, Rear Driver Side Part Number: 22847911
$79.41 MSRP: $154.12You Save: $74.71 (49%)Ships in 1-2 Business DaysProduct Specifications- Other Name: Regulator Assembly-Rear Side Door Window (Left-Hand); Regulator, Rear Door Window Regulator
- Position: Driver Side
- Replaces: 15883168, 20841501, 20906007


Cadillac Window Regulator, Front Driver Side Part Number: 20914715
$110.64 MSRP: $216.62You Save: $105.98 (49%)Ships in 1-2 Business DaysProduct Specifications- Other Name: Regulator, Front Door Window Regulator; Power Window Motor and Regulator Assembly; Window Motor
- Position: Driver Side
- Replaces: 15930527, 15880564, 25790177


Cadillac Window Regulator, Rear Driver Side Part Number: 25980843
$230.37 MSRP: $447.12You Save: $216.75 (49%)Ships in 1-2 Business DaysProduct Specifications- Other Name: Regulator, Rear Door Window Regulator
- Position: Driver Side
- Replaces: 15825745, 15804920, 15948277


Cadillac Window Regulator, Rear Passenger Side Part Number: 19301980
$248.13 MSRP: $485.82You Save: $237.69 (49%)Ships in 1-2 Business DaysProduct Specifications- Other Name: Regulator, Rear Door Window Regulator; Regulator; Regulator, Door And End Gate Window
- Position: Passenger Side
- Replaces: 15077723, 15757401, 15135971, 15206913, 15071220


Cadillac Window Regulator, Front Passenger Side Part Number: 84005615
$116.02 MSRP: $217.88You Save: $101.86 (47%)Ships in 1-2 Business DaysProduct Specifications- Other Name: Regulator, Front Door Window Regulator
- Position: Passenger Side
- Replaces: 23189477


Cadillac Window Regulator, Passenger Side Part Number: 19244841
$95.20 MSRP: $178.79You Save: $83.59 (47%)Ships in 1-2 Business DaysProduct Specifications- Other Name: Regulator, Door Lock Remote Control; Regulator, Front Door Window Regulator
- Position: Passenger Side
- Replaces: 10393235, 25737255, 25770817


Cadillac Window Regulator, Front Passenger Side Part Number: 15871125
$110.56 MSRP: $196.56You Save: $86.00 (44%)Ships in 1-2 Business DaysProduct Specifications- Other Name: Regulator, Front Door Window Regulator
- Position: Passenger Side
- Replaces: 15037212, 15103054, 15046508, 15077852, 15755428


Cadillac Window Motor, Passenger Side Part Number: 19244843
$78.60 MSRP: $140.36You Save: $61.76 (44%)Product Specifications- Other Name: Motor, Front Door Window Regulator
- Position: Passenger Side


Cadillac Window Regulator, Front Driver Side Part Number: 22071949
$112.25 MSRP: $201.34You Save: $89.09 (45%)Product Specifications- Other Name: Regulator, Front Side Door Window; Regulator
- Position: Driver Side
| Page 1 of 10 |Next >
1-20 of 199 Results
Cadillac Window Regulator
Choose OEM Window Regulator, you're making the optimal decision for superior quality and perfect performance. You can feel confident because each component goes through stringent quality checks. Every part is carefully built to comply with Cadillac's factory specifications. You'll enjoy a smooth, worry-free installation that fits just right. At ChevyPartsDeal.com, you'll find it easy to get top-quality OEM Cadillac Window Regulator. You can shop at highly competitive prices and protect your budget. All our genuine Cadillac parts include a dependable manufacturer's warranty. You'll also appreciate our straightforward return policy and swift delivery services for extra convenience.
Cadillac Window Regulator will allow you to move the glass with a tap either in rainy or sunny weather. Cadillac is rooted in the history of starting in 1902 and continues to demand audacious thinking. Each Cadillac is a combination of sharp lines and comfortable interiors to make everyday commutes feel like a special event. The new developments, such as the hand-crafted Celestiq that has a smart glass roof and full-width screen demonstrate that Cadillac is an adventure-taker. The marque combines classic style with the new technology to provide drivers with bright screens, silence, and a feeling that the badge is not irrelevant anymore. Since the first V8 breakthrough, the company continues to increase the level of comfort, refining the ride, and piling on intelligent driver assist that transforms a long drive to an easy one, all without compromising the styling to the point of making the car noticeable among the crowd in the parking lot. The Window Regulator mounted in each of the doors has a motor-driven cable track that moves the glass up and down and when wear starts you hear clicks, feel hesitations, or you see rust indicating that time to replace is close. Apply lubrication to the tracks and pivot points in order to prevent strain to the Window Regulator to ensure the pane slides in a straight line. Leaving a dragging pane may snap cables but a new Window Regulator can be applied to ensure smooth movement and prevent the weather.
Cadillac Window Regulator Parts and Q&A
- Q: How to replace the front side door window regulator on Cadillac CTS?A:The first step to replace front side door window regulators requires running the window to its highest position before removing the door trim panel. The window requires taping in a full up position once the water deflector is taken off. The door trim panel wiring must first be joined through the access holes in the inner panel before the window clamp nuts receive 4 revolutions. Lower the Window Regulator 3/4 of its length before disconnecting the electrical connector from the Window Regulator motor. Take out the Window Regulator by removing its bolts numbered 1 to 5 and also numbered 2 to 3. When installing the Window Regulator get it into the door while observing fastener cautions during the procedure. Secure and torque the Window Regulator bolts (1, 2, 3, 4, 5) to 9 nm (80 lb in). Lower the window glass into the clamps of the Window Regulator while maintaining the glass entirely rearward inside the channel. To gain optimal power transfer to the Window Motor for correct positioning the vehicle should be started after connecting the power Window Motor electrical connector. Fully raise the window then fasten its clamp nuts at 11 nm (95 lb in) torque. After verifying proper window opening and tight seals you should shut off the vehicle. Use the water deflector beside the door trim panel for installation.
- Q: How to replace the front side door window regulator on Cadillac Escalade?A:Before starting to replace the front side door Window Regulator you need to raise the window glass for support. The first step requires removal of trim panel and the water deflector while disconnecting the harness from the electric Window Motor assembly. The window glass must be disconnected from the regulator by first removing the two securing bolts followed by the bolts from the Window Regulator itself. You can remove the door Window Regulator assembly by bringing together its two sides after taking out the motor from the Window Regulator. Put the regulator inside the door structure then set it in place with proper orientation through a light twisting action. Before fastening the bolts tighten the regulator bolt threads with permatex threadlocker (Part Number 24200, GM P/N 12345382) to 9 n.m (80 lb in). Mount the window glass to the regulator after which regular bolts should be installed to hold it in place by applying the same torque measurement. After installation of the water deflectors and trim panels you must lower the window to check its proper functioning.


Related Cadillac Parts
 Cadillac Bumper
 Cadillac Door Lock
 Cadillac Spoiler
 Cadillac Trunk Latch
 Cadillac Door Lock Actuator
 Cadillac Exterior Door Handle
 Cadillac Door Latch Assembly
 Cadillac Door Seal
 Cadillac Liftgate Lock Actuator
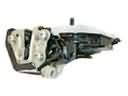 Cadillac Rear Passenger Door Handle Latch
 Cadillac Trunk Lock Cylinder
 Cadillac Weather Strip