ChevyParts
My Garage
My Account
Cart
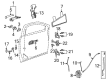
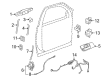
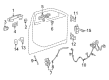
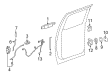
OEM Cadillac Door Lock Actuator
Power Door Lock Actuator- Select Vehicle by Model
- Select Vehicle by VIN
Select Vehicle by Model
orMake
Model
Year
Select Vehicle by VIN
For the most accurate results, select vehicle by your VIN (Vehicle Identification Number).
330 Door Lock Actuators found


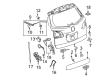
Cadillac Lock Actuator Part Number: 13524683
$140.41 MSRP: $208.99You Save: $68.58 (33%)Ships in 1-2 Business DaysProduct Specifications- Other Name: Latch Assembly-Lift Gate; Tailgate Lock Actuator; Door Lock Actuator; Trunk Latch.
- Replaces: 13509599, 13585478, 13581023, 13587646


Cadillac Door Jamb Switch Part Number: 25664288
$90.85 MSRP: $131.98You Save: $41.13 (32%)Product Specifications- Other Name: Actuator Kit, Door Lock; Trunk Lock Actuator Motor; Door Lock Actuator
- Replaced by: 19542041
- Replaces: 16627973, 16636561, 16632015, 22144363, 3635350, 25664020


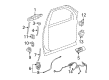
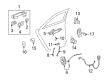
Cadillac Lock Actuator, Front Passenger Side Part Number: 13579523
$147.27 MSRP: $222.18You Save: $74.91 (34%)Ships in 1-2 Business DaysProduct Specifications- Other Name: Lock, Front Side Door; Door Lock Actuator Motor; Door Latch Assembly; Door Lock Actuator; Door Lock; Lock Assembly; Lock; Latch; Latch, Front Side Door
- Position: Passenger Side
- Replaces: 13503814, 13503802, 13577984


Cadillac Lock Actuator, Front Driver Side Part Number: 13597534
$103.16 MSRP: $161.47You Save: $58.31 (37%)Ships in 1-3 Business DaysProduct Specifications- Other Name: Latch Assembly-Front Side Door; Door Lock Actuator Motor; Door Lock Actuator; Door Lock
- Position: Driver Side
- Replaced by: 13528301
- Replaces: 13507152, 13587926, 13590496, 13597540, 13586155, 13592277


Cadillac Lock Actuator, Front Passenger Side Part Number: 13579491
$158.23 MSRP: $247.67You Save: $89.44 (37%)Ships in 1-3 Business DaysProduct Specifications- Other Name: Lock, Front Side Door; Door Lock Actuator Motor; Door Latch Assembly; Door Lock Actuator; Door Lock; Lock; Latch; Latch, Front Side Door
- Position: Passenger Side
- Replaces: 13503752


Cadillac Lock Actuator, Front Passenger Side Part Number: 22862027
$179.03 MSRP: $280.22You Save: $101.19 (37%)Ships in 1-3 Business DaysProduct Specifications- Other Name: Lock, Front Side Door; Door Lock Actuator Motor; Door Lock Actuator; Door Lock; Lock Assembly; Lock, Door Lock
- Position: Passenger Side
- Replaces: 22785470, 25949797


Cadillac Lock Actuator, Front Passenger Side Part Number: 22862245
$191.14 MSRP: $299.18You Save: $108.04 (37%)Ships in 1-3 Business DaysProduct Specifications- Other Name: Lock, Front Side Door; Door Lock Actuator Motor; Door Lock Actuator; Door Lock; Lock Assembly
- Position: Passenger Side
- Replaces: 20786540, 20922216, 22791030


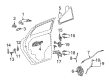
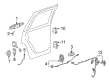
Cadillac Lock Actuator, Rear Passenger Side Part Number: 22862037
$206.32 MSRP: $322.95You Save: $116.63 (37%)Ships in 1-3 Business DaysProduct Specifications- Other Name: Latch Assembly-Rear Side Door; Door Lock Actuator Motor; Door Lock; Lock Assembly; Latch, Door Lock
- Position: Passenger Side
- Replaces: 22785480


Cadillac Lock Actuator, Rear Driver Side Part Number: 22862036
$206.32 MSRP: $322.95You Save: $116.63 (37%)Product Specifications- Other Name: Latch Assembly-Rear Side Door; Door Lock Actuator Motor; Door Lock; Lock Assembly; Latch, Door Lock
- Position: Driver Side
- Replaces: 22785479


Cadillac Window Latch Part Number: 84686105
$39.33 MSRP: $59.33You Save: $20.00 (34%)Product Specifications- Other Name: Latch Assembly-Lift Gate Window; Trunk Latch; Door Lock; Lock; Latch; Latch, End Gate Lock
- Replaced by: 86507563


Cadillac Lock Actuator, Front Driver Side Part Number: 13579522
$152.91 MSRP: $230.68You Save: $77.77 (34%)Ships in 1-2 Business DaysProduct Specifications- Other Name: Lock, Front Side Door; Door Lock Actuator Motor; Door Latch Assembly; Door Lock Actuator; Door Lock; Lock Assembly; Lock; Latch; Latch, Front Side Door
- Position: Driver Side
- Replaces: 13503801, 13577983, 13503819


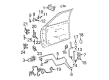
Cadillac Lock Actuator, Rear Driver Side Part Number: 13579551
$152.92 MSRP: $230.70You Save: $77.78 (34%)Ships in 1-3 Business DaysProduct Specifications- Other Name: Lock, Rear Side Door; Door Lock Actuator Motor; Door Latch Assembly; Door Lock; Lock; Latch; Latch, Rear Side Door
- Position: Driver Side
- Replaces: 13503783, 13578018, 13503807


Cadillac Lock Assembly, Passenger Side Part Number: 15111446
$154.90 MSRP: $233.68You Save: $78.78 (34%)Ships in 1-2 Business DaysProduct Specifications- Other Name: Latch, Door Lock; Door Lock Actuator Motor; Door Lock Actuator; Lock; Door Lock
- Position: Passenger Side
- Replaces: 15066137, 16631792


Cadillac Lock Actuator, Front Driver Side Part Number: 13579497
$166.16 MSRP: $250.67You Save: $84.51 (34%)Ships in 1-2 Business DaysProduct Specifications- Other Name: Lock, Front Side Door; Door Lock Actuator Motor; Door Latch Assembly; Door Lock Actuator; Door Lock; Lock; Latch; Latch, Front Side Door
- Position: Driver Side
- Replaces: 13503738, 13577966


Cadillac Lock Actuator, Front Driver Side Part Number: 25876386
$180.09 MSRP: $271.69You Save: $91.60 (34%)Ships in 1-3 Business DaysProduct Specifications- Other Name: Lock, Front Side Door; Door Lock Actuator Motor; Door Lock Actuator; Door Lock; Lock Assembly; Lock, Door Lock
- Position: Driver Side
- Replaces: 25945752, 20783850, 25848878, 25879295


Cadillac Lock Actuator, Rear Passenger Side Part Number: 22862238
$182.36 MSRP: $275.11You Save: $92.75 (34%)Ships in 1-2 Business DaysProduct Specifications- Other Name: Lock, Rear Side Door; Door Lock Actuator Motor; Door Lock; Lock Assembly; Latch, Rear Side Door
- Position: Passenger Side
- Replaces: 20825340, 20922247, 22791036, 25843164, 25992282


Cadillac Lock Actuator, Rear Driver Side Part Number: 22862242
$186.89 MSRP: $281.94You Save: $95.05 (34%)Ships in 1-2 Business DaysProduct Specifications- Other Name: Lock, Rear Side Door; Door Lock Actuator Motor; Door Lock; Lock Assembly; Latch, Rear Side Door
- Position: Driver Side
- Replaces: 20922246, 20825339, 25843163, 25992281, 22791035


Cadillac Lock Actuator Part Number: 13584872
$187.22 MSRP: $282.44You Save: $95.22 (34%)Ships in 1-2 Business DaysProduct Specifications- Other Name: Latch Assembly-Lift Gate; Tailgate Lock Actuator; Door Lock Actuator; Trunk Latch; Trunk Lock.
- Replaces: 13501871, 13502697, 13581406, 15887967, 15858590, 15780269


Cadillac Lock Actuator, Rear Driver Side Part Number: 25876389
$191.42 MSRP: $288.77You Save: $97.35 (34%)Ships in 1-2 Business DaysProduct Specifications- Other Name: Latch Assembly-Rear Side Door; Door Lock Actuator Motor; Door Lock; Lock Assembly; Latch, Door Lock
- Position: Driver Side
- Replaces: 25945736, 20783857, 25873488


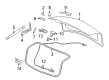
Cadillac Lock, Rear Part Number: 25885392
$167.89 MSRP: $251.00You Save: $83.11 (34%)Product Specifications- Other Name: Latch, Rear Compartment Lid Or Tail Gate Latch; Trunk Latch; Door Lock
- Position: Rear
| Page 1 of 17 |Next >
1-20 of 330 Results
Cadillac Door Lock Actuator
Choose OEM Door Lock Actuator, you're making the optimal decision for superior quality and perfect performance. You can feel confident because each component goes through stringent quality checks. Every part is carefully built to comply with Cadillac's factory specifications. You'll enjoy a smooth, worry-free installation that fits just right. At ChevyPartsDeal.com, you'll find it easy to get top-quality OEM Cadillac Door Lock Actuator. You can shop at highly competitive prices and protect your budget. All our genuine Cadillac parts include a dependable manufacturer's warranty. You'll also appreciate our straightforward return policy and swift delivery services for extra convenience.
Cadillac Door Lock Actuator offers fast, safe door control that is equally luxurious to touch. Cadillac has its roots dating back to 1902 based on aggressive styling and sophisticated engineering to cut up a luxury niche. Through sedans, crossovers, and future electric flagships, the brand blends angular exterior body with serene and silent interiors. Drivers are provided with comfortable seats, sharp digital dashboard displays, and an easy-to-use interface that will help reduce the length of a road trip. Maybe continuous technological advances, such as a smart glass roof and full-width touchscreen in the custom-built Celestiq, show that the company is an experimenter not a follower. Cadillac is a brand that can be relied upon by anyone who is not willing to compromise forward progress in the name of heritage. Since the beginning days of V8 legends to the current battery-electric vehicle (BEV3) platform, Cadillac has maintained a smooth performance and low drama. A current day Door Lock Actuator is a device that converts each fob button press into a sharp electronic pulse that transmits via the wiring harness into acting the latch rods into place in milliseconds and combines functionality with reassuring security. The Door Lock Actuator is also compatible with the GM Pass Key system and therefore would-be thieves would be blocked even before they can simply pull a handle. Designed as a direct-fit component, every Door Lock Actuator can be fitted without cutting or splicing and maintains the acoustical fit of the interior trim and the clean lines of the exterior.
Cadillac Door Lock Actuator Parts and Q&A
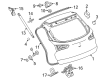
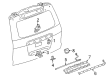
- Q: How to replace the liftgate door lock actuator on Cadillac Escalade?A:You start the liftgate lock actuator replacement by taking off upper and lower trim before disconnecting electrical connectors and removing cables. Unbolt the latch actuator then remove the unit from the liftgate before taking out the liftgarte lock cylinder. You should put in the liftgate lock cylinder first but then connect the actuator to the liftgate and put the bolts onto the actuator loosely. Adjust the actuator to its proper position by closing the liftgate glass while following the service precautions instructions on fasteners. Tighten each bolt within the actuator assembly to 9 n.m while connecting the cables according to their designated positions. After that connect all electrical wiring and place back the upper and lower trim panels.
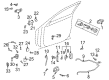
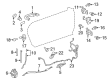
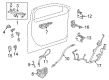
- Q: How to replace the inner door lock actuator on Cadillac XLR?A:The first step to replace the door inside manual release actuator involves positioning the seat to the rear and removing the trim plugs from the floor mounted door release fastener sockets. Move the pushpin from the front seat riser cover near to the floor-mounted door release then tilt the cover forward to expose the rear fastener of the release mechanism. Detach both fasteners on the door release assembly as well as the fasteners on the backside of the door release actuator. Detach the release halves then remove the cable sheath from the housing but retain the position of the cable sheath end which is important for later installation. Pull the door release towards the back while passing the cable through the actuator sections before disconnecting the cable end from the latch actuating lever. Position the door release actuator with its rear facing and insert the cable end to the release actuating lever while rotating the assembly forward and steering the cable through the actuator halves until the cable sheath seating position is located in the molded fingers of the housing. Fasten the cable sheath into the actuator before joining the two parts next follow by mounting fasteners to the backside of the door release actuator while tightening them to 2 Nm (18 lb in). Secure the door release actuator at the door sill before attaching both fasteners at 10 Nm torque specs to the door release assembly and finally use pushpins to secure the seat riser cover to the hole after inserting the trim plugs into the door release actuator.


Related Cadillac Parts
 Cadillac Bumper
 Cadillac Center Console
 Cadillac Glove Box
 Cadillac Bumper Reflector
 Cadillac Center Console Latch
 Cadillac Convertible Top Motor
 Cadillac Dash Panel Vent Portion Covers
 Cadillac Door Check
 Cadillac Tailgate Handle
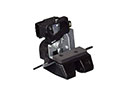 Cadillac Tailgate Latch
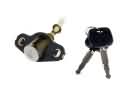 Cadillac Trunk Lock Cylinder
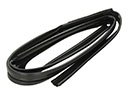 Cadillac Window Run