ChevyParts
My Garage
My Account
Cart
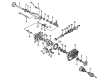
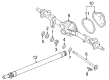
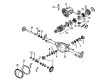
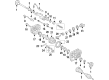
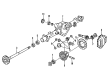
OEM 2008 Chevrolet Silverado 1500 Pinion Bearing
Transmission Pinion Bearing- Select Vehicle by Model
- Select Vehicle by VIN
Select Vehicle by Model
orMake
Model
Year
Select Vehicle by VIN
For the most accurate results, select vehicle by your VIN (Vehicle Identification Number).
7 Pinion Bearings found


2008 Chevrolet Silverado 1500 Side Bearings Part Number: 11505123
$51.58 MSRP: $152.62You Save: $101.04 (67%)Ships in 1-2 Business DaysProduct Specifications- Other Name: Bearing, Differential Side Gear; Differential Pinion Bearing; Differential Bearing; Bearing
- Item Weight: 1.60 Pounds
- Item Dimensions: 4.9 x 1.4 x 5.1 inches
- Condition: New
- Fitment Type: Direct Replacement
- SKU: 11505123
- Warranty: This genuine part is guaranteed by GM's factory warranty.

2008 Chevrolet Silverado 1500 Wheel Bearing Part Number: 9436881
$57.71 MSRP: $145.36You Save: $87.65 (61%)Ships in 1-3 Business DaysProduct Specifications- Other Name: Bearing, Differential; Differential Pinion Bearing; Differential Bearing; Axle Bearings; Shaft; Inner; Side; Differential Gear; Front Wheel; Rear Wheel; Nut.
- Item Weight: 1.70 Pounds
- Item Dimensions: 5.1 x 1.5 x 5.0 inches
- Condition: New
- Fitment Type: Direct Replacement
- SKU: 9436881
- Warranty: This genuine part is guaranteed by GM's factory warranty.


2008 Chevrolet Silverado 1500 Side Bearings Part Number: 25824250
$65.71 MSRP: $128.64You Save: $62.93 (49%)Ships in 1-2 Business DaysProduct Specifications- Other Name: Bearing, Differential Side Gear; Differential Pinion Bearing; Differential Bearing
- Replaces: 09418390, 9418390
- Item Weight: 1.20 Pounds
- Item Dimensions: 4.3 x 4.3 x 2.1 inches
- Condition: New
- Fitment Type: Direct Replacement
- SKU: 25824250
- Warranty: This genuine part is guaranteed by GM's factory warranty.


2008 Chevrolet Silverado 1500 Pinion Bearings Part Number: 23243839
$56.88 MSRP: $110.40You Save: $53.52 (49%)Ships in 1-2 Business DaysProduct Specifications- Other Name: Bearing, Differential Pinion; Differential Pinion Bearing; Rear Pinion Bearing; Front/Inner/Outer Pinion; Diff/Drive Axle; Pinion/Clutch/Rear Wheel
- Position: Front
- Replaces: 09418357, 26053758, 9418357, 15286375, 20997052, 22786621, 9418356, 09418356, 12479221
- Item Weight: 1.30 Pounds
- Item Dimensions: 4.2 x 4.2 x 2.1 inches
- Condition: New
- Fitment Type: Direct Replacement
- SKU: 23243839
- Warranty: This genuine part is guaranteed by GM's factory warranty.


2008 Chevrolet Silverado 1500 Pinion Bearings Part Number: 9413427
$60.64 MSRP: $109.76You Save: $49.12 (45%)Ships in 1-2 Business DaysProduct Specifications- Other Name: Bearing, Differential Drive Pinion Gear Outer; Differential Pinion Bearing; Rear, Front, Outer Pinion Bearings; Differential Drive, Steering Knuckle King, Pinion Shaft, Front Axle Bearings.
- Item Weight: 1.20 Pounds
- Item Dimensions: 3.1 x 3.2 x 3.1 inches
- Condition: New
- Fitment Type: Direct Replacement
- SKU: 9413427
- Warranty: This genuine part is guaranteed by GM's factory warranty.
2008 Chevrolet Silverado 1500 Pinion Bearings Part Number: 9414917
$70.11 MSRP: $133.08You Save: $62.97 (48%)Ships in 1-2 Business DaysProduct Specifications- Other Name: Bearing, Differential Drive Pinion Gear Inner; Differential Pinion Bearing; Differential Bearing; Rear Pinion Bearing; Drive Pinion Rear; Axle Pinion Shaft; Ring And Pinion; Pinion Shaft Front.
- Position: Inner
- Item Weight: 2.40 Pounds
- Item Dimensions: 4.4 x 5.1 x 2.4 inches
- Condition: New
- Fitment Type: Direct Replacement
- SKU: 9414917
- Warranty: This genuine part is guaranteed by GM's factory warranty.
2008 Chevrolet Silverado 1500 Pinion Bearings Part Number: 9417781
$43.86 MSRP: $103.28You Save: $59.42 (58%)Ships in 1-2 Business DaysProduct Specifications- Other Name: Bearing, Front Differential Drive Pinion Gear Outer; Differential Pinion Bearing; Rear, Front, Outer Pinion Bearing; Differential Drive Pinion Front, Drive Pinion, Pinion Shaft Front, Front Axle
- Position: Front Outer
- Item Weight: 1.40 Pounds
- Item Dimensions: 3.4 x 3.6 x 1.4 inches
- Condition: New
- Fitment Type: Direct Replacement
- SKU: 9417781
- Warranty: This genuine part is guaranteed by GM's factory warranty.
2008 Chevrolet Silverado 1500 Pinion Bearing
With a comprehensive array of OEM 2008 Chevrolet Silverado 1500 Pinion Bearing, from fuel pumps to door handles, our website is a one-stop-shop for your needs. All our genuine 2008 Chevrolet Silverado 1500 Pinion Bearing are backed by the manufacturer's warranty and are offered at competitive prices in the market. Rest assured, you can shop with complete confidence.
2008 Chevrolet Silverado 1500 Pinion Bearing Parts and Q&A
- Q: How to replace the drive pinion bearings on a 10.5-inch axle on 2008 Chevrolet Silverado 1500?A: A complete set of parts needed to change drive pinion bearings requires these tools: j 22761 (Differential Side Bearing Installer), j 8614-01 (Flange and Pulley Holding Tool), j 37624 (Pinion Bearing Installer), j 24433 (Pinion Cone and Side Bearing Installer), j 22912-b (Split Plate Bearing Puller), j 44414 (Rear Axle Pinion Oil Seal Installer), j 8608 (Rear Pinion Bearing Installer), j 8092 (Universal Driver Handle - 3/4 in - 10). Start the process by lifting the vehicle into position then dissembling the Differential assembly unit. Begin by removing the pinion gear bearing retainer and afterward separate the pinion yoke from the oil seal and outer Pinion Bearing before extracting the pinion and collapsible spacer. Apply the j 22912-b hydraulic press unit with brass drifts inserted into the slots to pull out the inner Pinion Bearing from the pinion properly. Use a hammer and brass drift to remove both the Pinion Bearing cups from their positions until the pilot bearing for the pinion gear becomes accessible for extraction. Install the pinion gear pilot bearing with j 22761 before installing the inner Pinion Bearing cup with j 37624 and j 8092 and finish with j 8608 and j 8092 to install the outer Pinion Bearing cup. Use the j 24433 hydraulic press to operate the bearing onto the pinion while the cone seats onto the component. Surround the outer Pinion Bearing in its retainer then mount it while using j 44414 to place a new pinion oil seal. Secure the bearing retainer with the pinion while applying sealant to the pinion yoke splines, then fix the yoke by manually aligning the removed marks. Use a soft-faced hammer to tap the yoke until a fewthreads appear then put on the washer and tighten the new pinion nut. Use the j 8614-01 to hold the pinion yoke when tightening the pinion nut to just take up the end play by rotating the pinion for bearing seating. Install the original shim or a 0.41 mm shim instead of the j 8614-01. Secure the pinion gear bearing retainer onto the axle housing before torquing its bolts to 88 n.m (65 lb ft). The torque measurement of the pinion should reach between 1.0-2.3 n.m (10-20 lb in) during testing of used bearings or 1.7-3.4 n.m (15-30 lb in) for new bearings. After reaching the required torque level with the pinion nut tighten it further before rotating the pinion gear multiple times to guarantee the proper installation of the bearings. Afterwards install the Differential assembly then adjust the Differential side bearing preload followed by selective shim thickness measurement of the drive pinion to align backlash and complete the process by filling the axle with lubricant and lowering the vehicle.
Related 2008 Chevrolet Silverado 1500 Parts
 2008 Chevrolet Silverado 1500 Differential
 2008 Chevrolet Silverado 1500 Differential Bearing
 2008 Chevrolet Silverado 1500 Differential Cover
 2008 Chevrolet Silverado 1500 Differential Seal
 2008 Chevrolet Silverado 1500 Driveshaft Yokes
 2008 Chevrolet Silverado 1500 Pinion Washer
 2008 Chevrolet Silverado 1500 Slip Yoke
 2008 Chevrolet Silverado 1500 Universal Joint
 2008 Chevrolet Silverado 1500 Wheel Seal