ChevyParts
My Garage
My Account
Cart
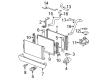
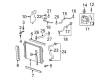
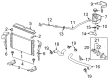
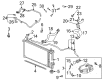
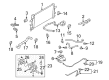
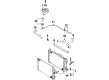
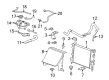
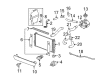
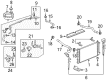
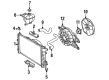
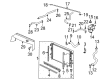
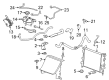
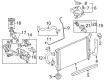
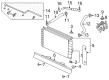
OEM Saturn Radiator
Cooling Radiator- Select Vehicle by Model
- Select Vehicle by VIN
Select Vehicle by Model
orMake
Model
Year
Select Vehicle by VIN
For the most accurate results, select vehicle by your VIN (Vehicle Identification Number).
27 Radiators found


Saturn Radiator Part Number: 84079536
$269.64 MSRP: $406.69You Save: $137.05 (34%)Ships in 1-2 Business DaysProduct Specifications- Other Name: Radiator Assembly; Radiator, Radiator
- Replaces: 15226650, 20772530, 22860600, 22893857, 23347009, 23428277, 20841738, 23434160

Saturn Radiator Assembly Part Number: 21030615
$65.93 MSRP: $362.71You Save: $296.78 (82%)Ships in 1-2 Business DaysProduct Specifications- Other Name: Radiator, Radiator; Radiator

Saturn Auxiliary Radiator Part Number: 22720231
$614.17 MSRP: $975.11You Save: $360.94 (38%)Ships in 1-3 Business DaysProduct Specifications- Other Name: Radiator, Turbocharger/Supercharger Cooling; Intercooler; Radiator
Saturn Radiator Part Number: 23347008
$215.35 MSRP: $324.82You Save: $109.47 (34%)Ships in 1-3 Business DaysProduct Specifications- Other Name: Radiator Assembly; Radiator, Radiator
- Replaces: 15226678, 20841737, 20772532, 20957467, 22893856, 23428276, 23434159, 22860601

Saturn Radiator Part Number: 20777042
$319.18 MSRP: $481.42You Save: $162.24 (34%)Ships in 1-2 Business DaysProduct Specifications- Other Name: Radiator Assembly; Radiator, Radiator
- Replaces: 96800739


Saturn Radiator Part Number: 15873468
$173.95 MSRP: $260.02You Save: $86.07 (34%)Product Specifications- Other Name: Radiator Assembly; Radiator, Radiator


Saturn Radiator Assembly Part Number: 22731217
$211.40 MSRP: $316.00You Save: $104.60 (34%)Product Specifications- Other Name: Radiator, Radiator; Radiator
- Replaces: 15795494


Saturn Radiator Assembly Part Number: 25813509
Product Specifications- Other Name: Radiator; Radiator, Radiator
- Replaces: 10310317, 10420263, 15791269


Saturn Radiator Assembly Part Number: 25813498
Product Specifications- Other Name: Radiator; Radiator, Radiator
- Replaces: 10310318, 10436714, 10420728, 15791268


Saturn Radiator Assembly Part Number: 13170111
Product Specifications- Other Name: Radiator; Radiator, Radiator


Saturn Radiator Assembly Part Number: 52476876
Product Specifications- Other Name: Radiator; Radiator, Radiator

Saturn Radiator Part Number: 19130434
$70.45 MSRP: $104.84You Save: $34.39 (33%)Product Specifications- Other Name: Radiator Assembly; Radiator, Radiator
- Replaces: 19129881

Saturn Radiator Part Number: 22717621
$107.49 MSRP: $159.95You Save: $52.46 (33%)Product Specifications- Other Name: Radiator Assembly; Radiator, Radiator

Saturn Radiator, Green Line Part Number: 52495681
$146.13 MSRP: $218.43You Save: $72.30 (34%)Product Specifications- Other Name: Radiator, Radiator

Saturn Cooling Module Part Number: 21031315
Product Specifications- Other Name: Radiator, Air Conditioner Condenser
- Replaces: 21030626

Saturn Radiator Part Number: 15246275
Product Specifications- Other Name: Radiator Assembly; Radiator, Radiator

Saturn Lower Hose Part Number: 19130431
Product Specifications- Other Name: Radiator Assembly; Radiator; Radiator, Radiator
- Position: Lower
- Replaces: 19129981
Saturn Radiator Part Number: 19130432
Product Specifications- Other Name: Radiator Assembly; Radiator, Radiator
- Replaces: 19129942

Saturn Radiator Part Number: 15892121
Product Specifications- Other Name: Radiator Assembly; Radiator, Radiator
- Replaces: 15211586

Saturn Radiator Assembly Part Number: 52482167
Product Specifications- Other Name: Radiator; Radiator, Radiator
| Page 1 of 2 |Next >
1-20 of 27 Results
Saturn Radiator
Choose OEM Radiator, you're making the optimal decision for superior quality and perfect performance. You can feel confident because each component goes through stringent quality checks. Every part is carefully built to comply with Saturn's factory specifications. You'll enjoy a smooth, worry-free installation that fits just right. At ChevyPartsDeal.com, you'll find it easy to get top-quality OEM Saturn Radiator. You can shop at highly competitive prices and protect your budget. All our genuine Saturn parts include a dependable manufacturer's warranty. You'll also appreciate our straightforward return policy and swift delivery services for extra convenience.
The Saturn Radiator is located in front, absorbing the air, and the cooled fluid is pumped back into the engine block to maintain the temperature constant and prevent heat. Customers appreciated the fact that the Saturn body panels are made out of pliable plastic, which bounces back when hit by carts and never rusts away; therefore, a ten-year-old door would not look old. The weight is kept low since Saturn engines have been cast using lost-foam methods, which substitute massive unwanted metal with accurate forms, allowing the vehicle to accelerate swiftly and consume a little fuel. Saturn factory paint sticks strong, does not chip, and does not fade even after being subjected to constant summer sun, and that is why owners do not have to wax their cars so much and have more fun when driving their cars. The long wheelbase is combined with a tight steering rack to provide the car with a relaxing highway manner, but still able to twist through the city lanes without much ado despite loading the car with friends and equipment. It is time to replace a Radiator. Place the car on a flat surface, allow the hood to cool, unscrew the battery, open the drain tap, and remove the coolant in a specially closed container. Pop the fan shroud off, loosen up hose clamps, and walk the old Radiator up straight without pulling. Install the rubber mounts and the fan, insert the replacement Radiator into the cradle, tighten bolts, force hoses into their correct holes using new clamps, and then reattach the shroud. Add the correct mix, squeeze the upper hose to vent air, light the engine, observe the gauge, and drive, stopping only when the leaks remain nonexistent.