ChevyParts
My Garage
My Account
Cart
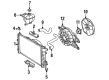
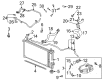
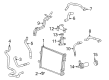
OEM Saturn Coolant Reservoir
Coolant Tank Reservoir- Select Vehicle by Model
- Select Vehicle by VIN
Select Vehicle by Model
orMake
Model
Year
Select Vehicle by VIN
For the most accurate results, select vehicle by your VIN (Vehicle Identification Number).
12 Coolant Reservoirs found


Saturn Expansion Tank Part Number: 20813489
$40.09 MSRP: $79.07You Save: $38.98 (50%)Ships in 1-2 Business DaysProduct Specifications- Other Name: Tank, Radiator Surge; Coolant Reservoir; Reservoir; Tank, Engine Coolant Recovery
- Replaces: 96455727


Saturn Reservoir Part Number: 21030881
$52.93 MSRP: $79.82You Save: $26.89 (34%)Ships in 1-3 Business DaysProduct Specifications- Other Name: Reservoir, Engine Coolant Recovery; Engine Coolant Reservoir; Coolant Reservoir


Saturn Recovery Tank, Green Line Part Number: 25775252
$67.26 MSRP: $99.64You Save: $32.38 (33%)Ships in 1-2 Business DaysProduct Specifications- Other Name: Tank, Radiator Surge; Engine Coolant Reservoir; Coolant Reservoir; Reservoir; Tank, Engine Coolant Recovery

Saturn Reservoir Part Number: 23159167
$64.76 MSRP: $97.69You Save: $32.93 (34%)Ships in 1-2 Business DaysProduct Specifications- Other Name: Reservoir, Engine Coolant Recovery; Coolant Reservoir
- Replaces: 10353002, 25846051, 22867267


Saturn Reservoir Tank Part Number: 10368831
$64.27 MSRP: $95.62You Save: $31.35 (33%)Product Specifications- Other Name: Tank, Engine Coolant Recovery; Engine Coolant Reservoir; Coolant Reservoir; Reservoir


Saturn Reservoir Tank Part Number: 93179469
Product Specifications- Other Name: Tank, Radiator Surge; Coolant Reservoir; Reservoir; Tank, Engine Coolant Recovery


Saturn Recovery Tank Part Number: 22681007
Product Specifications- Other Name: Reservoir, Engine Coolant Recovery; Coolant Reservoir


Saturn Recovery Tank Part Number: 22681006
Product Specifications- Other Name: Reservoir, Coolant Recovery; Coolant Reservoir; Reservoir, Engine Coolant Recovery


Saturn Reservoir Assembly Part Number: 10381902
Product Specifications- Other Name: Tank, Engine Coolant Recovery; Engine Coolant Reservoir; Coolant Reservoir; Reservoir

Saturn Reservoir Part Number: 21030411
Product Specifications- Other Name: Reservoir Coolant Recovery; Coolant Reservoir; Reservoir, Engine Coolant Recovery

Saturn Reservoir Part Number: 15250668
Product Specifications- Other Name: Reservoir, Engine Coolant Recovery; Coolant Reservoir
- Replaces: 10311259, 10295298

Saturn Reservoir Part Number: 25884797
Product Specifications- Other Name: Reservoir, Turbocharger/Supercharger Cooling; Coolant Reservoir
- Replaces: 22697069
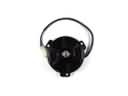
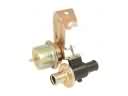
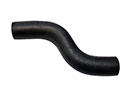
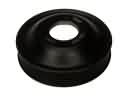
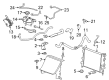
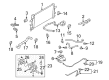
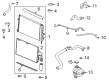
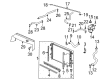
Saturn Coolant Reservoir
Choose OEM Coolant Reservoir, you're making the optimal decision for superior quality and perfect performance. You can feel confident because each component goes through stringent quality checks. Every part is carefully built to comply with Saturn's factory specifications. You'll enjoy a smooth, worry-free installation that fits just right. At ChevyPartsDeal.com, you'll find it easy to get top-quality OEM Saturn Coolant Reservoir. You can shop at highly competitive prices and protect your budget. All our genuine Saturn parts include a dependable manufacturer's warranty. You'll also appreciate our straightforward return policy and swift delivery services for extra convenience.
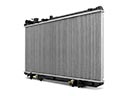
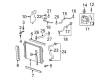
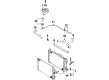
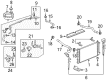
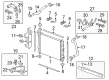
The Saturn Coolant Reservoir is a plastic overflow tank that traps the expanding antifreeze, maintains system pressure constant, and supplies the coolant back when temperatures decrease. The Saturn cars won the loyalty of fans through the invention of polymer body panels that cause dents in parking lots, but the paint and pride are saved on the greatly busy streets. The engine blocks that have been lost are lighter, hence the acceleration is quicker and fuel consumption is reasonable. An even more challenging multi-coat paint finish makes the color resist chips, and the colors are bright during both long winters and hot summers. Cabin noise is also minimal due to narrow panel joints and sealed door panels; therefore, long-distance rides become less exhausting and the talk is not distorted. Add a no-compromise attitude of parts interchange and you will have straightforward maintenance that will not drain a paycheck. Drivers have faith in a Saturn to boot, run, and appear good even after many years, particularly when the cooling parts of the car such as the second Coolant Reservoir remain fit. Simple tools are required to replace the Coolant Reservoir. You would have to park your Saturn on level ground, turn off the engine, and allow the radiator cap to cool. Slowly crack the cap to release pressure, loosen the negative battery cable, unscrew the hose clamps, release the level sensor, twist out two bolts, and clear the old tank. Move the sensor to the new tank, position the sensor in the bracket, and tighten the bolts. Reconnect hoses, add premixed coolant to the line, squeeze the top hose to vent air, start the motor, and look around the filled-up Coolant Reservoir.