ChevyParts
My Garage
My Account
Cart
OEM GMC Speedometer
Speedometer Gauge- Select Vehicle by Model
- Select Vehicle by VIN
Select Vehicle by Model
orMake
Model
Year
Select Vehicle by VIN
For the most accurate results, select vehicle by your VIN (Vehicle Identification Number).
388 Speedometers found

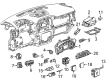
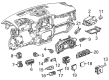
GMC Instrument Cluster Part Number: 84748659
$157.63 MSRP: $237.75You Save: $80.12 (34%)Ships in 1-3 Business DaysProduct Specifications- Other Name: Cluster, Instrument Panel Gage
- Replaces: 84699231
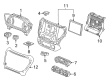
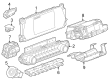
GMC Instrument Cluster Part Number: 85599809
$409.41 MSRP: $617.65You Save: $208.24 (34%)Ships in 1-3 Business DaysProduct Specifications- Other Name: Cluster, Instrument Panel Gage
- Replaced by: 87869499

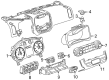
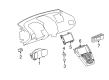
GMC Instrument Cluster Part Number: 84398584
$206.10 MSRP: $310.86You Save: $104.76 (34%)Ships in 1-3 Business DaysProduct Specifications- Other Name: Cluster, Instrument Panel Gage; Cluster
- Replaced by: 84624950
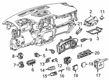
GMC Instrument Cluster Part Number: 84930784
$321.15 MSRP: $484.48You Save: $163.33 (34%)Ships in 1-3 Business DaysProduct Specifications- Other Name: Cluster, Instrument Panel Gage
- Replaces: 84785464
GMC Instrument Cluster Part Number: 84748670
$173.83 MSRP: $272.03You Save: $98.20 (37%)Ships in 1-3 Business DaysProduct Specifications- Other Name: Cluster, Instrument Panel Gage
- Replaced by: 84930780
GMC Instrument Cluster Part Number: 84930765
$144.80 MSRP: $226.60You Save: $81.80 (37%)Ships in 1-3 Business DaysProduct Specifications- Other Name: Cluster, Instrument Panel Gage
- Replaces: 84785451


GMC Instrument Cluster Part Number: 84748647
$299.49 MSRP: $451.80You Save: $152.31 (34%)Ships in 1-3 Business DaysProduct Specifications- Other Name: Cluster, Instrument Panel Gage
- Replaces: 84699219
GMC Instrument Cluster Part Number: 84785463
$197.50 MSRP: $309.08You Save: $111.58 (37%)Ships in 1-3 Business DaysProduct Specifications- Other Name: Cluster, Instrument Panel Gage
GMC Instrument Cluster Part Number: 84474088
$208.19 MSRP: $314.06You Save: $105.87 (34%)Ships in 1-3 Business DaysProduct Specifications- Other Name: Cluster, Instrument Panel Gage; Cluster
- Replaces: 84033921, 84324674

GMC Instrument Cluster Part Number: 85641298
$119.23 MSRP: $186.58You Save: $67.35 (37%)Ships in 1-2 Business DaysProduct Specifications- Other Name: Cluster, Instrument Panel Gage; Cluster Assembly
GMC Instrument Cluster Part Number: 84935278
$455.40 MSRP: $712.83You Save: $257.43 (37%)Ships in 1-3 Business DaysProduct Specifications- Other Name: Cluster, Instrument Panel Gage
- Replaces: 84770049, 84724442
GMC Instrument Cluster Part Number: 84852064
$436.21 MSRP: $682.79You Save: $246.58 (37%)Ships in 1-3 Business DaysProduct Specifications- Other Name: Cluster, Instrument Panel Gage
- Replaces: 84734993
GMC Instrument Cluster Part Number: 84474091
$184.91 MSRP: $289.42You Save: $104.51 (37%)Ships in 1-3 Business DaysProduct Specifications- Other Name: Cluster, Instrument Panel Gage; Cluster
- Replaces: 84324677
GMC Instrument Cluster Part Number: 85599811
$261.38 MSRP: $394.23You Save: $132.85 (34%)Ships in 1-3 Business DaysProduct Specifications- Other Name: Cluster, Instrument Panel Gage
- Replaces: 84996530, 85547863, 85154544
GMC Instrument Cluster Part Number: 84930790
$291.63 MSRP: $456.49You Save: $164.86 (37%)Ships in 1-3 Business DaysProduct Specifications- Other Name: Cluster, Instrument Panel Gage
- Replaces: 84785465, 84930798
GMC Instrument Cluster Part Number: 87869499
$409.41 MSRP: $617.65You Save: $208.24 (34%)Ships in 1-2 Business DaysProduct Specifications- Other Name: Cluster, Instrument Panel Gage
- Replaces: 85599809

GMC Instrument Cluster Part Number: 23265866
$264.53 MSRP: $398.97You Save: $134.44 (34%)Ships in 1-3 Business DaysProduct Specifications- Other Name: Cluster, Instrument Panel Gage
- Replaces: 22956685, 23229483, 22936204

GMC Instrument Cluster Part Number: 84682107
$176.64 MSRP: $264.07You Save: $87.43 (34%)Product Specifications- Other Name: Cluster, Instrument Panel Gage

GMC Instrument Cluster Part Number: 84835703
$139.48 MSRP: $208.48You Save: $69.00 (34%)Product Specifications- Other Name: Cluster, Instrument Panel Gage; Cluster Assembly


GMC Instrument Cluster Part Number: 85115342
$230.38 MSRP: $344.44You Save: $114.06 (34%)Product Specifications- Other Name: Cluster, Instrument Panel Gage; Cluster
| Page 1 of 20 |Next >
1-20 of 388 Results
GMC Speedometer
Choose OEM Speedometer, you're making the optimal decision for superior quality and perfect performance. You can feel confident because each component goes through stringent quality checks. Every part is carefully built to comply with GMC's factory specifications. You'll enjoy a smooth, worry-free installation that fits just right. At ChevyPartsDeal.com, you'll find it easy to get top-quality OEM GMC Speedometer. You can shop at highly competitive prices and protect your budget. All our genuine GMC parts include a dependable manufacturer's warranty. You'll also appreciate our straightforward return policy and swift delivery services for extra convenience.
GMC Speedometer provides the driver with an easy to comprehend and accurate feedback that allows them to maximize the capacity of the trucks on the road safely without getting fines and cargoes and passengers are safe. GMC, established more than 100 years ago, builds pickups and SUVs with boxed steel frames, powertrains with strong torque, sophisticated suspension, and a smart MultiPro tailgate, which can be flipped and folded to create the ease of loading. It incorporates digital surround vision, hitch guidance, and sound insulated cabins, and puts all models through hard courses to guarantee long life. Other features incorporated by the company include over the air software update systems and heavy duty cargo tie downs that allows the owner to alternate between family and work travel without much ado. Such benefits establish a reputation of durability and ease that both the family and the contractors would be willing to pay. The dashboard that indicates the actual road speed in real time is the Speedometer whose primary task is to ensure the driver does not exceed legal and safe road usage limits. In order to install a new gauge, one should first park on a flat surface, switch on the brake, and unhook the battery. Unbolt the cluster, pop the trim panel and slide it forward. Prepare the unit by sitting it on its bracket, screwing, and connecting power, ground, illumination, and the signal wire or cable. Install the run wires through loom around the hot components and then reconnect the cluster and replace the trim. Reconnect the battery, turn on the key, complete the calibration instructions, and go on a steady test drive without forgetting to ensure that the needle or the numbers follow the rising and falling speed as it should and in a smooth manner.
Related GMC Parts
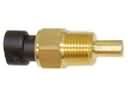 GMC Coolant Temperature Sensor
 GMC Turn Signal Switch
 GMC Horn
 GMC Antenna Base
 GMC Automatic Transmission Shift Levers
 GMC Automatic Transmission Shift Position Sensor Switch
 GMC Distributor Cap
 GMC Door Lock Switch
 GMC Mirror Switch
 GMC Seat Heater Switch
 GMC Shift Solenoid
 GMC Turn Signal Flasher
Browse GMC Speedometer by Models
Acadia Sierra 1500 Yukon Canyon Sierra 2500 HD Terrain Envoy Sonoma Typhoon Syclone Caballero C1500 Envoy XL Envoy XUV Jimmy K1500 S15 S15 Jimmy Safari Savana 2500 Savana 3500 Sierra 2500 Sierra 3500 Yukon XL Acadia Limited C2500 C3500 G2500 K2500 K3500 Savana 1500 Yukon XL 1500 C1500 Suburban C2500 Suburban G1500 G3500 Hummer EV Pickup K1500 Suburban K2500 Suburban P2500 R1500 R1500 Suburban R2500 R2500 Suburban R3500 Sierra 1500 HD Sierra 3500 HD V1500 V1500 Suburban V2500 V2500 Suburban V3500 Yukon XL 2500