ChevyParts
My Garage
My Account
Cart
OEM Chevrolet Trailblazer CV Boot
Axle Boot- Select Vehicle by Model
- Select Vehicle by VIN
Select Vehicle by Model
orMake
Model
Year
Select Vehicle by VIN
For the most accurate results, select vehicle by your VIN (Vehicle Identification Number).
6 CV Boots found

Chevrolet Trailblazer Boot Kit Part Number: 42756982
$40.41 MSRP: $66.56You Save: $26.15 (40%)Ships in 1-3 Business Days
Chevrolet Trailblazer Boot Kit, Rear Passenger Side Part Number: 42722017
$35.75 MSRP: $56.00You Save: $20.25 (37%)Ships in 1-3 Business DaysChevrolet Trailblazer Boot Kit, Rear Driver Side Part Number: 42722013
$40.21 MSRP: $62.98You Save: $22.77 (37%)Ships in 1-3 Business Days
Chevrolet Trailblazer Boot Kit Part Number: 42721984
$38.34 MSRP: $63.15You Save: $24.81 (40%)Ships in 1-3 Business Days

Chevrolet Trailblazer Boot Kit, Front Part Number: 26059675


Chevrolet Trailblazer Boot Kit, Front Part Number: 26059671
$36.90 MSRP: $57.80You Save: $20.90 (37%)
Chevrolet Trailblazer CV Boot
Want to cut long-term maintenance and repair costs? Choose OEM CV Boot. Those parts deliver top durability you can trust. On our site, you'll find a huge catalog of genuine Chevrolet Trailblazer parts. Prices are unbeatable, so you can keep more in your pocket. Every OEM Chevrolet Trailblazer CV Boot includes a manufacturer's warranty. You can also get an easy return policy that keeps buying risk free. Fast delivery, get your car on the road quickly. It's simple to search, compare, and order. Stop guessing about quality or fit. Order today and save with parts that last.
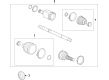
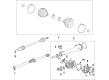
The CV Boot of Chevrolet Trailblazer vehicles is one of the automotive parts which functions in protecting the CV joints especially in transferring power out of the transaxle to the wheels. This flexible rubber or plastic boot holds in the required lubricant for the CV joint and at the same time, shield this joint from dust and other abrasive particles to guarantee effectiveness. In the years past, different types of CV joints have been fitted in Chevrolet Trailblazer models, namely the Rzeppa joint for the outer ends, tripod or double offset joint for the inboard ends. The main difference of the two types is found in the positions of operation and the movements being allowed, where outer joints sweep more extensive positions. checking of the CV Boot Section is very important since once the CV boot is torn or develop cracks it results to the failure of CV joints affecting the operation of Chevrolet trailblazer.
Chevrolet Trailblazer CV Boot Parts and Q&A
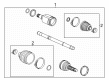
- Q: What tools are needed to service and repair the CV Boot and CV Joint for the wheel drive shaft outer joint on Chevrolet Trailblazer?A:The following tools are necessary for wheel drive shaft outer joint and boot replacement on the Axle Shaft assembly: the following repair tools are necessary: j35910 (Seal Clamp Tool), j41048 (Swage Clamp Tool), and j8059 (Snap Ring Pliers). J35910 (Seal Clamp Tool), j41048 (Swage Clamp Tool), and j8059 (Snap Ring Pliers). Set the halfshaft into a vise that has protective covers guarding its jaws. Remove the swage rings with a hand grinder without hurting the outer race. After compression of the halfshaft seal press away from the cv joint outer race completely remove all grease from the cv joint face. Use tool j8059 to spread the snap ring ears in the inner race before extracting the retaining snap ring. You should extract the cv joint through its halfshaft while disposing of the worn seal. Start by using a brass drift to move the cage while performing ball removal before rotating each piece 90 degrees relative to the outer race lands for extraction. All cv joint parts require degreasing before an inspection checks for damage and wear that determines whether replacement parts are needed. Begin by lightly applying grease to the race grooves of each part. Next, insert the inner race into its cage where it must match up perfectly with the outer race. Finally, use a brass drift to install all balls in their proper positions before packing the joint with grease. Begin the installation process with a brass drift tool that tilts the cage to reposition all balls inside. Afterward, apply pre-measured kit grease to pack the new cv joint seal and assembly. First mount the cv joint seal with its new small swage clamp and then install the large retaining clamp before inserting the seal into the halfshaft bar's joint seal groove. Fasten the swage clamp with j41048 while aligning the bolts by alternating them until their fit is tight. Afterward check for any pinch points. Position the retaining snap ring inside the cv joint inner race with its retaining ring side facing the halfshaft bar. Apply the cv joint over the halfshaft bar and authenticate its position so place the cv joint seal externally on the outer race while using j35910 alongside a breaker bar and torque wrench to create 176 nm (130 ft. Lbs.) of torque. A final step involves examination of the clamp ear's gap dimension.
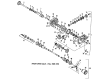
- Q: How to replace the CV Boot and CV Joint on the Wheel Drive Shaft Inner on Chevrolet Trailblazer?A:Removing the wheel drive shaft inner joint and boot requires you to remove the clamp on the boot using the side cutters but care should be taken not to damage the tripot housing. Chop around the swage ring using hand grinder, and then eliminate the tripot casing and trilobal tripot bushing from the halfshaft bar. Remove tripot bushing and degrease the housing and spider assembly. Use 320 grit of 3m cloth to remove any corrosion from the transmission sealing surface and have the components dry while taking care when handling the tripot spider assembly to not separate the tripot balls and needle rollers. Compress tripot boot onto halfshaft bar awy from spider assembly then use j 8059 to spread spacer rings(1, 3), remove spider assembly, spacer rings(1, 3), tripot boot discarding latter two ring. Wash the halfshaft bar with a wire brush observing the needle rollers, needle bearings, trunnion, and tripot housing for damage, replacing those that are damaged with the kit which is right. For assembly, we need to place the new swage clamp (on the boot neck without swaging) and place the new small swage clamp and boot into place at the halfshaft bar making sure that the boot neck goes into the groove. To swage clamp inboard end 41048, stands, halfshaft assembly to plant and top half on bottom half. Check for pinch points at the boot, put it in and tighten the bolts by hand, align both the boot, halfshaft bar, and swage clamp, and tighten every bolt 180 degrees at a time using a ratchet wrench, and then do the same for the opposite side until both sides are bottomed. Unscrew the bolts and dismantle the dies. If there are deformations in the swage clamp, put it back into j 41048 and re-swage. Check the swage clamp for "lip" deformities and that the convolute retainer is properly assembled so as not to damage the boot and install it over boot capturing 4 convolutions to make sure they are fully seated. Install the spacer ring and spider assembly on the halfshaft bar, the other spacer later in the groove at the other end of the halfshaft bar, make sure it is fully seated. After packing the boot and housing with the pre-measured grease from the kit, the large retaining clamp should then be fitted on the boot, followed by fitting the housing and new trilobal tripot bushing over the spider assembly. Mount the boot onto the trilobal tripot bushing and then inspect the inboard stroke position. For male tripot housing assembly, dimension a=280mm (11 in) and for female tripot housing assembly, dimension b=228mm (9 in). Secure the large retaining clamp and boot to the housing using j 35566, and finally unclamp the convolute retainer from the boot.


Related Chevrolet Trailblazer Parts
 Chevrolet Trailblazer Control Arm
 Chevrolet Trailblazer CV Joint
 Chevrolet Trailblazer Air Suspension Compressor
 Chevrolet Trailblazer Axle Shaft
 Chevrolet Trailblazer Ball Joint
 Chevrolet Trailblazer Coil Springs
 Chevrolet Trailblazer Control Arm Bolt
 Chevrolet Trailblazer Drive Shaft
 Chevrolet Trailblazer Spare Wheel
 Chevrolet Trailblazer Sway Bar Bushing
 Chevrolet Trailblazer Sway Bar Link
 Chevrolet Trailblazer Trailing Arm