ChevyParts
My Garage
My Account
Cart
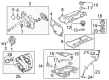
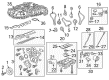
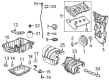
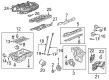
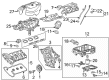
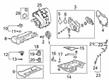
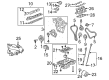
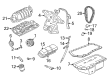
OEM Buick LaCrosse Intake Manifold
Engine Intake Manifold- Select Vehicle by Model
- Select Vehicle by VIN
Select Vehicle by Model
orMake
Model
Year
Select Vehicle by VIN
For the most accurate results, select vehicle by your VIN (Vehicle Identification Number).
12 Intake Manifolds found


Buick LaCrosse Intake Manifold Part Number: 12637620
$94.22 MSRP: $164.41You Save: $70.19 (43%)


Buick LaCrosse Intake Manifold Part Number: 12699182
$277.94 MSRP: $484.98You Save: $207.04 (43%)Ships in 1-2 Business Days

Buick LaCrosse Intake Manifold Part Number: 89018187
$179.87 MSRP: $313.86You Save: $133.99 (43%)Ships in 1-2 Business Days
Buick LaCrosse Intake Manifold Part Number: 12646130
$191.76 MSRP: $334.56You Save: $142.80 (43%)Ships in 1-2 Business Days
Buick LaCrosse Intake Manifold Part Number: 12611155
$370.63 MSRP: $588.47You Save: $217.84 (38%)Ships in 1-2 Business Days
Buick LaCrosse Intake Manifold Part Number: 12674126
$207.65 MSRP: $329.57You Save: $121.92 (37%)Ships in 1-2 Business Days
Buick LaCrosse Intake Manifold Part Number: 89018222
$131.68 MSRP: $207.20You Save: $75.52 (37%)Buick LaCrosse Intake Manifold Part Number: 12607282
$1266.98 MSRP: $2001.65You Save: $734.67 (37%)
Buick LaCrosse Intake Manifold, Upper Part Number: 12583312

Buick LaCrosse Intake Manifold Part Number: 12634205

Buick LaCrosse Intake Manifold Part Number: 19371505

Buick LaCrosse Intake Manifold Part Number: 19417844
Buick LaCrosse Intake Manifold
Want to cut long-term maintenance and repair costs? Choose OEM Intake Manifold. Those parts deliver top durability you can trust. On our site, you'll find a huge catalog of genuine Buick LaCrosse parts. Prices are unbeatable, so you can keep more in your pocket. Every OEM Buick LaCrosse Intake Manifold includes a manufacturer's warranty. You can also get an easy return policy that keeps buying risk free. Fast delivery, get your car on the road quickly. It's simple to search, compare, and order. Stop guessing about quality or fit. Order today and save with parts that last.
Again and again, great attention needs to be paid to the Buick LaCrosse Intake Manifold as this part plays a critical role in the vehicle's performance, contributing to its reliable engines that can provide an impressive air and fuel mixture for the car cylinders. The Buick LaCrosse Intake Manifold has received fame because of its plastic building with less weight, through which it enhances the fuel insurance and impetus caliber that plays a huge role in enhancing the general performance of the engine. This intake manifold can be used in combination with different models of LaCrosse cars; primary and secondary halves of this intake manifold are provided with gaskets, and new designs for coolant channeling are also incorporated in this intake manifold. Ever since its release in 2004 the Buick LaCrosse has maintained a youth appeal and through its current intake manifold helps in achieving it. The LaCrosse Intake Manifold not only increases the car's power, but at the same time it guarantees safe operation and minimizes the possibility of various engine failures. In the case of the Buick LaCrosse Intake Manifold, some of the characteristics which are considered to be special include the enhanced airflow and miscellaneous dispersion features, so that the Buick LaCrosse Intake Manifold clearly stands as a worthwhile buy for any auto enthusiast who is determined to balance optimal performance with absolute durability. All in all, Buick LaCrosse Intake Manifold is a clear example of the brand's quality and actually is good innovation that will help the company strengthen its position as a mid-size sedan car maker.
Buick LaCrosse Intake Manifold Parts and Q&A
- Q: How to replace the lower intake manifold on Buick LaCrosse?A:In order to change the lower Intake Manifold one has to turn off the ignition and remove the air inlet duct. Next, remove the fuel pressure and evaporative-emission (EVAP) hoses from the engine, and disconnect the baro sensor electric connector. Efforts must not be made to unplug the connectors of the Engine Control Module (ECM); instead, take off the ecm bracket with the ecm and leave it aside. Then, detach the purge solenoid electric connection, pull the wiring harness from the right side of the Intake Manifold, and the Fuel Injector electric connection. I will then disconnect the Throttle Body electrical connector, Brake Booster Vacuum Hose and vacuum check valve from the brake booster as well as the positive crankcase ventilation (PCV) hose off the Intake Manifold. Go ahead and take out the Intake Manifold bolts (1-6) and remove the Intake Manifold. Don't disassemble the Intake Manifold if you didn't have to. If you did, you will clean and inspect it and also inspect sealing surfaces. For assembly, arrange the Intake Manifold as required and fix it. Connect the pcv hose back in the Intake Manifold, the Brake Booster Vacuum Hose and check valve to the brake booster. Turn the two screws of the Throttle Body electrical connector back on and reconnect the Fuel Injector electrical connector. Mounting the wiring harness to the right of the Intake Manifold, make sure you tighten the bracket bolts of the wiring harness to 10 nm (89 inch lbs.). Connect the purge solenoid electrical, reinstall the ecm bracket to the ecm, and attach the baro sensor electrical connector. Finally set the fuel pressure and evap hoses to the engine and reconnect the air inlet duct.

Related Buick LaCrosse Parts
 Buick LaCrosse Air Filter
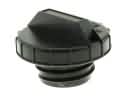 Buick LaCrosse Gas Cap
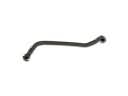 Buick LaCrosse Crankcase Breather Hose
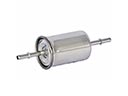 Buick LaCrosse Fuel Filter
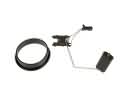 Buick LaCrosse Fuel Level Sensor
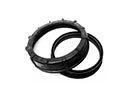 Buick LaCrosse Fuel Pump Seal
 Buick LaCrosse Fuel Pump Tank Seal
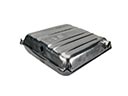 Buick LaCrosse Fuel Tank
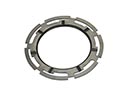 Buick LaCrosse Fuel Tank Lock Ring
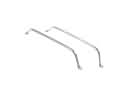 Buick LaCrosse Fuel Tank Strap
 Buick LaCrosse Mass Air Flow Sensor
 Buick LaCrosse PCV Valve Hose