ChevyParts
My Garage
My Account
Cart
OEM Saturn Thermostat
Engine Coolant Thermostat- Select Vehicle by Model
- Select Vehicle by VIN
Select Vehicle by Model
orMake
Model
Year
Select Vehicle by VIN
For the most accurate results, select vehicle by your VIN (Vehicle Identification Number).
22 Thermostats found


Saturn Thermostat, Green Line Part Number: 12622410
$69.04 MSRP: $157.67You Save: $88.63 (57%)Ships in 1-2 Business DaysProduct Specifications- Other Name: Thermostat Assembly-Engine Coolant
- Replaces: 21018811, 90537453, 55350941, 12615097


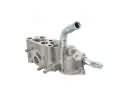
Saturn Thermostat Housing, Green Line Part Number: 12597172
$93.11 MSRP: $196.13You Save: $103.02 (53%)Ships in 1-2 Business DaysProduct Specifications- Other Name: Housing, Engine Coolant Temperature; Engine Coolant Thermostat Housing; Thermostat Housing Cover; Water Manifold; Housing, Engine Coolant Thermostat


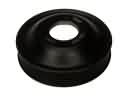
Saturn Thermostat Part Number: 12591881
$45.62 MSRP: $85.67You Save: $40.05 (47%)Ships in 1-2 Business DaysProduct Specifications- Other Name: Thermostat Assembly-Engine Coolant; Thermostat, Engine Coolant Temperature


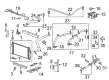
Saturn Thermostat Part Number: 24507563
$20.53 MSRP: $41.76You Save: $21.23 (51%)Product Specifications- Other Name: Thermostat, Engine Coolant Temperature
- Replaced by: 19435095

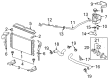
Saturn Thermostat Housing Part Number: 12689039
$79.73 MSRP: $149.72You Save: $69.99 (47%)Ships in 1-2 Business DaysProduct Specifications- Other Name: Housing, Engine Coolant Temperature; Thermostat Housing Cover; Housing, Engine Coolant Thermostat
- Replaces: 12651113

Saturn Thermostat Part Number: 12572866
$11.41 MSRP: $21.42You Save: $10.01 (47%)Ships in 1-3 Business DaysProduct Specifications- Other Name: Thermostat Assembly-Engine Coolant

Saturn Thermostat Housing Part Number: 12689041
$54.62 MSRP: $115.04You Save: $60.42 (53%)Ships in 1-2 Business DaysProduct Specifications- Other Name: Housing, Engine Coolant Temperature; Thermostat Housing Cover
- Replaces: 12638893, 12599235

Saturn Thermostat Housing Part Number: 12605853
$99.70 MSRP: $209.98You Save: $110.28 (53%)Product Specifications- Other Name: Housing, Engine Coolant Temperature; Thermostat Housing Cover; Housing, Engine Coolant Thermostat


Saturn Thermostat Part Number: 24435102
$34.03 MSRP: $60.76You Save: $26.73 (44%)Product Specifications- Other Name: Thermostat, Engine Coolant Temperature


Saturn Thermostat Part Number: 24420653
Product Specifications- Other Name: Thermostat, Engine Coolant Temperature


Saturn Thermostat Part Number: 21006335
Product Specifications- Other Name: Thermostat, Engine Coolant Temperature; Thermostat Kit, Engine Coolant Temperature

Saturn Thermostat Housing Part Number: 12581522
Product Specifications- Other Name: Housing, Engine Coolant Thermostat; Thermostat Housing Cover; Water Manifold

Saturn Thermostat Housing Part Number: 25192231
$139.03 MSRP: $249.38You Save: $110.35 (45%)Product Specifications- Other Name: Housing, Engine Coolant Thermostat; Thermostat Housing Cover
- Replaces: 12992382

Saturn Thermostat Housing Part Number: 12612633
Product Specifications- Other Name: Housing-Engine Coolant Thermostat; Housing, Engine Coolant Thermostat

Saturn Thermostat Part Number: 12581519
Product Specifications- Other Name: Thermostat Kit, Engine Coolant Temperature; Engine Coolant Thermostat

Saturn Thermostat Housing Part Number: 12590275
Product Specifications- Other Name: Housing, Engine Coolant Temperature; Thermostat Housing Cover; Housing, Engine Coolant Thermostat
Saturn Thermostat Housing Part Number: 12581521
Product Specifications- Other Name: Housing-Engine Coolant Thermostat; Cover; Housing, Engine Coolant Thermostat

Saturn Thermostat Housing Part Number: 55353492
Product Specifications- Other Name: Housing, Engine Coolant Thermostat; Thermostat Housing Cover; Thermostat Housing Gasket; Thermostat
- Replaces: 90502201

Saturn Thermostat Housing Part Number: 21006065
Product Specifications- Other Name: Thermostat, Engine Coolant Temperature; Engine Coolant Thermostat; Thermostat Housing Cover

Saturn Thermostat Housing Part Number: 12583152
Product Specifications- Other Name: Housing, Engine Coolant Thermostat
| Page 1 of 2 |Next >
1-20 of 22 Results
Saturn Thermostat
Choose OEM Thermostat, you're making the optimal decision for superior quality and perfect performance. You can feel confident because each component goes through stringent quality checks. Every part is carefully built to comply with Saturn's factory specifications. You'll enjoy a smooth, worry-free installation that fits just right. At ChevyPartsDeal.com, you'll find it easy to get top-quality OEM Saturn Thermostat. You can shop at highly competitive prices and protect your budget. All our genuine Saturn parts include a dependable manufacturer's warranty. You'll also appreciate our straightforward return policy and swift delivery services for extra convenience.
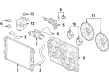
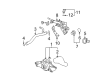
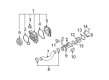
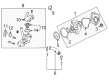
The Saturn Thermostat is a small valve that fits in the coolant outlet and controls the flow to the radiator to allow the engine to warm fast and maintain a constant operating temperature. Saturn cars have polymer side panels that shake off grocery cart collisions and road salt, so years on, fenders are straight and the paint is still intact unlike many of its rivals with metal bodies. The body is mounted on a space frame that is not easily twisted but is lighter than the non-space frame, which contributes to fuel economy and quick steering. Lost foam casting on the inside of the engine bay enables complex coolant channels and lighter code dispersion giving the heat an equal distribution, which takes off the pressure of the cooling channel. Multi-layer, which is durable, will resist chips and therefore the bright finish will remain clean even after terrible winters. The Saturn powertrains also can use standard replacement parts that can be found on the shelf in the store. When it is time to change the Thermostat, park the Saturn overnight in such a way that it cools down and the pressure decreases. Open the hood, unscrew the battery ground to ensure it is safe, place a pan under the drain cock and pour a bit of fluid to ensure that it is at the bottom of the housing. Unscrew the upper hose, separate the two housing bolts, and lift the cap as a unit and monitor the orientation of the Thermostat. Peel off any gasket residue, place the new Thermostat with spring on the block, install a new seal, then repeat the sequence, filling the block with coolant and burping air, then get out of the seat.