ChevyParts
My Garage
My Account
Cart
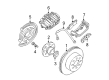
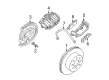
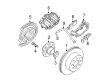
OEM GMC Sierra 1500 Brake Caliper Bracket
Caliper Bracket- Select Vehicle by Model
- Select Vehicle by VIN
Select Vehicle by Model
orMake
Model
Year
Select Vehicle by VIN
For the most accurate results, select vehicle by your VIN (Vehicle Identification Number).
10 Brake Caliper Brackets found


GMC Sierra 1500 Caliper Mount, Red Part Number: 13514241
$42.01 MSRP: $83.56You Save: $41.55 (50%)Ships in 1-3 Business Days

GMC Sierra 1500 Caliper Support Part Number: 15265833
$69.30 MSRP: $137.84You Save: $68.54 (50%)


GMC Sierra 1500 Caliper Bracket, Passenger Side Part Number: 25997055
$127.26 MSRP: $246.98You Save: $119.72 (49%)Ships in 1-2 Business Days
GMC Sierra 1500 Caliper Bracket, Driver Side Part Number: 25997053
$141.36 MSRP: $255.84You Save: $114.48 (45%)Ships in 1-2 Business Days
GMC Sierra 1500 Caliper Bracket, Silver Part Number: 23498371
$62.47 MSRP: $125.42You Save: $62.95 (51%)


GMC Sierra 1500 Caliper Bracket, Rear Part Number: 25997047


GMC Sierra 1500 Mount Bracket, Rear Part Number: 18043519


GMC Sierra 1500 Caliper Mount Part Number: 18048917

GMC Sierra 1500 Caliper Bracket Part Number: 18040090
GMC Sierra 1500 Caliper Bracket, Rear Part Number: 25997048
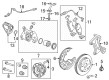
GMC Sierra 1500 Brake Caliper Bracket
Want to cut long-term maintenance and repair costs? Choose OEM Brake Caliper Bracket. Those parts deliver top durability you can trust. On our site, you'll find a huge catalog of genuine GMC Sierra 1500 parts. Prices are unbeatable, so you can keep more in your pocket. Every OEM GMC Sierra 1500 Brake Caliper Bracket includes a manufacturer's warranty. You can also get an easy return policy that keeps buying risk free. Fast delivery, get your car on the road quickly. It's simple to search, compare, and order. Stop guessing about quality or fit. Order today and save with parts that last.
GMC Sierra 1500 Brake Caliper Bracket Parts and Q&A
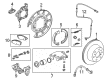
- Q: How to replace the rear brake caliper bracket on GMC Sierra 1500?A:Check brake fluid levels before replacing the rear Brake Caliper Bracket. When the fluid sits midway the reservoir marks you can work without draining but if it reaches the top lower it to center position. Position a large c-clamp over the top of the caliper with the piston in toward the back of the outboard pad and use the clamp to fully retract the caliper pistons. Use mechanic's wire to hold up the brake caliper while you unscrew its bolts from the bracket. Keep the hydraulic brake hose attached without breaking it throughout the process. Start by taking away brake pads, anti-rattle clips, and bolts from the Brake Caliper Bracket before disconnecting the bracket. Wipe contaminants off the ends of the bracket and check both the mounting area and threads for dirt. Before putting on the new Brake Caliper Bracket clean the bolt threads with denatured alcohol then apply threadlocker gm p/n 12345493 (Canadian P/N 10953488) to both threads. Attach the Brake Caliper Bracket bolts first then tighten them to 200 nm (148 ft. Lbs.) and fix the anti-rattle clips before placing and fastening the new brake pads on the bracket. Put the brake caliper on the bracket then fasten it with brake bolts at 42 nm (31 ft-lbs) torque and install the wheel and tire unit. When the engine is off depress the brake pedal to two-thirds of its range and ease off before repeating to place the pistons and pads correctly into position. Insert new brake fluid to reach the correct mark in the master cylinder reservoir only when the fluid level drops. Keep the reservoir fresh with clean brake fluid.
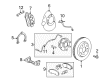
- Q: How to replace the front brake caliper bracket on the 1500 Series on GMC Sierra 1500?A:Check the brake master cylinder fluid before replacing the front Brake Caliper Bracket on 1500 series by draining excess fluid to the midway point between markings. Hook two c-clamps onto the caliper housing to push back its pistons until they extend fully while pressing them against the rear of the outboard pad. Once you rid yourself of the c-clamps you must uninstall the brake caliper bolts while keeping the brake components detached so footage on the brake pedals will not harm anything. Secure the caliper with mechanic's wire and let the hydraulic brake hose stay connected before removing brake pads and clips. After that, take out the Brake Caliper Bracket bolts to take off the whole bracket assembly. Wipe all debris from the surfaces and holes on the bracket before starting installation. Use new Brake Caliper Bracket while removing old adhesive from its mounting surface and treating bolt threads with denatured alcohol before adding threadlocker gm p/n 12345493 (Canadian P/N 10953488) to the threads. Insert and tighten the Brake Caliper Bracket bolts to 180 nm (133 ft lbs). Then position the anti-rattle clips and install the brake pads on the rotor surface. Push the caliper onto its bracket and fasten it by tightening the brake caliper bolts to 100 nm. Reposition the tire and wheel parts then let the vehicle down and press the brake pedal halfway without starting the engine before easing off the pressure. Keep repeating the test until the pedal feels solid and add clean brake fluid to reach the correct reservoir level when necessary.


Related GMC Sierra 1500 Parts
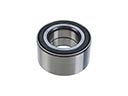 GMC Sierra 1500 Wheel Bearing
 GMC Sierra 1500 ABS Pump And Motor Assembly
 GMC Sierra 1500 Backing Plate
 GMC Sierra 1500 Brake Caliper Repair Kit
 GMC Sierra 1500 Brake Drum
 GMC Sierra 1500 Brake Dust Shields
 GMC Sierra 1500 Brake Rotor
 GMC Sierra 1500 Brake Shoe Set
 GMC Sierra 1500 Hydraulic Hose
 GMC Sierra 1500 Parking Brake Cable
 GMC Sierra 1500 Parking Brake Shoes
 GMC Sierra 1500 Wheel Hub Bolt