ChevyParts
My Garage
My Account
Cart
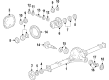
OEM GMC Canyon Pinion Bearing
Transmission Pinion Bearing- Select Vehicle by Model
- Select Vehicle by VIN
Select Vehicle by Model
orMake
Model
Year
Select Vehicle by VIN
For the most accurate results, select vehicle by your VIN (Vehicle Identification Number).
12 Pinion Bearings found


GMC Canyon Pinion Bearings, Inner Part Number: 22510042
$44.26 MSRP: $134.26You Save: $90.00 (68%)Ships in 1-2 Business Days
GMC Canyon Pinion Bearings Part Number: 9417784
$24.86 MSRP: $68.16You Save: $43.30 (64%)Ships in 1-2 Business Days


GMC Canyon Pinion Bearings Part Number: 23243839
$56.88 MSRP: $113.16You Save: $56.28 (50%)Ships in 1-2 Business Days

GMC Canyon Side Bearings Part Number: 25824250
$66.28 MSRP: $131.86You Save: $65.58 (50%)Ships in 1-2 Business Days


GMC Canyon Rear Pinion Bearing Part Number: 23490333
$66.78 MSRP: $132.84You Save: $66.06 (50%)Ships in 1-2 Business Days
GMC Canyon Rear Pinion Bearing Part Number: 23490334
$60.66 MSRP: $120.68You Save: $60.02 (50%)Ships in 1-2 Business Days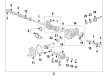
GMC Canyon Pinion Bearings, Front Outer Part Number: 84428300
$16.42 MSRP: $30.84You Save: $14.42 (47%)Ships in 1-2 Business DaysGMC Canyon Front Pinion Bearing, Outer Part Number: 85617857
$29.72 MSRP: $55.82You Save: $26.10 (47%)Ships in 1-2 Business DaysGMC Canyon Pinion Bearings, Outer Part Number: 84937118
$8.07 MSRP: $14.60You Save: $6.53 (45%)Ships in 1-2 Business DaysGMC Canyon Pinion Bearings, Rear Part Number: 84937117
$20.62 MSRP: $37.32You Save: $16.70 (45%)GMC Canyon Front Pinion Bearing Part Number: 23471879
$20.64 MSRP: $38.76You Save: $18.12 (47%)Ships in 1-2 Business DaysGMC Canyon Pinion Bearings Part Number: 84428299
$24.06 MSRP: $45.17You Save: $21.11 (47%)Ships in 1-2 Business Days
GMC Canyon Pinion Bearing
Want to cut long-term maintenance and repair costs? Choose OEM Pinion Bearing. Those parts deliver top durability you can trust. On our site, you'll find a huge catalog of genuine GMC Canyon parts. Prices are unbeatable, so you can keep more in your pocket. Every OEM GMC Canyon Pinion Bearing includes a manufacturer's warranty. You can also get an easy return policy that keeps buying risk free. Fast delivery, get your car on the road quickly. It's simple to search, compare, and order. Stop guessing about quality or fit. Order today and save with parts that last.
GMC Canyon Pinion Bearing Parts and Q&A
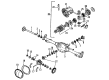
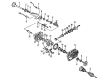
- Q: How to replace the drive pinion bearings in the rear drive axle on GMC Canyon?A:The process of swapping drive pinion bearings in rear drive axles starts with vehicle elevation and Differential and drive pinion removal from the axle. The split-plate bearing puller (J 22912-01) should be used to push off the bearing which sits on the pinion before you can remove the shim. When extracting bearings from the axle housing work evenly with a hammer against a brass drift to remove the outer cup followed by the inner cup extraction. The installation of the outer Pinion Bearing cup requires an outer bearing race installer (J 7817) and universal driver handle (J 8092) while the installation of the inner Pinion Bearing cup needs a rear Pinion Bearing race installer (J 8608) with the universal driver handle (J 8092). Insert the selective shim of the chosen thickness between the inner Pinion Bearing and gear shoulder. Execute the inner Pinion Bearing installation with pinion cone and side bearing installer j 24433 while pushing it down until the cone completely seats onto the pinion shim. The installation process requires a new collapsible spacer with proper axle lubricant application to the pinion bearings. Place the axle housing pinion next to the outside bearing before adding both components. The pinion oil seal installer (J 33782) must be used for new pinion oil seal installation before applying gm p/n 12346004 (Canadian P/N 10953480) sealant to the pinion yoke splines and placing the yoke in position. Finally, match attaining alignment along the original marks. Drive the pinion yoke onto the pinion shaft using a soft-faced hammer until it shows a few threads. Subsequently add the washer and brand-new pinion nut. Using the holding tool (J 8614-01) on the pinion yoke secure it while tightening the pinion nut until the end play reaches its minimal point. A mechanic should use an inch-pound torque wrench to measure pinion rotating torque at 1.0 to 2.8 nm (10 to 25 inch lbs.) for used bearings or 1.7 to 3.4 nm (15 to 30 inch lbs.) for new bearings. Tighten the pinion nut by small amounts until its rotating torque matches the specified range. Use the torque meter to check the specified value before rotating the pinion at least three times to check bearing seating. Make additional adjustments if required. The vehicle requires reinstallation of its Differential before lubricating the axle with proper fluid then proceeding to lower the vehicle.
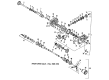
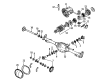
- Q: How to service and repair the front drive axle's pinion bearing on GMC Canyon?A:The procedure to service and repair the Pinion Bearing of the front drive axle begins with vehicle lift before Differential carrier assembly removal. Prepare a (J 22536) on the pinion before fixing it in place and striking it with a hammer to extract it while preventing it from slipping out of the rear axle housing. Open the collapsible spacer while removing the pinion bearings with their cups before taking off the ring gear. Clean the mating surface between the ring gear and Differential case after which the new ring gear bolts can be installed by hand-starting them one-by-one to check alignment before torquing them alternately at 120 nm (89 lb ft). Determine the selective shim thickness for the pinion gear before installing the drive Pinion Bearing cups. The installation process begins with the selective shim placed on the pinion until the inner Pinion Bearing receives placement with a new collapsible spacer after which pinion bearings receive axle lubricant. Put the pinion inside the axle housing before attaching the outer Pinion Bearing and a fresh pinion oil seal through tool (J 21128). Apply sealant to the splines of the pinion yoke then install it according to the removal marks while soft-facing hammer taps help seat the yoke properly. You should use (J 8614-01) to maintain pinion yoke position before tightening the new pinion nut until the pinion end play reaches a proper seating. The pinion torque requires measurement while the pinion end play remains just taken up. Use a torque wrench to check for rotating torques between 1.0 - 2.3 nm (10 - 20 lb in) for used bearings and 1.7 - 3.4 nm (15 - 30 lb in) for new bearings before necessary adjustments. Achieve the required torque on the pinion then spin it several times to ensure optimal bearing seating before putting on the Differential carrier and conducting a pinion-ring gear tooth contact pattern check. A 4.318 mm (0.170 in) thick service spacer must be inserted into the left side of the axle housing before sliding the Differential assembly towards it when performing Differential side bearing preload adjustment. Measure the right side Differential side bearing cup's thickness using tool (J 22779) before obtaining an average value. The (J 22779) will be utilized to adjust the backlash on the right side to a range of 0.025-0.051 mm (0.001-0.002 in), starting from a right-side shim of 1.016 mm (0.040 in) and then adding a bent shim. Measure the tool in three locations after removal to get left service shim thickness without preload and then perform right side calculation. Organize both shim packs and install the Differential assembly before torquing the Differential bearing cap bolts to 63 nm (46 lb ft). Check the drive pinion and Differential side bearing preload numbers then change the shim thickness if needed to maintain specifications. A gear tooth contact pattern evaluation serves as the last step to validate proper ring and pinion gear alignment.


Related GMC Canyon Parts
 GMC Canyon CV Joint Companion Flange
 GMC Canyon Differential
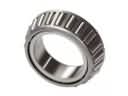 GMC Canyon Differential Bearing
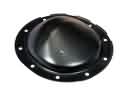 GMC Canyon Differential Cover
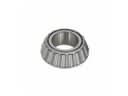 GMC Canyon Differential Pinion Bearing
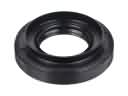 GMC Canyon Differential Seal
 GMC Canyon Drive Shaft
 GMC Canyon Driveshaft Yokes
 GMC Canyon Pinion Washer
 GMC Canyon Slip Yoke
 GMC Canyon Universal Joint
 GMC Canyon Wheel Seal