ChevyParts
My Garage
My Account
Cart
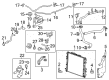
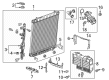
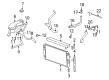
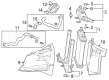
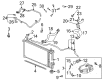
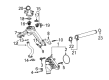
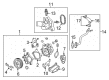
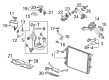
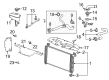
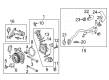
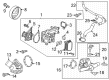
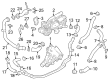
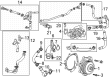
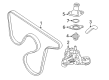
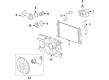
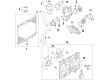
OEM Chevrolet Thermostat Gasket
Engine Coolant Thermostat Gasket- Select Vehicle by Model
- Select Vehicle by VIN
Select Vehicle by Model
orMake
Model
Year
Select Vehicle by VIN
For the most accurate results, select vehicle by your VIN (Vehicle Identification Number).
59 Thermostat Gaskets found


Chevrolet Thermostat Gasket Part Number: 12582472
$5.85 MSRP: $11.00You Save: $5.15 (47%)Ships in 1-3 Business DaysProduct Specifications- Other Name: Seal, Engine Coolant Thermostat Housing; Engine Coolant Thermostat Gasket; Coolant Thermostat Gasket


Chevrolet Thermostat Gasket Part Number: 12650486
$15.65 MSRP: $28.33You Save: $12.68 (45%)Ships in 1-2 Business DaysProduct Specifications- Other Name: Gasket, Engine Coolant Thermostat Housing


Chevrolet Thermostat Housing Gasket Part Number: 24577118
$12.60Product Specifications- Other Name: Gasket, Engine Coolant Thermostat Housing; Thermostat Gasket
- Replaces: 24576633


Chevrolet Thermostat Gasket Part Number: 12620318
$4.56 MSRP: $8.60You Save: $4.04 (47%)Ships in 1-3 Business DaysProduct Specifications- Other Name: Gasket-Engine Coolant Thermostat Housing; Coolant Pipe Seal


Chevrolet Thermostat Gasket Part Number: 10226107
$12.60 MSRP: $13.06You Save: $0.46 (4%)Ships in 1-2 Business DaysProduct Specifications- Other Name: Gasket, Engine Coolant Thermostat Housing; Engine Coolant Thermostat Seal; Coolant Thermostat Seal
- Replaced by: 19435096


Chevrolet By-Pass Pipe Gasket Part Number: 12643771
$4.59 MSRP: $8.20You Save: $3.61 (45%)Ships in 1-3 Business DaysProduct Specifications- Other Name: Gasket, Engine Coolant By-Pass; Gasket, Engine Coolant By - Pass
- Replaced by: 12737097


Chevrolet Thermostat Gasket Part Number: 12649163
$5.19 MSRP: $9.28You Save: $4.09 (45%)Ships in 1-2 Business DaysProduct Specifications- Other Name: Gasket-Engine Coolant Thermostat Housing; Coolant Pipe Seal


Chevrolet By-Pass Pipe Upper Seal Part Number: 94011602
$2.60 MSRP: $4.88You Save: $2.28 (47%)Ships in 1-3 Business DaysProduct Specifications- Other Name: Seal, Engine Coolant By-Pass; Seal, Engine Coolant By - Pass
- Position: Upper


Chevrolet By-Pass Pipe Lower Seal Part Number: 94011603
$2.51 MSRP: $4.48You Save: $1.97 (44%)Ships in 1-3 Business DaysProduct Specifications- Other Name: Seal, Engine Coolant By-Pass; Seal, Engine Coolant By - Pass
- Position: Lower

Chevrolet Thermostat Gasket Part Number: 12551507
$6.28 MSRP: $11.80You Save: $5.52 (47%)Ships in 1-2 Business DaysProduct Specifications- Other Name: Gasket, Engine Coolant Thermostat Housing; Water Pump Gasket; Water Pump O-Ring
- Replaces: 12553106

Chevrolet Thermostat Unit O-Ring Part Number: 55579986
$9.27 MSRP: $16.80You Save: $7.53 (45%)Ships in 1-2 Business DaysProduct Specifications- Other Name: Seal, Engine Coolant Thermostat Housing

Chevrolet Thermostat Gasket Part Number: 55487536
$20.08 MSRP: $37.69You Save: $17.61 (47%)Ships in 1-3 Business DaysProduct Specifications- Other Name: Gasket, Engine Coolant Thermostat Housing

Chevrolet Thermostat Unit O-Ring Part Number: 55579985
$9.66 MSRP: $18.16You Save: $8.50 (47%)Ships in 1-2 Business DaysProduct Specifications- Other Name: Seal, Engine Coolant Thermostat Housing

Chevrolet Thermostat Unit Gasket Part Number: 12666900
$1.31 MSRP: $2.46You Save: $1.15 (47%)Ships in 1-3 Business DaysProduct Specifications- Other Name: Seal-Engine Coolant Flow Control Valve; Thermostat Gasket; Gasket, Engine Coolant By - Pass

Chevrolet Thermostat Gasket Part Number: 55496127
$1.22 MSRP: $2.18You Save: $0.96 (45%)Ships in 1-2 Business DaysProduct Specifications- Other Name: Gasket-Engine Coolant Thermostat Housing

Chevrolet Housing Gasket Part Number: 10112551
$3.18 MSRP: $5.68You Save: $2.50 (45%)Ships in 1-2 Business DaysProduct Specifications- Other Name: Gasket-Engine Coolant Thermostat Housing; Water Pump Gasket; Water Pump O-Ring; Gasket, Engine Coolant Thermostat Housing

Chevrolet Gasket Part Number: 12647029
$2.51 MSRP: $4.53You Save: $2.02 (45%)Ships in 1-3 Business Days
Chevrolet Thermostat Housing Seal Part Number: 12690766
$19.73 MSRP: $37.04You Save: $17.31 (47%)Ships in 1-3 Business DaysProduct Specifications- Other Name: Seal, Engine Coolant Thermostat Housing (O Ring); Seal, Engine Coolant Thermostat Housing
- Replaces: 12584325

Chevrolet Thermostat Seal Part Number: 19316306
$5.84 MSRP: $10.96You Save: $5.12 (47%)Ships in 1-3 Business DaysProduct Specifications- Other Name: Gasket, Engine Coolant Thermostat Housing; Thermostat Gasket; Gasket; Seal, Engine Coolant Thermostat Housing

Chevrolet Thermostat Housing Gasket Part Number: 19316195
$3.93 MSRP: $7.02You Save: $3.09 (45%)Product Specifications- Other Name: Seal, Engine Coolant Thermostat Housing; Thermostat Gasket; Water Pump Gasket; Water Pump O-Ring; Gasket
| Page 1 of 3 |Next >
1-20 of 59 Results
Chevrolet Thermostat Gasket
Choose OEM Thermostat Gasket, you're making the optimal decision for superior quality and perfect performance. You can feel confident because each component goes through stringent quality checks. Every part is carefully built to comply with Chevrolet's factory specifications. You'll enjoy a smooth, worry-free installation that fits just right. At ChevyPartsDeal.com, you'll find it easy to get top-quality OEM Chevrolet Thermostat Gasket. You can shop at highly competitive prices and protect your budget. All our genuine Chevrolet parts include a dependable manufacturer's warranty. You'll also appreciate our straightforward return policy and swift delivery services for extra convenience.
Chevrolet Thermostat Gasket provides a seal that is leak free and enables the engine to warm within a short time and ensure that operating heat is constant. Since its inception in the year 1911, Chevrolet has become a household name by combining convenience with bold styling and spirited power among which commuters, families and road trip lovers will find a version that suits their lifestyle. All the contemporary Chevy models are engine powered with a blend of muscle and thoughtfulness, as well as soft materials and light infotainment. Other additions such as adaptive cruise, lane keeping alerts and optional Super Cruise hands-free driving all make long journeys smooth sailing. Lightness of construction and intelligent gearing assists the lineup squeeze incredibly amazing mileage out of each gallon without losing road acceleration. With high safety ratings and an expansive parts system, a Chevy will ensure customers that they are safely protected wherever they go on the highway. When changing the Thermostat Gasket, it is optimal to park the vehicle overnight and allow the cooling system to cool down to the ambient temperature. Relieve pressure slowly by turning the radiator cap slowly then empty as much coolant as needed to bring the level below the thermostat housing. Unbolt the housing, loosen the hose clamp, and lift the cover taking note of the orientation of the thermostat. Wipe the two mating surfaces with a scraper by removing all remnants of old gasket until the surface of the two mating faces is clean and smooth as glass. Install new ring, place any bleed notch facing upwards, fit cover back on and evenly torque bolts.
Related Chevrolet Parts
 Chevrolet Water Pump
 Chevrolet Coolant Reservoir
 Chevrolet Fan Blade
 Chevrolet Water Pump Gasket
 Chevrolet A/C Condenser Fan
 Chevrolet Coolant Reservoir Cap
 Chevrolet Cooling Fan Bracket
 Chevrolet Cooling Fan Clutch
 Chevrolet Fan Motor
 Chevrolet Oil Cooler Hose
 Chevrolet Transmission Oil Cooler
 Chevrolet Transmission Oil Cooler Hose
Browse Chevrolet Thermostat Gasket by Models
Nova S10 Colorado Tahoe Cruze Malibu Camaro Equinox Impala SS SSR Avalanche Silverado 1500 Silverado 2500 HD Caprice Classic Cobalt Suburban Traverse Blazer HHR Sonic Tracker Volt Spark Trax Trailblazer Astro Cavalier Corvette Aveo City Express Express 1500 Express 2500 Express 3500 Lumina Metro Monte Carlo P30 Prizm Uplander Venture Silverado 3500 Suburban 1500 Trailblazer EXT Avalanche 1500 Avalanche 2500 Aveo5 Captiva Sport Cruze Limited Impala Limited Malibu Limited Silverado 1500 Classic Silverado 1500 LD Silverado 1500 LTD Silverado 2500 HD Classic Silverado 3500 Classic Silverado 3500 HD Suburban 2500 Suburban 3500 HD