ChevyParts
My Garage
My Account
Cart
OEM Chevrolet Silverado 1500 Classic Intake Manifold
Engine Intake Manifold- Select Vehicle by Model
- Select Vehicle by VIN
Select Vehicle by Model
orMake
Model
Year
Select Vehicle by VIN
For the most accurate results, select vehicle by your VIN (Vehicle Identification Number).
3 Intake Manifolds found


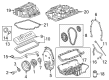
Chevrolet Silverado 1500 Classic Intake Manifold Part Number: 17113542


Chevrolet Silverado 1500 Classic Intake Manifold Part Number: 19418186
Chevrolet Silverado 1500 Classic Intake Manifold
Want to cut long-term maintenance and repair costs? Choose OEM Intake Manifold. Those parts deliver top durability you can trust. On our site, you'll find a huge catalog of genuine Chevrolet Silverado 1500 Classic parts. Prices are unbeatable, so you can keep more in your pocket. Every OEM Chevrolet Silverado 1500 Classic Intake Manifold includes a manufacturer's warranty. You can also get an easy return policy that keeps buying risk free. Fast delivery, get your car on the road quickly. It's simple to search, compare, and order. Stop guessing about quality or fit. Order today and save with parts that last.
Chevrolet Silverado 1500 Classic Intake Manifold Parts and Q&A
- Q: How to replace the upper intake manifold on Chevrolet Silverado 1500 Classic?A:To replace the upper Intake Manifold, start by removing the fuel pipe/hoses, and then removing the cruise control cable from the throttle lever and the accelerator control cable bracket if applicable. Next disconnect the accelerator cable from Throttle Body lever and also from accelerator control cable bracket. Remove the connections to the electrical connectors for the a/c compressor clutch and a/c pressure switch if so equipped, along with the engine wire harness clip from the accelerator control cable bracket. Spend time removing the nuts of the accelerator control cable bracket and bracket that has the cables going to them from Throttle Body, and fasten them off to the side. Bars between the throttle position (TP) sensor , idle air control (IAC) motor , and control port injector module connectors and the engine wiring harness clip bolt screws. Make connections from the evaporative emission (EVAP) canister purge solenoid valve and manifold absolute pressure (MAP) sensor, then evap canister tube from the purge solenoid valve. You need to unfasten the engine wiring harness bracket, its nuts, the rear ground nut and wire on the rear of the right Cylinder Head, and the rear bracket nut of the evap canister purge solenoid valve. Lower and repose the engine wiring harness, then remove the positive crankcase ventilation (PCV) valve hose, power Brake Booster Vacuum Hose, accelerator cable bracket nuts, and accelerator cable bracket. Remove the Intake Manifold-upper studs, the Throttle Body studs (first two on the front), the Intake Manifold-upper (discard the gasket and O-ring seals as needed). Take off vacuum fitting from power brake booster, pcv valve cover, and rear Throttle Body stub where necessary, then remove Throttle Body and gasket and MAP Sensor and seal if necessary. Check and clean the Intake Manifold-upper prior to installing it. If necessary, install the purge solenoid valve and its studs, using threadlock when reinstalling old studs if needed and tightening to 10 nm (89 inch lbs.), instead of t.r.a.m. (194). Put a new MAP Sensor seal with a drop of a clean engine oil and follow it with the MAP Sensor, a new Throttle Body Gasket, and the Throttle Body. If the rear Throttle Body stud is reused, apply threadlock and tighten to 9 nm (80 inch lbs.). Put in a new o-ring seal to the pcv cover and the power brake booster vacuum fitting as well as wedging in a new o-ring seal into the fuel meter body and a new upper Intake Manifold gasket. Mount the Intake Manifold-upper and tighten the studs to 9 nm (80 inch lbs), the accelerator cable bracket and its nuts to 12 nm (106 inch lbs). Connect the power Brake Booster Vacuum Hose and PCV Valve Hose and center the engine wiring harness and bracket then install the rear bracket stud applying 25 nm (18 ft. Lbs.) then the rear bracket nut for the evap canister purge solenoid valve 9 nm (80 inch lbs.) and install the ground nut and wire to 16 nm (12 ft. Lbs.). Reattach the engine wiring harness bracket and its nuts to 12 nm (106 inch lbs.) and reconnect evap canister tube to the purge solenoid valve, and connect the evap canister purge solenoid valve and MAP Sensor followed by tp sensor, iac motor, and control port injector module to the related sockets. Install the clip bolt on the engine wiring harness with a 9 nm (80 inch lbs.) torque and position the bracket and cables onto the location at the Throttle Body installation and tighten the nuts with a 9 nm (80 inch lbs.) torque. Lastly, reconnect the a/c compressor clutch and a/c pressure switch connectors, place the engine wiring harness clip back to the accelerator control cable bracket, attach the accelerator cable to the bracket and Throttle Body lever, (and the cruise control cable if installed), and the reinstalling of the fuel pipes/hoses.

Related Chevrolet Silverado 1500 Classic Parts
 Chevrolet Silverado 1500 Classic Air Hose
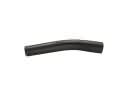 Chevrolet Silverado 1500 Classic Fuel Filler Hose
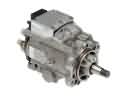 Chevrolet Silverado 1500 Classic Fuel Injection Pump
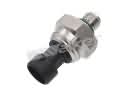 Chevrolet Silverado 1500 Classic Fuel Pressure Sensor
 Chevrolet Silverado 1500 Classic Fuel Pump Gasket
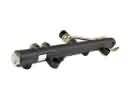 Chevrolet Silverado 1500 Classic Fuel Rail
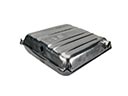 Chevrolet Silverado 1500 Classic Fuel Tank
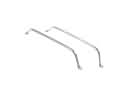 Chevrolet Silverado 1500 Classic Fuel Tank Strap
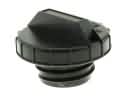 Chevrolet Silverado 1500 Classic Gas Cap
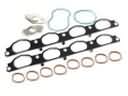 Chevrolet Silverado 1500 Classic Intake Manifold Gasket
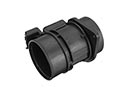 Chevrolet Silverado 1500 Classic Mass Air Flow Sensor
 Chevrolet Silverado 1500 Classic Throttle Cable