ChevyParts
My Garage
My Account
Cart
OEM Chevrolet Lift Support
Lift Support Shocks- Select Vehicle by Model
- Select Vehicle by VIN
Select Vehicle by Model
orMake
Model
Year
Select Vehicle by VIN
For the most accurate results, select vehicle by your VIN (Vehicle Identification Number).
305 Lift Supports found


Chevrolet Lift Cylinder, Passenger Side Part Number: 15130344
$43.05 MSRP: $86.44You Save: $43.39 (51%)Ships in 1-3 Business DaysProduct Specifications- Other Name: Strut, Lift Gate; Back Glass Lift Support; Liftgate Lift Support; Door Lift Support; Lift Support; Support Strut; Strut, End Gate Support
- Position: Passenger Side
- Replaces: 15168000, 15050912


Chevrolet Lift Cylinder, Passenger Side Part Number: 22743451
$49.52 MSRP: $98.52You Save: $49.00 (50%)Ships in 1-3 Business DaysProduct Specifications- Other Name: Strut, Lift Gate; Back Glass Lift Support; Liftgate Lift Support; Tailgate Lift Support; Door Lift Support; Lift Support; Support Cylinder; Strut, End Gate Support
- Position: Passenger Side
- Replaces: 15854712


Chevrolet Lift Cylinder Part Number: 23137745
$24.61 MSRP: $46.23You Save: $21.62 (47%)Ships in 1-2 Business DaysProduct Specifications- Other Name: Strut, End Gate Support; Back Glass Lift Support; Liftgate Lift Support; Door Lift Support; Lift Support
- Replaces: 25970284, 20880956


Chevrolet Lift Cylinder Part Number: 84183515
$88.29 MSRP: $150.34You Save: $62.05 (42%)Product Specifications- Other Name: Strut, Lift Gate; Liftgate Lift Support; Tailgate Lift Support; Door Lift Support; Lift Support; Support Cylinder; Lock; Strut, End Gate Support
- Replaces: 23431142, 23408748, 23487668


Chevrolet Lift Cylinder, Passenger Side Part Number: 23282828
$16.24 MSRP: $26.75You Save: $10.51 (40%)Product Specifications- Other Name: Strut Assembly-Lift Gate (Right-Hand); Back Glass Lift Support; Liftgate Lift Support; Door Lift Support; Lift Support
- Position: Passenger Side
- Replaces: 25978710

Chevrolet Lift Cylinder, Driver Side Part Number: 23282827
$16.24 MSRP: $26.75You Save: $10.51 (40%)Ships in 1-3 Business DaysProduct Specifications- Other Name: Strut Assembly-Lift Gate (Left-Hand); Back Glass Lift Support; Liftgate Lift Support; Door Lift Support; Lift Support
- Position: Driver Side
- Replaces: 25978709


Chevrolet Lift Cylinder, Passenger Side Part Number: 15093450
$27.43 MSRP: $45.21You Save: $17.78 (40%)Product Specifications- Other Name: Strut, End Gate Support; Liftgate Lift Support; Lift Support; Support Strut; Window Lift Cylinder; Strut
- Position: Passenger Side
- Replaces: 15042352


Chevrolet Support Cylinder, Passenger Side Part Number: 15147258
$28.83 MSRP: $47.48You Save: $18.65 (40%)Ships in 1-2 Business DaysProduct Specifications- Other Name: Strut, End Gate Support; Back Glass Lift Support; Liftgate Lift Support; Tailgate Lift Support; Lift Support
- Position: Passenger Side

Chevrolet Support Cylinder, Driver Side Part Number: 15147257
$28.83 MSRP: $47.48You Save: $18.65 (40%)Ships in 1-2 Business DaysProduct Specifications- Other Name: Strut, End Gate Support; Back Glass Lift Support; Liftgate Lift Support; Tailgate Lift Support; Lift Support
- Position: Driver Side


Chevrolet Lift Cylinder, Passenger Side Part Number: 15029088
$30.32 MSRP: $47.48You Save: $17.16 (37%)Ships in 1-3 Business DaysProduct Specifications- Other Name: Strut, End Gate Support; Back Glass Lift; Liftgate Support; Tailgate Support; Door Support.; Support Cylinder
- Position: Passenger Side


Chevrolet Lift Cylinder, Driver Side Part Number: 15029087
$28.83 MSRP: $47.48You Save: $18.65 (40%)Ships in 1-3 Business DaysProduct Specifications- Other Name: Strut, End Gate Support; Back Glass Lift; Liftgate Support; Tailgate Support; Door Support.; Support Cylinder
- Position: Driver Side


Chevrolet Lift Cylinder Part Number: 10274108
$36.43 MSRP: $60.02You Save: $23.59 (40%)Ships in 1-3 Business DaysProduct Specifications- Other Name: Strut Assembly-Hood; Hood Lift Support; Lift Support; Strut, Hood Panel


Chevrolet Lift Cylinder, Driver Side Part Number: 15161943
$37.09 MSRP: $61.48You Save: $24.39 (40%)Ships in 1-3 Business DaysProduct Specifications- Other Name: Strut, End Gate Support; Back Glass Lift Support; Liftgate Lift Support; Door Lift Support; Lift Support; Support Cylinder
- Position: Driver Side


Chevrolet Lift Cylinder Part Number: 10399704
$37.68 MSRP: $62.47You Save: $24.79 (40%)Product Specifications- Other Name: Strut Assembly-Hood; Hood Lift Support; Lift Support; Strut, Hood Panel


Chevrolet Lift Cylinder, Passenger Side Part Number: 25876680
$27.12 MSRP: $43.06You Save: $15.94 (38%)Ships in 1-2 Business DaysProduct Specifications- Other Name: Strut, Lift Gate; Back Glass Lift Support; Liftgate Lift Support; Door Lift Support; Lift Support
- Position: Passenger Side


Chevrolet Support Strut, Driver Side Part Number: 15093449
$27.12 MSRP: $43.06You Save: $15.94 (38%)Product Specifications- Other Name: Strut, End Gate Support; Window Lift Cylinder; Strut
- Position: Driver Side
- Replaces: 15042351


Chevrolet Lift Cylinder, Passenger Side Part Number: 15120903
$39.93 MSRP: $63.40You Save: $23.47 (38%)Ships in 1-2 Business DaysProduct Specifications- Other Name: Strut, End Gate Support; Back Glass Lift; Liftgate Hatch Door Support.; Support Strut
- Position: Passenger Side
- Replaces: 15079253, 15068722


Chevrolet Lift Cylinder, Driver Side Part Number: 15120902
$39.93 MSRP: $63.40You Save: $23.47 (38%)Ships in 1-2 Business DaysProduct Specifications- Other Name: Strut, End Gate Support; Back Glass Lift; Liftgate Hatch Door Support.; Support Strut
- Position: Driver Side
- Replaces: 15068721, 15079252

Chevrolet Lift Cylinder, Driver Side Part Number: 15766375
$52.10 MSRP: $82.73You Save: $30.63 (38%)Product Specifications- Other Name: Strut, End Gate Support; Back Glass Lift; Liftgate Support; Tailgate Support; Door Support.; Support Cylinder
- Position: Driver Side


Chevrolet Lift Cylinder Part Number: 23155754
$14.87 MSRP: $23.27You Save: $8.40 (37%)Ships in 1-3 Business DaysProduct Specifications- Other Name: Strut Assembly-Hood; Hood Lift Support; Lift Support; Support Cylinder; Strut, Hood Panel
| Page 1 of 16 |Next >
1-20 of 305 Results
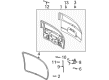
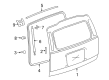
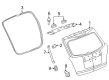
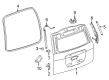
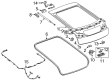
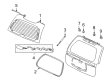
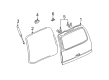
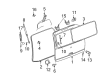
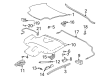
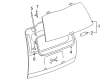
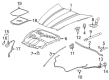
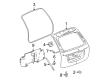
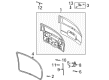
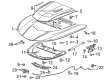
Chevrolet Lift Support
Choose OEM Lift Support, you're making the optimal decision for superior quality and perfect performance. You can feel confident because each component goes through stringent quality checks. Every part is carefully built to comply with Chevrolet's factory specifications. You'll enjoy a smooth, worry-free installation that fits just right. At ChevyPartsDeal.com, you'll find it easy to get top-quality OEM Chevrolet Lift Support. You can shop at highly competitive prices and protect your budget. All our genuine Chevrolet parts include a dependable manufacturer's warranty. You'll also appreciate our straightforward return policy and swift delivery services for extra convenience.
Chevrolet Lift Support provides the owners with the much needed relief of having the capability to raise and support the hood or liftgate with ease and comfort to ensure that routine checks or loading is safe and fast. Chevrolet has taken more than a century to develop cars with a combination of power, appearance and everyday utility. Since the first days of touring cars through the advanced SUVs and electric cars, the brand continues to score even higher with its fuel efficient engines, confident handling and intelligent driver aids. The new Super Cruise hands-free system, spacious cabins with user friendly technology and unique daring design that makes any Chevy one to be noticed have captured the recent attention. Whether the teenager heads to school or the family goes on the vacation Chevy will provide the comfort, safety and fun without breaking the wallet. This gas strut is a reservoir that contains compressed gas and it functions as a spring and damper in managing the rise and fall of heavy panels. The installation of a new Lift Support is not complex. Support the hood or the lift gate using a thick stick to ensure it does not fall. Note the position of the worn unit and then slide a flat object under each of the retaining clips and remove the sockets off the ball studs. Compare the replacement length, and add a dab of grease to each stud and place the rod downwards and press the sockets onto the balls till the clips cling. Position the panel into the final mold and repeat the process with the temporary prop removed and a couple of cycles to ensure the panel moves freely and the seal is tight.
Related Chevrolet Parts
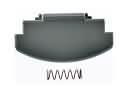 Chevrolet Center Console Latch
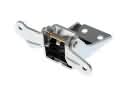 Chevrolet Door Hinge
 Chevrolet Door Lock Actuator
 Chevrolet Door Lock Cylinder
 Chevrolet Door Striker
 Chevrolet Air Deflector
 Chevrolet Car Mirror
 Chevrolet Convertible Top Motor
 Chevrolet Door Moldings
 Chevrolet Door Seal
 Chevrolet Side View Mirrors
 Chevrolet Windshield Wiper
Browse Chevrolet Lift Support by Models
Nova S10 Colorado Tahoe Cruze Malibu Camaro Equinox Impala SS SSR Avalanche Silverado 1500 Silverado 2500 HD Caprice Classic Cobalt Suburban Traverse Blazer HHR Sonic Tracker Volt Spark Trax Trailblazer Astro Cavalier Corvette Aveo Beretta Bolt EUV Bolt EV Celebrity Chevette City Express Corsica Express 1500 Express 2500 Express 3500 G10 G20 G30 K5 Blazer Lumina Metro Monte Carlo P30 Prizm S10 Blazer Silverado 2500 Sprint Uplander Venture Lumina APV Silverado 3500 Suburban 1500 Trailblazer EXT Avalanche 1500 Avalanche 2500 Aveo5 Blazer EV C10 Suburban C1500 Suburban C20 Suburban C2500 Suburban Captiva Sport Citation II Cruze Limited Equinox EV Impala Limited K10 Suburban K1500 Suburban K20 Suburban K2500 Suburban Malibu Limited R10 Suburban R1500 Suburban R20 Suburban R2500 Suburban Silverado 1500 HD Silverado 1500 LTD Silverado 3500 HD Silverado EV Spark EV Suburban 2500 Suburban 3500 HD Traverse Limited V10 Suburban V1500 Suburban V20 Suburban V2500 Suburban