ChevyParts
My Garage
My Account
Cart
OEM Chevrolet Impala Rod Bearing
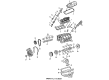
Engine Connecting Rod Bearing- Select Vehicle by Model
- Select Vehicle by VIN
Select Vehicle by Model
orMake
Model
Year
Select Vehicle by VIN
For the most accurate results, select vehicle by your VIN (Vehicle Identification Number).
9 Rod Bearings found

Chevrolet Impala Connecting Rod Bearing Part Number: 12657438
$12.62 MSRP: $20.04You Save: $7.42 (38%)Ships in 1-3 Business Days

Chevrolet Impala Bearing Part Number: 89017573
$15.64 MSRP: $25.77You Save: $10.13 (40%)Ships in 1-3 Business Days


Chevrolet Impala Connecting Rod Bearing Part Number: 12643667
$11.33 MSRP: $17.76You Save: $6.43 (37%)Ships in 1-2 Business Days


Chevrolet Impala Bearing Set, Green Line Part Number: 12591093
$42.83 MSRP: $74.79You Save: $31.96 (43%)Ships in 1-3 Business Days
Chevrolet Impala Rod Bearings Part Number: 89017700
$15.69 MSRP: $25.84You Save: $10.15 (40%)Ships in 1-2 Business Days
Chevrolet Impala Connecting Rod Bearing Part Number: 12523924
$34.44 MSRP: $54.67You Save: $20.23 (37%)Ships in 1 Business Day

Chevrolet Impala Bearings Part Number: 89060553
$6.22 MSRP: $9.74You Save: $3.52 (37%)
Chevrolet Impala Bearings Part Number: 18008494

Chevrolet Impala Connecting Rod Bearing Part Number: 12480255
$0.38 MSRP: $0.59You Save: $0.21 (36%)
Chevrolet Impala Rod Bearing
Want to cut long-term maintenance and repair costs? Choose OEM Rod Bearing. Those parts deliver top durability you can trust. On our site, you'll find a huge catalog of genuine Chevrolet Impala parts. Prices are unbeatable, so you can keep more in your pocket. Every OEM Chevrolet Impala Rod Bearing includes a manufacturer's warranty. You can also get an easy return policy that keeps buying risk free. Fast delivery, get your car on the road quickly. It's simple to search, compare, and order. Stop guessing about quality or fit. Order today and save with parts that last.
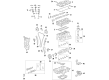
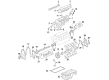
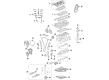
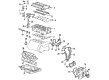
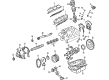
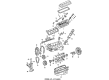
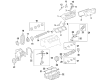
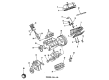
Chevrolet Impala Rod Bearing is an important part of the vehicle that contributes largely to boosting up Chevrolet Impala's performance as well as its durability. The Rod Bearing plays a very important role of bearing the crankshaft and connecting rods as it facilitates the rotation while at the same time reducing the friction on the engine which is very vital in the longevity of the vehicle's engine. There are different types of bearings used in the Impala models manufactured by Chevrolet: Chevrolet has used Rod Bearings of different type and tri-metal have been widely used the most as they are stronger and more fatigue resistant. Said advanced Rod Bearings could include dry film lubricant coatings and customized pre-camber for better oil fitment compounded by increased oil hole size. This fine attention of detail does not only improve the efficiency of the Chevrolet Impala but also contributes to safety by constantly checking and monitoring the oil clearance generally to range between 0.001" and 0.0035". The Chevrolet Impala has had a glorious run since its first generation in the year 1958 up to the tenth generation of the year 2020 and provides the prime of both worlds as far as engine options are concerned right from the V8s to the highly efficient modern auto engines. The use of reliable and durable Rod Bearings in the manufacturing of Chevrolet Impala leads to its reliability which makes drivers opt for it. As for features, the Chevrolet Impala Rod Bearing has become one of the body kits that focuses on performance and comfort in the automotive market to reaffirm the car's full-sized sedan design and power and safe, efficient, responsive range of models.
Chevrolet Impala Rod Bearing Parts and Q&A
- Q: What additional engine repair information can be found for the service and repair of the connecting rod bearing on Chevrolet Impala?A:For information on repairing and servicing bearing on connecting rods, additional engine repair directions are available elsewhere. When an internal engine component is not given a special service procedure, it shows that the manufacturer has not prepared one. To do engine overhaul, important steps in unit repair include service operations, machining, cleaning, inspection and fitting, including boring and honing the cylinder, fitting connecting rod with bearings, Crankshaft with bearings and camshaft bearings, disassembling the connecting rod and Piston, cylinder head, valve-related components and Oil Pump, fitting in Piston and rings and fixing thread damage, as well as valve and seat grinding tasks found during Cylinder Head assembly. Chain, belt and gears are the main parts in timing components service.
- Q: How to replace the connecting rod bearing on Chevrolet Impala?A:To dismantle the connecting Rod Bearing one will need to collect the following tools: connecting rod bolt guide set (J 5239), torque angle meter (J 36660-A), cylinder bore ridge reamer (J 24270). Start by removing the Oil Pan, and Oil Pump off the Crankshaft oil deflector. Rotate the Crankshaft together with the Piston and rod assembly to be serviced to bottom dead center (BDC), of course making sure that match marks on the connecting rod and caps are used. Remove nuts of connecting rods, cap, and also lower connecting rods bearing with caution and also install thread protector to prevent Crankshaft journal damage. Replace the lower Piston, upper connecting Rod Bearing, then push the Piston and connecting rod up the cylinder to access the top of the Piston and bolt what's called the tope Piston before installing lower Piston, lower Piston, back bearing, upper Rod Bearing, new Piston browning up from bottom, and reverse all the steps. Clean off oil from the connecting rod bearings and Crankshaft journal, then check all components. For installation, oil the top connecting Rod Bearing with new engine oil and use the j 5239 in lowering the Piston and rod assembly to crank. Install the lower connecting Rod Bearing in the cap, oil it, and install the connecting rod cap and nuts with proper torque. It is also recommended to measure the connecting rod side clearance and install Crankshaft oil deflector, Oil Pump, and Oil Pan then lower the vehicle after installation. Put on new engine oil on the Piston, rings, cylinder bore, and bearing surfaces; using the Piston ring compressor (J 8037), compress the Piston rings and fit the Piston to its original bore. Follow similar ease with the installation of the connecting rod to make sure that any component is tightened and checked for any problem before reassembling the engine.


Related Chevrolet Impala Parts
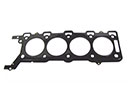 Chevrolet Impala Head Gasket
 Chevrolet Impala Oil Pan
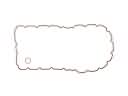 Chevrolet Impala Oil Pan Gasket
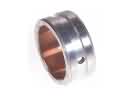 Chevrolet Impala Balance Shaft Bearing Set
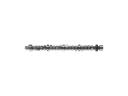 Chevrolet Impala Camshaft
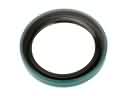 Chevrolet Impala Crankshaft Seal
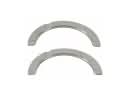 Chevrolet Impala Crankshaft Thrust Washer Set
 Chevrolet Impala Pushrod
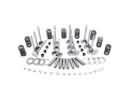 Chevrolet Impala Rocker Shaft Spring Kit
 Chevrolet Impala Timing Belt Tensioner
 Chevrolet Impala Timing Cover Gasket
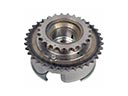 Chevrolet Impala Variable Timing Sprocket