ChevyParts
My Garage
My Account
Cart
OEM Saturn Fuel Level Sensor
Gas Gauge Sensor- Select Vehicle by Model
- Select Vehicle by VIN
Select Vehicle by Model
orMake
Model
Year
Select Vehicle by VIN
For the most accurate results, select vehicle by your VIN (Vehicle Identification Number).
17 Fuel Level Sensors found


Saturn Fuel Gauge Sending Unit Part Number: 19168971
$74.79 MSRP: $140.46You Save: $65.67 (47%)Ships in 1-2 Business DaysProduct Specifications- Other Name: Sensor Kit, Fuel Tank Meter/Pump; Fuel Level Sensor; Fuel Sending Unit; Level Sensor
- Replaces: 19121351, 88965566

Saturn Fuel Gauge Sending Unit Part Number: 15856782
$74.14 MSRP: $137.82You Save: $63.68 (47%)Ships in 1-2 Business DaysProduct Specifications- Other Name: Sensor Kit, Fuel Tank Meter/Pump; Fuel Level Sensor; Fuel Sending Unit; Level Sensor
- Replaces: 15245453, 22718238

Saturn Fuel Gauge Sending Unit, Green Line Part Number: 19180190
$74.45 MSRP: $152.99You Save: $78.54 (52%)Ships in 1-2 Business DaysProduct Specifications- Other Name: Sensor Kit, Fuel Tank Meter/Pump; Fuel Level Sensor; Fuel Sending Unit; Level Sensor; Fuel Sender Unit; Sending Unit
- Replaces: 19153328

Saturn Fuel Gauge Sending Unit Part Number: 19332414
$77.61 MSRP: $159.50You Save: $81.89 (52%)Ships in 1-2 Business DaysProduct Specifications- Other Name: Sensor Kit, Fuel Tank Meter/Pump; Fuel Level Sensor; Fuel Sending Unit; Level Sensor
- Replaces: 19177348, 88967308

Saturn Fuel Gauge Sending Unit, Driver Side Part Number: 19256248
$72.63 MSRP: $145.24You Save: $72.61 (50%)Ships in 1-2 Business DaysProduct Specifications- Other Name: Sensor Kit, Fuel Tank Meter/Pump; Fuel Level Sensor; Fuel Sending Unit; Level Sensor
- Position: Driver Side
- Replaces: 19180443

Saturn Fuel Gauge Sending Unit Part Number: 19153220
$79.89 MSRP: $144.60You Save: $64.71 (45%)Ships in 1-2 Business DaysProduct Specifications- Other Name: Sensor Kit, Fuel Tank Meter/Pump; Fuel Level Sensor; Fuel Sending Unit; Level Sensor

Saturn Fuel Gauge Sending Unit Part Number: 84084766
$75.01 MSRP: $220.52You Save: $145.51 (66%)Ships in 1-2 Business DaysProduct Specifications- Other Name: Sensor Kit-Fuel Level; Fuel Level Sensor; Fuel Sending Unit; Level Sensor; Sensor Kit, Fuel Tank Meter/Pump
- Replaces: 19167429, 22753589, 23240487


Saturn Fuel Gauge Sending Unit Part Number: 19167438
$59.95 MSRP: $107.08You Save: $47.13 (45%)Product Specifications- Other Name: Sensor Kit, Fuel Tank Meter/Pump; Fuel Level Sensor; Fuel Sending Unit; Level Sensor; Sending Unit; Partition
- Replaces: 88967289

Saturn Fuel Gauge Sending Unit, Passenger Side Part Number: 22716734
Product Specifications- Other Name: Sensor Kit, Fuel Tank Meter/Pump; Fuel Level Sensor; Fuel Sending Unit; Level Sensor
- Position: Passenger Side

Saturn Fuel Gauge Sending Unit Part Number: 21015335
Product Specifications- Other Name: Sender, Fuel Tank Meter/Pump; Fuel Level Sensor; Fuel Sending Unit; Sending Unit
Saturn Fuel Gauge Sending Unit, Driver Side Part Number: 22716733
Product Specifications- Other Name: Sensor Kit, Fuel Tank Meter/Pump; Fuel Level Sensor; Fuel Sending Unit; Level Sensor
- Position: Driver Side

Saturn Fuel Gauge Sending Unit Part Number: 22681970
Product Specifications- Other Name: Sender, Fuel; Fuel Level Sensor; Fuel Sending Unit; Sending Unit; Sender, Fuel Tank Meter/Pump
Saturn Fuel Gauge Sending Unit Part Number: 19245460
Product Specifications- Other Name: Sensor Kit, Fuel Tank Meter/Pump; Fuel Level Sensor; Fuel Sending Unit; Sending Unit; Sender, Fuel Tank Meter/Pump
- Replaces: 21008432

Saturn Fuel Gauge Sending Unit Part Number: 15870643
Product Specifications- Other Name: Sensor Kit, Fuel Tank Meter/Pump; Fuel Level Sensor; Fuel Sending Unit; Level Sensor
- Replaces: 22710506
Saturn Fuel Gauge Sending Unit, Passenger Side Part Number: 15870642
Product Specifications- Other Name: Sensor Kit, Fuel Tank Meter/Pump; Fuel Level Sensor; Fuel Sending Unit; Level Sensor
- Position: Passenger Side
Saturn Fuel Gauge Sending Unit, Passenger Side Part Number: 15867654
Product Specifications- Other Name: Sensor Kit, Fuel Tank Meter/Pump; Fuel Level Sensor; Fuel Sending Unit; Level Sensor
- Position: Passenger Side
Saturn Fuel Gauge Sending Unit, Driver Side Part Number: 15867653
Product Specifications- Other Name: Sensor Kit, Fuel Tank Meter/Pump; Fuel Level Sensor; Fuel Sending Unit; Level Sensor
- Position: Driver Side
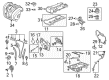
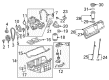
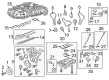
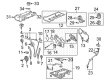
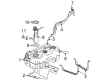
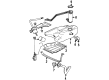
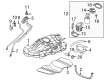
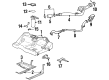
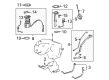
Saturn Fuel Level Sensor
Choose OEM Fuel Level Sensor, you're making the optimal decision for superior quality and perfect performance. You can feel confident because each component goes through stringent quality checks. Every part is carefully built to comply with Saturn's factory specifications. You'll enjoy a smooth, worry-free installation that fits just right. At ChevyPartsDeal.com, you'll find it easy to get top-quality OEM Saturn Fuel Level Sensor. You can shop at highly competitive prices and protect your budget. All our genuine Saturn parts include a dependable manufacturer's warranty. You'll also appreciate our straightforward return policy and swift delivery services for extra convenience.
The Saturn Fuel Level Sensor is installed in the tank and is made up of a float and strip of resistors, which measure the amount of gasoline remaining in the tank and transmit that value to the gauge and computer. The Saturn panels shake off parking lot dings unlike the tin-can compacts, which rust and rattle within a few winters; hence, paint is unchipped and the metal under the skin remains undamaged. Lost-foam casting subtracted pounds from the aluminum block, which provided each Saturn a more energetic launch at the moment the light turns green and saved it on long trips. The deep-dip paint method is applied to impregnate every part of the body with a protective surface in areas other paints fail, preventing salt from eating away rocker panels. Combine these body and engine advantages with a reliable Fuel Level Sensor and the odometer will be able to travel well without the cabin making a sound or the gauge beginning to lie. Replacement of an exhausted Fuel Level Sensor requires parking on a flat surface, resting the brake, and unscrewing the negative battery cable. Lift the rear seat or drop the tank in your Saturn, brush off any dirt on the lock ring. Unplug the wiring, pinch the fuel lines just in time, spin the ring, and lift up the module. Place a new seal and slide it in, then lower the fresh Fuel Level Sensor to clear the float, tighten the ring, and reconnect the line and connector, then reconnect the battery, cycle the key two times, and ensure that the gauge is starting up dry.