ChevyParts
My Garage
My Account
Cart
OEM Pontiac Ball Joint
Control Arm Joint- Select Vehicle by Model
- Select Vehicle by VIN
Select Vehicle by Model
orMake
Model
Year
Select Vehicle by VIN
For the most accurate results, select vehicle by your VIN (Vehicle Identification Number).
18 Ball Joints found


Pontiac Lower Ball Joint Part Number: 96535089
$34.77 MSRP: $84.86You Save: $50.09 (60%)Ships in 1-2 Business DaysProduct Specifications- Other Name: Joint, Front Lower Control Arm Ball; Suspension Ball Joint; Ball Joint; Joint, Front Wheel Lower Control Arm
- Position: Lower


Pontiac Ball Joint, Front Lower Part Number: 17989117
$44.93 MSRP: $71.33You Save: $26.40 (38%)Ships in 1-3 Business DaysProduct Specifications- Other Name: Stud Kit, Front Lower Control Arm Ball; Suspension Ball Joint
- Position: Front Lower


Pontiac Ball Joint, Front Upper Part Number: 88911387
$34.91 MSRP: $62.33You Save: $27.42 (44%)Ships in 1-3 Business DaysProduct Specifications- Other Name: Joint Kit, Front Upper Control Arm Ball; Suspension Ball Joint
- Position: Front Upper
- Replaced by: 19460397

Pontiac Ball Joint, Front Lower Part Number: 22156472
$40.37 MSRP: $77.00You Save: $36.63 (48%)Ships in 1-2 Business DaysProduct Specifications- Other Name: Stud Assembly, Front Lower Control Arm Ball; Ball Joints; Lower Ball Joint
- Position: Front Lower

Pontiac Ball Joint Part Number: 88967438
$53.24 MSRP: $106.88You Save: $53.64 (51%)Product Specifications- Other Name: Stud Kit, Front Lower Control Arm Ball; Suspension Ball Joint
- Replaces: 22157023


Pontiac Ball Joint Part Number: 88965333
$48.48 MSRP: $82.54You Save: $34.06 (42%)Ships in 1-2 Business DaysProduct Specifications- Other Name: Stud Kit, Front Lower Control Arm Ball; Suspension Ball Joint
- Replaces: 22157089, 88955451

Pontiac Lower Ball Joint, Front Part Number: 19184280
$22.95 MSRP: $23.86You Save: $0.91 (4%)Ships in 1-2 Business DaysProduct Specifications- Other Name: Stud Kit, Front Lower Control Arm Ball; Suspension Ball Joint; Ball Joint; Stud Kit, Front Wheel Lower Control Arm
- Position: Front Lower
- Replaces: 88972115

Pontiac Ball Joint, Front Lower Part Number: 17988890
$44.93 MSRP: $71.33You Save: $26.40 (38%)Ships in 1-3 Business DaysProduct Specifications- Other Name: Ball Joint Kit, Front Wheel Lower Control Arm; Suspension Ball Joint; Lower Ball Joint
- Position: Front Lower
Pontiac Ball Joints Part Number: 9767781
Product Specifications- Other Name: Lower Ball Joint; Suspension Ball Joint; Ball Joint

Pontiac Lower Ball Joint Part Number: 88965475
Product Specifications- Other Name: Stud Kit, Front Lower Control Arm Ball; Suspension Ball Joint; Ball Joint
- Position: Lower
- Replaces: 09766421, 9766421

Pontiac Ball Joint, Lower Part Number: 9769592
Product Specifications- Other Name: Ball Joint Kit, Front Lower Control Arm
- Position: Lower

Pontiac Ball Joints, Lower Part Number: 9769579
Product Specifications- Other Name: Stud, Front Lower Control Arm Ball; Suspension Ball Joint; Ball Joint
- Position: Lower

Pontiac Ball Joints, Front Lower Part Number: 22156500
Product Specifications- Other Name: Ball Joint Kit, Front Wheel Lower Control Arm; Suspension Ball Joint
- Position: Front Lower

Pontiac Ball Joints, Upper Part Number: 22145478
Product Specifications- Other Name: Stud Kit, Upper Control Arm Shaft; Suspension Ball Joint; Ball Joint; Upper Ball Joint
- Position: Upper

Pontiac Ball Joint, Front Lower Part Number: 22113159
Product Specifications- Other Name: Stud, Front Lower Control Arm Ball
- Position: Front Lower
- Replaces: 22112893

Pontiac Ball Joint, Front Lower Part Number: 19416895
Product Specifications- Other Name: Stud Kit, Front Lower Control Arm Ball
- Position: Front Lower
- Replaces: 09767281, 19122185, 9767281
Pontiac Ball Joint, Front Lower Part Number: 17983075
Product Specifications- Other Name: Stud Kit, Front Lower Control Arm Ball; Suspension Ball Joint
- Position: Front Lower
Pontiac Lower Ball Joint, Front Part Number: 19184279
$21.66 MSRP: $33.93You Save: $12.27 (37%)Product Specifications- Other Name: Stud Kit, Front Lower Control Arm Ball; Suspension Ball Joint; Ball Joint; Stud Kit, Front Wheel Lower Control Arm
- Position: Front Lower
Pontiac Ball Joint
Choose OEM Ball Joint, you're making the optimal decision for superior quality and perfect performance. You can feel confident because each component goes through stringent quality checks. Every part is carefully built to comply with Pontiac's factory specifications. You'll enjoy a smooth, worry-free installation that fits just right. At ChevyPartsDeal.com, you'll find it easy to get top-quality OEM Pontiac Ball Joint. You can shop at highly competitive prices and protect your budget. All our genuine Pontiac parts include a dependable manufacturer's warranty. You'll also appreciate our straightforward return policy and swift delivery services for extra convenience.
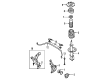
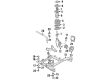
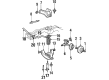
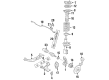
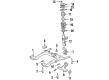
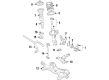
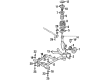
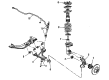
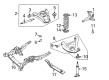
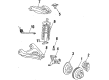
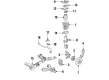
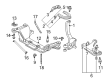
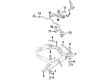
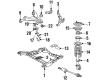
Pontiac Ball Joint is a swivel made of steel that connects the control arm and steering knuckle, thus enabling it to easily steer, have a firm suspension, and maintain a straight wheel path. Since its debut in 1926, Pontiac pursued road excitement versus showroom shine, providing drivers with wide roads hugging curves and carving stances. Firebird gulped the air and the Grand Am was comfortable with reflexes, blending with calm, and Pontiac was always on the side of the one at the wheel. The car interiors were covered with gauges that were driver-wrapped, the shifters were placed in a palm-like spot, and suspension tuning was a compromise between weekend and weekday driving. All throttle thrusts were visceral since Pontiac tuned the powertrains to respond instantly rather than corporate boasting. It has a factory Ball Joint that is sealed with grit so that steering remains sharp after rough winters. Outside modifications were strutting with technology such as disc brakes, rack steering, and thick control arms, coming early, allowing the owner to be in control when pavement becomes challenging. In case the original Ball Joint is worn, it can easily be replaced at home as long as one is organized. Find level ground, loosen chock wheels, jack the car, and place it on stands. Take out the wheel, draw the cotter pin, loosen the castle nut, use a pickle fork or press to clear the stud. Unscrew the end of the control arm, push the worn Ball Joint out of it, clean the bore, and force the fresh unit into it until the circlip clips. Install the fresh cotter pin, screw on the stud, attach the torque fasteners, reattach the wheel, lower the car, and check with a slow test run.
Related Pontiac Parts
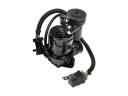 Pontiac Air Suspension Compressor
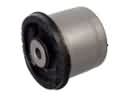 Pontiac Axle Beam Mount
 Pontiac Control Arm Bracket
 Pontiac Control Arm Bumper
 Pontiac Control Arm Bushing
 Pontiac Differential Cover
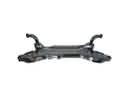 Pontiac Front Cross-Member
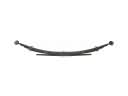 Pontiac Leaf Spring
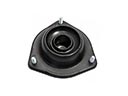 Pontiac Shock And Strut Mount
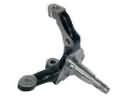 Pontiac Spindle
 Pontiac Suspension Strut Rod
 Pontiac Trailing Arm