ChevyParts
My Garage
My Account
Cart
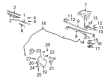
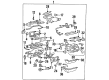
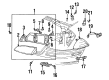
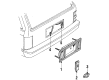
OEM Oldsmobile Turn Signal Light Connector
Turn Signal Lamp Connector- Select Vehicle by Model
- Select Vehicle by VIN
Select Vehicle by Model
orMake
Model
Year
Select Vehicle by VIN
For the most accurate results, select vehicle by your VIN (Vehicle Identification Number).
21 Turn Signal Light Connectors found


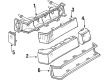
Oldsmobile Wire Harness, Black Part Number: 13586139
$32.51 MSRP: $61.06You Save: $28.55 (47%)Ships in 1-2 Business DaysProduct Specifications- Other Name: Connector Assembly, Wiring Harness W/Leads *Black; Headlight Connector; Door Jamb Switch; Lamp Switch Connector; Connector Kit; Connector
- Replaces: 21025422, 12101864


Oldsmobile Harness Connector, Black Part Number: 12117025
$37.70 MSRP: $70.80You Save: $33.10 (47%)Ships in 1-2 Business DaysProduct Specifications- Other Name: Connector-W/Leads, 3-Way F. *Black; Headlight Connector


Oldsmobile Socket & Wire, Gray Part Number: 19368034
$28.58 MSRP: $52.70You Save: $24.12 (46%)Ships in 1-2 Business DaysProduct Specifications- Other Name: Connector Kit, Wiring Harness *Gray
- Replaces: 12116958, 15306302, 21022284


Oldsmobile Wire Connector Part Number: 12085535
$20.51 MSRP: $38.52You Save: $18.01 (47%)Ships in 1-2 Business DaysProduct Specifications- Other Name: Connector, Chassis/Body Marker/Hazard


Oldsmobile Control Module Connector, Black Part Number: 15306189
$59.41 MSRP: $130.98You Save: $71.57 (55%)Ships in 1-2 Business DaysProduct Specifications- Other Name: Connector, Air Conditioner Instrument Panel
- Replaces: 12101833, 12089287, 12162066, 15306181


Oldsmobile Oil Level Sensor, Black, Passenger Side Part Number: 13586114
$26.54 MSRP: $48.68You Save: $22.14 (46%)Ships in 1-2 Business DaysProduct Specifications- Other Name: Connector Assembly, Wiring Harness W/Leads *Black; Windshield Washer Hose Connector; Back Up Light Switch; Oil Dipstick
- Position: Passenger Side
- Replaces: 12102747

Oldsmobile Level Sensor Connector Part Number: 12167116
$37.52 MSRP: $70.46You Save: $32.94 (47%)Ships in 1-2 Business DaysProduct Specifications- Other Name: Connector, Computer Control Sensors

Oldsmobile Door Jamb Switch Part Number: 12101855
$31.44 MSRP: $59.04You Save: $27.60 (47%)Ships in 1-2 Business DaysProduct Specifications- Other Name: Connector, Air Conditioner Evaporator Blower

Oldsmobile Sensor Connector, Black Part Number: 12101854
$35.96 MSRP: $114.12You Save: $78.16 (69%)Ships in 1-2 Business DaysProduct Specifications- Other Name: Connector-W/Leads, 6-Way F. *Black

Oldsmobile Socket & Wire, Black Part Number: 19368709
$27.10 MSRP: $49.33You Save: $22.23 (46%)Ships in 1-2 Business DaysProduct Specifications- Other Name: Connector Kit, Wiring Harness *Black; Windshield Washer Hose; Headlight Connector & Socket; Bulb Socket
- Replaces: 12102664


Oldsmobile Socket Part Number: 12101898
$30.49 MSRP: $54.66You Save: $24.17 (45%)Ships in 1-2 Business DaysProduct Specifications- Other Name: Connector, Wiring Harness; Headlight Connector; Headlight Socket; Bulb Socket

Oldsmobile Connector Retainer Part Number: 13586175
$5.82 MSRP: $9.13You Save: $3.31 (37%)Ships in 1-2 Business DaysProduct Specifications- Other Name: Connector Kit, Wiring Harness
- Replaces: 12059296, 12020833


Oldsmobile Connector Part Number: 15305888
$36.43 MSRP: $78.86You Save: $42.43 (54%)Ships in 1 Business DayProduct Specifications- Other Name: Connector, Air Conditioner Electric Temperature And Motor Control
- Replaces: 12126415


Oldsmobile Bulb Socket, Amber Lens Part Number: 12013813
$22.98 MSRP: $34.21You Save: $11.23 (33%)Product Specifications- Other Name: Connector, Turn Signal & Cornering Lamp; Tail Light Holders; Tail Light Socket; Headlight Socket; Car Bulbs

Oldsmobile Bulb Socket, Amber Lens Part Number: 8909518
Product Specifications- Other Name: Socket Assembly - Backing Lamp; Tail Light Socket

Oldsmobile Switch Assembly Connector, Driver Side Part Number: 12085536
$36.13 MSRP: $64.52You Save: $28.39 (44%)Product Specifications- Other Name: Connector, Inline-To Instrument Panel Harness
- Position: Driver Side

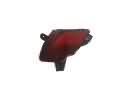
Oldsmobile Side Marker Lamp Part Number: 8912750
Product Specifications- Other Name: Socket/Wiring; Tail Light Holders; Tail Light Socket; Bumper Reflector; Headlight Socket; Bulb Socket

Oldsmobile Socket & Wire Part Number: 12027133
Product Specifications- Other Name: Socket, Back Up Lamp; Tail Light Holders; Tail Light Socket; Bulb Socket

Oldsmobile Socket & Wire Part Number: 8914822
Product Specifications- Other Name: Socket Assembly, Stop & T/Plain

Oldsmobile Socket & Wire Part Number: 8914823
Product Specifications- Other Name: Socket/Wiring; Tail Light Holders; Tail Light Socket
| Page 1 of 2 |Next >
1-20 of 21 Results
Oldsmobile Turn Signal Light Connector
Choose OEM Turn Signal Light Connector, you're making the optimal decision for superior quality and perfect performance. You can feel confident because each component goes through stringent quality checks. Every part is carefully built to comply with Oldsmobile's factory specifications. You'll enjoy a smooth, worry-free installation that fits just right. At ChevyPartsDeal.com, you'll find it easy to get top-quality OEM Oldsmobile Turn Signal Light Connector. You can shop at highly competitive prices and protect your budget. All our genuine Oldsmobile parts include a dependable manufacturer's warranty. You'll also appreciate our straightforward return policy and swift delivery services for extra convenience.
Oldsmobile Turn Signal Light Connector provides a clean electrical conduct that ensures that your blinkers are bright and reliable and they fit with the smooth driving experience that Oldsmobile owners demand. Along the way since its inception in 1897 Oldsmobile advanced the car industry with its Curved Dash, which taught the world that cars did not need to be costly, then with Hydra-Matic so that drivers no longer needed to balance a clutch and cruise in traffic. Putting emphasis on proper tuned engines, quiet cabins and good build quality, Oldsmobile developed a reputation of being comfortable and confident on long journeys, proving that continuous innovation can be your close companion and hand in hand with daily reliability. The experience of Oldsmobile in facilitating road traveling over an extended period of its history is why each minor component, such as Turn Signal Light Connector, has to work perfectly. The connector between the lamp and wiring harness is a Turn Signal Light Connector which keeps moisture and vibration out of the lamp, ensuring that the signal is never flickering. Installation, parking, and cutting power, removing the screws of the lens, slide out of the lamp housing, press the tab, and yank the worn connector out. Compare the new Turn Signal Light Connector, and align the keyed terminals, and then push until you hear a click to indicate that the fit is in place. Clear the loom of hot metal or sharp edges, attach the clips, replace the housing and the lens, re-connect the power and check left, right, and hazard flashes to ensure clean illumination.
Related Oldsmobile Parts
 Oldsmobile Bumper Reflector
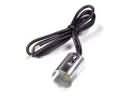 Oldsmobile Dome Light Connector
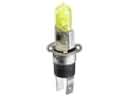 Oldsmobile Fog Light Bulb
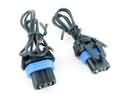 Oldsmobile Fog Light Connector
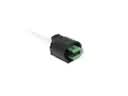 Oldsmobile Forward Light Harness Connector
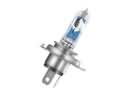 Oldsmobile Headlight Bulb
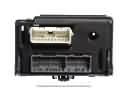 Oldsmobile Light Control Module
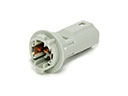 Oldsmobile Light Socket
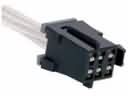 Oldsmobile Power Seat Connector
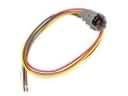 Oldsmobile Rear Light Harness Connector
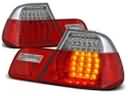 Oldsmobile Tail Light
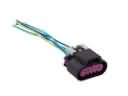 Oldsmobile Tail Light Connector