ChevyParts
My Garage
My Account
Cart
OEM Oldsmobile Dome Light Connector
Interior Dome Light Connector- Select Vehicle by Model
- Select Vehicle by VIN
Select Vehicle by Model
orMake
Model
Year
Select Vehicle by VIN
For the most accurate results, select vehicle by your VIN (Vehicle Identification Number).
14 Dome Light Connectors found


Oldsmobile Control Module Connector, Black Part Number: 15306189
$59.41 MSRP: $130.98You Save: $71.57 (55%)Ships in 1-2 Business DaysProduct Specifications- Other Name: Connector, Air Conditioner Instrument Panel
- Replaces: 12101833, 12089287, 12162066, 15306181


Oldsmobile Wire Connector Part Number: 12085535
$20.51 MSRP: $38.52You Save: $18.01 (47%)Ships in 1-2 Business DaysProduct Specifications- Other Name: Connector, Chassis/Body Marker/Hazard

Oldsmobile Door Ajar Switch Part Number: 12101848
$22.72 MSRP: $42.66You Save: $19.94 (47%)Ships in 1-2 Business DaysProduct Specifications- Other Name: Connector, Wiring Harness


Oldsmobile Wire Harness, Black Part Number: 13586139
$32.51 MSRP: $61.06You Save: $28.55 (47%)Ships in 1-2 Business DaysProduct Specifications- Other Name: Connector Assembly, Wiring Harness W/Leads *Black; Headlight Connector; Door Jamb Switch; Lamp Switch Connector; Connector Kit; Connector
- Replaces: 21025422, 12101864


Oldsmobile Oil Level Sensor, Black, Passenger Side Part Number: 13586114
$26.54 MSRP: $48.68You Save: $22.14 (46%)Ships in 1-2 Business DaysProduct Specifications- Other Name: Connector Assembly, Wiring Harness W/Leads *Black; Windshield Washer Hose Connector; Back Up Light Switch; Oil Dipstick
- Position: Passenger Side
- Replaces: 12102747

Oldsmobile Door Jamb Switch Part Number: 19329253
$36.20 MSRP: $115.74You Save: $79.54 (69%)Ships in 1-2 Business DaysProduct Specifications- Other Name: Connector Kit-Wiring Harness
- Replaces: 19115673, 15306397, 15306197, 19257375, 19303743, 88986450, 13584433

Oldsmobile Connector Retainer Part Number: 13586175
$5.82 MSRP: $9.13You Save: $3.31 (37%)Ships in 1-2 Business DaysProduct Specifications- Other Name: Connector Kit, Wiring Harness
- Replaces: 12059296, 12020833

Oldsmobile Courtesy Lamp Part Number: 12167138
$18.65 MSRP: $28.14You Save: $9.49 (34%)Ships in 1-2 Business DaysProduct Specifications- Other Name: Socket; Interior Lights
- Replaces: 12007642

Oldsmobile Socket & Wire, Gray, Rear Part Number: 8901283
$43.84 MSRP: $68.61You Save: $24.77 (37%)Ships in 1-2 Business DaysProduct Specifications- Other Name: Socket & Wire Assembly-Rear Side Marker Lamp (Wedge Bse W*Gray; Tail Light Holders; Tail Light Socket; Bulb Socket
- Position: Rear


Oldsmobile Connector Part Number: 15306009
$33.42 MSRP: $59.68You Save: $26.26 (44%)Product Specifications- Other Name: Connector, Generator; Headlight Connector
- Replaces: 12186568, 12085537


Oldsmobile Lamp Housing Part Number: 25675798
Product Specifications- Other Name: Connector, Courtesy/Dome/Reading Lamp; Connector


Oldsmobile Connector, Black Part Number: 12125676
Product Specifications- Other Name: Connector-W/Leads, 10-Way F. *Black

Oldsmobile Switch Assembly Connector, Driver Side Part Number: 12085536
$36.13 MSRP: $64.52You Save: $28.39 (44%)Product Specifications- Other Name: Connector, Inline-To Instrument Panel Harness
- Position: Driver Side

Oldsmobile Wire Harness Part Number: 15079776
Product Specifications- Other Name: Harness; Harness, Dome Lamp
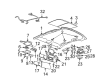
Oldsmobile Dome Light Connector
Choose OEM Dome Light Connector, you're making the optimal decision for superior quality and perfect performance. You can feel confident because each component goes through stringent quality checks. Every part is carefully built to comply with Oldsmobile's factory specifications. You'll enjoy a smooth, worry-free installation that fits just right. At ChevyPartsDeal.com, you'll find it easy to get top-quality OEM Oldsmobile Dome Light Connector. You can shop at highly competitive prices and protect your budget. All our genuine Oldsmobile parts include a dependable manufacturer's warranty. You'll also appreciate our straightforward return policy and swift delivery services for extra convenience.
The Oldsmobile Dome Light Connector supplies the roof lamp with consistent power in order to have the cabin bright whenever a door is opened. Since Oldsmobile is a brand that originated in 1897, it was the first company to implement a moving assembly line, and some of its cars, such as the cheaper Curved Dash, were affordable to families. It subsequently became part of General Motors and continued to push the boundaries with innovations like the Hydra-Matic automatic transmission which was invented in 1940 and eliminated the need to have a clutch and made driving easier. Oldsmobile also engineered its engines, lowered cabin noise by design, and gained a reputation of reliability and comfort to allow the owners to take long trips without worrying of their car. The years of gradual improvement demonstrated how Oldsmobile was able to combine innovation with its value. The Dome Light Connector itself is a miniature plastic fitting that enters the roof harness and carries twelve volt current but still allows one to service the interior lamp. Installation requires disconnection of the battery should be done to avoid short circuiting during the installation of a new Dome Light Connector. Use a trim tool to pop off the dome lens then remove the bulb holder to reveal the plug. Carefully unscrew and remove the old connector, paying attention to the colours of the wires and the sequence of pins. Removal of any damaged wires on the ends of the wire, replacing damaged wire ends with new terminals or the pre-terminated connector, and pushing the pins until they snap. Plug the connector back into the bracket, slide the loom out of the sharp corners, re-connect the bulb and the lens, re-connect the battery and check the light. Lastly ensure that the Dome Light Connector is firm.
Related Oldsmobile Parts
 Oldsmobile Fog Light
 Oldsmobile Fog Light Bulb
 Oldsmobile Fog Light Lens
 Oldsmobile Forward Light Harness Connector
 Oldsmobile Headlight Bulb
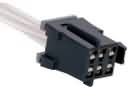 Oldsmobile Instrument Panel Harness Connector
 Oldsmobile Interior Light Bulb
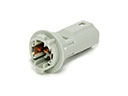 Oldsmobile Light Socket
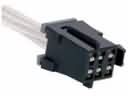 Oldsmobile Power Seat Connector
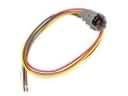 Oldsmobile Rear Light Harness Connector
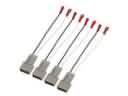 Oldsmobile Speaker Connector
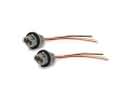 Oldsmobile Turn Signal Light Connector