ChevyParts
My Garage
My Account
Cart
OEM Oldsmobile Tail Pipe
Exhaust Tail Pipe- Select Vehicle by Model
- Select Vehicle by VIN
Select Vehicle by Model
orMake
Model
Year
Select Vehicle by VIN
For the most accurate results, select vehicle by your VIN (Vehicle Identification Number).
19 Tail Pipes found


Oldsmobile Tail Pipe Part Number: 25625048
Product Specifications- Other Name: Extension, Exhaust Tail Pipe; Exhaust Pipe


Oldsmobile Tail Pipe Part Number: 15577586
Product Specifications- Other Name: Direct-Fit Exhaust; Exhaust System Kit; Exhaust Pipe; Tailpipe; Pipe, Exhaust Tail Pipe

Oldsmobile Muffler Part Number: 10140600
Product Specifications- Other Name: Muffler Assembly, Exhaust (W/ Tail Pipe); Muffler, Exhaust

Oldsmobile Tail Pipe Part Number: 10053772
Product Specifications- Other Name: Pipe, Exhaust Tail Pipe; Exhaust Pipe

Oldsmobile Muffler Part Number: 25515884
Product Specifications- Other Name: Muffler, Exhaust

Oldsmobile Muffler Part Number: 22537519
Product Specifications- Other Name: Muffler, Exhaust

Oldsmobile Tailpipe Part Number: 22506867
Product Specifications- Other Name: Pipe, Exhaust; Exhaust Pipe; Tail Pipe; Pipe, Exhaust Tail Pipe

Oldsmobile Muffler Part Number: 22505920
Product Specifications- Other Name: Muffler, Exhaust; Muffler, Exhaust System

Oldsmobile Cross Over Pipe Part Number: 22504709
Product Specifications- Other Name: Pipe, Exhaust Pipe

Oldsmobile Tail Pipe Part Number: 19149459
Product Specifications- Other Name: Pipe, Exhaust Tail; Direct-Fit Exhaust; Exhaust System Kit; Exhaust Pipe; Tailpipe; Pipe, Exhaust Tail Pipe
- Replaces: 12479985

Oldsmobile Tail Pipe Part Number: 15662531
Product Specifications- Other Name: Pipe, Exhaust Tail; Direct-Fit Exhaust; Exhaust System Kit; Exhaust Pipe; Tailpipe; Pipe, Exhaust Tail Pipe

Oldsmobile Tailpipe Part Number: 15634747
Product Specifications- Other Name: Pipe, Exhaust Tail Pipe; Exhaust Pipe; Tail Pipe

Oldsmobile Cross Over Pipe Part Number: 14078891
Product Specifications- Other Name: Pipe Assembly; Exhaust Pipe; Pipe, Exhaust Pipe
Oldsmobile Muffler & Pipe Part Number: 14063933
Product Specifications- Other Name: Muffler, Exhaust; Exhaust Pipe; Muffler

Oldsmobile Cross Over Part Number: 14054541
Product Specifications- Other Name: Pipe, Exhaust Crossover; Exhaust Pipe
Oldsmobile Rear Pipe Part Number: 1251925
Product Specifications- Other Name: Pipe Assembly-Exhaust Rear; Exhaust Pipe
- Position: Rear

Oldsmobile Tail Pipe Part Number: 10147977
Product Specifications- Other Name: Pipe, Exhaust Tail Pipe; Exhaust Pipe; Tailpipe

Oldsmobile Tail Pipe Part Number: 10114797
Product Specifications- Other Name: Pipe, Exhaust Tail Pipe; Exhaust Pipe

Oldsmobile Muffler Part Number: 10065300
Product Specifications- Other Name: Muffler, Exhaust
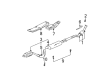
Oldsmobile Tail Pipe
Choose OEM Tail Pipe, you're making the optimal decision for superior quality and perfect performance. You can feel confident because each component goes through stringent quality checks. Every part is carefully built to comply with Oldsmobile's factory specifications. You'll enjoy a smooth, worry-free installation that fits just right. At ChevyPartsDeal.com, you'll find it easy to get top-quality OEM Oldsmobile Tail Pipe. You can shop at highly competitive prices and protect your budget. All our genuine Oldsmobile parts include a dependable manufacturer's warranty. You'll also appreciate our straightforward return policy and swift delivery services for extra convenience.
Oldsmobile Tail Pipe ducts directed exhaust outside the engine and the passenger compartment and this noises and heat and offered proper appearance to the car. Oldsmobile started to make cars in 1897 and was the first to adopt the moving assembly line, a decision which rendered reliable cars more cost-effective. The Curved Dash model introduced the motoring experience to a large number of families and subsequently, the technological advances such as the 1940 Hydra-Matic automatic transmission allowed the drivers to cruise without mishandling a clutch. Over the decades, Oldsmobile had developed a reputation of being reliable, running on smooth powertrains and having cabins that remained quiet and comfortable on trips and continues to be so in an old Oldsmobile. By the 1960s the division had agile V8s, streamlined Rocket style, and suspension upgrades that dampened the nomad on long highways, furthering the comfort theme of the company. The last part of the exhaust is a Tail Pipe which expels the gases and it is applied to tune the sound and backpressure making the rear end look smooth. In order to install a Tail Pipe, one has to park on level grounds, allow the exhaust to cool, block the wheels, and dispose the car on stands. Unscrew clamps, unhook rubber hangers and take out the old pipe and wipe joint. Install the new Tail Pipe by sliding over the outlet of the muffler, clamping together and re-attaching hangers finger-tight. Make sure the clearance is aligned, clamps are completely tight, start the engine and go on a short run to make sure the fit is rattle free.
Related Oldsmobile Parts
 Oldsmobile Catalytic Converter
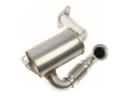 Oldsmobile EGR Filter
 Oldsmobile EGR Valve Gasket
 Oldsmobile Exhaust Flange Gasket
 Oldsmobile Exhaust Hanger
 Oldsmobile Exhaust Heat Shield
 Oldsmobile Exhaust Manifold
 Oldsmobile Exhaust Manifold Gasket
 Oldsmobile Exhaust Pipe
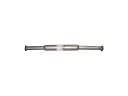 Oldsmobile Exhaust Resonator
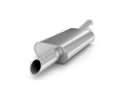 Oldsmobile Muffler
 Oldsmobile Vapor Canister