ChevyParts
My Garage
My Account
Cart
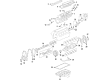
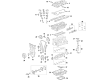
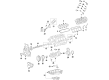
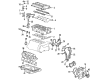
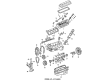
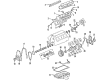
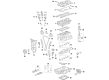
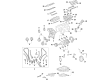
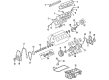
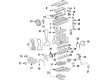
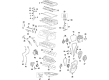
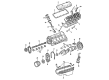
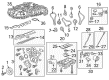
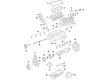
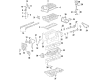
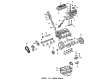
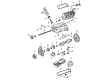
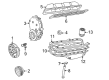
OEM GMC Oil Pan
Oil Drain Pan- Select Vehicle by Model
- Select Vehicle by VIN
Select Vehicle by Model
orMake
Model
Year
Select Vehicle by VIN
For the most accurate results, select vehicle by your VIN (Vehicle Identification Number).
108 Oil Pans found


GMC Oil Pan Part Number: 12599806
$122.08 MSRP: $301.69You Save: $179.61 (60%)Ships in 1-3 Business DaysProduct Specifications- Other Name: Pan, Engine Oil
- Replaces: 12599805


GMC Oil Pan Part Number: 12637773
$38.48 MSRP: $67.12You Save: $28.64 (43%)Ships in 1-2 Business DaysProduct Specifications- Other Name: Pan, Engine Oil; Lower Oil Pan


GMC Lower Engine Oil Pan Part Number: 12669909
$46.50 MSRP: $81.12You Save: $34.62 (43%)Ships in 1-2 Business DaysProduct Specifications- Other Name: Pan Lower Oil, Pan Lwr Oil; Lower Oil Pan
- Position: Lower
- Replaces: 12623115, 12659686


GMC Oil Pan, Green Line Part Number: 12601240
$156.96 MSRP: $273.89You Save: $116.93 (43%)Ships in 1-2 Business DaysProduct Specifications- Other Name: Pan, Engine Oil; Engine Oil Pan
- Replaces: 12578193


GMC Oil Pan Part Number: 12557558
$177.27 MSRP: $309.33You Save: $132.06 (43%)Ships in 1-3 Business DaysProduct Specifications- Other Name: Pan, Engine Oil; Oil Pan Gasket
- Replaces: 12528916


GMC Oil Pan Part Number: 12609074
$205.29 MSRP: $358.22You Save: $152.93 (43%)Ships in 1-2 Business DaysProduct Specifications- Other Name: Pan, Engine Oil
- Replaces: 12594603


GMC Oil Pan Part Number: 12640746
$225.02 MSRP: $392.69You Save: $167.67 (43%)Ships in 1-2 Business DaysProduct Specifications- Other Name: Pan, Engine Oil; Engine Oil Pan
- Replaces: 12627903, 12619776


GMC Oil Pan Part Number: 12628771
$328.66 MSRP: $573.50You Save: $244.84 (43%)Ships in 1-2 Business DaysProduct Specifications- Other Name: Pan, Engine Oil
- Replaces: 12558762, 12598151


GMC Oil Pan Part Number: 12676340
$26.26 MSRP: $43.24You Save: $16.98 (40%)Ships in 1-2 Business DaysProduct Specifications- Other Name: Pan, Engine Oil; Engine Oil Pan; Lower Oil Pan


GMC Oil Pan Part Number: 12647615
$27.32 MSRP: $44.98You Save: $17.66 (40%)Ships in 1-3 Business DaysProduct Specifications- Other Name: Pan, Engine Oil; Lower Oil Pan


GMC Oil Pan Part Number: 12624621
$170.23 MSRP: $280.42You Save: $110.19 (40%)Product Specifications- Other Name: Pan, Engine Oil
- Replaces: 12614821


GMC Oil Pan Part Number: 12628375
$104.57 MSRP: $165.96You Save: $61.39 (37%)Product Specifications- Other Name: Pan, Engine Oil; Lower Oil Pan

GMC Oil Pan Part Number: 12726914
$48.57 MSRP: $76.08You Save: $27.51 (37%)Ships in 1-2 Business DaysProduct Specifications- Other Name: Pan, Engine Oil
- Replaces: 12713653, 12694307


GMC Oil Pan Part Number: 10240721
$173.43 MSRP: $272.76You Save: $99.33 (37%)Product Specifications- Other Name: Pan Assembly-Oil; Pan, Engine Oil


GMC Oil Pan Part Number: 12666374
$179.01 MSRP: $281.67You Save: $102.66 (37%)Product Specifications- Other Name: Pan, Engine Oil; Engine Oil Pan
- Replaces: 12638371, 12636673, 12609875, 12575368


GMC Oil Pan Part Number: 98073535
$212.11 MSRP: $333.75You Save: $121.64 (37%)Product Specifications- Other Name: Pan, Engine Oil; Engine Oil Pan; Lower Oil Pan
- Replaces: 97220006, 97360794, 97329637


GMC Oil Pan Part Number: 12600499
$217.54 MSRP: $342.28You Save: $124.74 (37%)Product Specifications- Other Name: Pan, Engine Oil
- Replaces: 12580240


GMC Oil Pan Part Number: 12597151
$218.48 MSRP: $343.77You Save: $125.29 (37%)Product Specifications- Other Name: Pan, Engine Oil
- Replaces: 12556541


GMC Oil Pan Part Number: 97329702
$811.00 MSRP: $1281.81You Save: $470.81 (37%)Product Specifications- Other Name: Pan, Engine Oil
- Replaces: 98073536, 97223614


GMC Oil Pan Part Number: 12529174
Product Specifications- Other Name: Pan, Engine Oil
- Replaced by: 12559020
| Page 1 of 6 |Next >
1-20 of 108 Results
GMC Oil Pan
Choose OEM Oil Pan, you're making the optimal decision for superior quality and perfect performance. You can feel confident because each component goes through stringent quality checks. Every part is carefully built to comply with GMC's factory specifications. You'll enjoy a smooth, worry-free installation that fits just right. At ChevyPartsDeal.com, you'll find it easy to get top-quality OEM GMC Oil Pan. You can shop at highly competitive prices and protect your budget. All our genuine GMC parts include a dependable manufacturer's warranty. You'll also appreciate our straightforward return policy and swift delivery services for extra convenience.
GMC Oil Pan keeps oil blood in the engine and constantly lubricated even when working under intense conditions. GMC manufactures trucks and SUVs that do not make a fuss about potholes and heavy trailers. The company started in 1901 and has since accumulated decades of lessons of hard use into facade frames and sturdy powertrains. The drivers receive spacious, noisy cabins that soothe long distance journeys and high strength steel beneath takes the burden. Such modern innovations as surround vision and hitch guidance eliminate blind points and positively influence maneuvers in reverse with a load. MultiPro tailgate folds, opens and closes a hundred times more quickly than sweat soaked minutes in loading. All the models are subjected to ruthless testing programs to eliminate weak links even before the customers conduct a single turn of a key. The brand continues to enhance suspension tuning and electronics to give the brand a lifting ability without adding unnecessary complexity. Another unknown hero is the Oil Pan, which receives and cools the lubricant. The pan is clamped to the crankcase with stamped steel on older mills or cast aluminum on newer blocks, emptying crossmembers, carrying a pickup tube to the pump, holding enough fluid to get up steep climbs, to sudden stops and hours of idling. That confidence is equivalent to GMC durability targets in that they protect the crankshaft against starvation in cases of g-force spikes. Once a circuit is completed, the fluid returns to the Oil Pan where it releases heat and the process repeats itself. Its rudimentary bowl form conceals a vital task that keeps the horsepower going mile after mile.
GMC Oil Pan Parts and Q&A
- Q: How to remove and install an oil pan in 2.4L four cylinder engine on GMC Terrain?A:Before you can get the oil pan, you have to drop the engine oil and the drivebelt as well. Turn the right-front wheel lug nuts slightly counterclockwise, lift the front of the car, and set it on jackstands, then remove the right front wheel. Then pull the splash shield with bolts and nuts from under the right side of the engine compartment; now unbolt the lower air conditioning compressor mounting bolt but do not detach the other bolts. Take off the dipstick and dipstick tube which is located on the intake manifold by being bolted on it. Suspend an engine support which works across the top of the engine on the fender edges and must be securely bolted together. Disconnect the right engine mount and the bolts for the secondary air injection pump, lift the pump off the side of the oil pan and set aside, suspend. Unfasten the four bolts joining the oil pan to transaxle and the rest of the oil pan bolts in a reversal of the tightening pattern and after doing that detach the oil pan from the lower crankcase using a rubber mallet if necessary. For installation, counter sunk and cleaned all the old gasket material in the lower crankcase and the oil pan with a gasket scraper and solvent. Squirt a 2 mm thick layer of RTV sealant along the margin of the oil pan, inside the circles defined by the bolt holes and around the oil suction port prior to the installation of the oil pan. Substitute the oil pan and bolts to engage them as tightly as possible in a sequence as recommended within the torque limits. The rest of the installation is done in the reverse order to the removal and it is important to tighten the wheel lug nuts to the proper torque. Last but not the least, the amounts of oil in the engine should be replenished, an oil filter should be changed and the engine should be started to check if there is any leakage.

Related GMC Parts
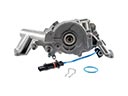 GMC Oil Pump
 GMC Balance Shaft Bearing
 GMC Balance Shaft Gear
 GMC Cam Gear
 GMC Cylinder Head
 GMC Engine Oil Cooler
 GMC Oil Filler Cap
 GMC Oil Pan Gasket
 GMC Oil Pump Gasket
 GMC Oil Pump Rotor Set
 GMC Piston
 GMC Variable Timing Sprocket
Browse GMC Oil Pan by Models
Acadia Sierra 1500 Yukon Canyon Sierra 2500 HD Terrain Envoy Sonoma Typhoon Syclone Caballero C1500 Envoy XL Envoy XUV Jimmy K1500 S15 S15 Jimmy Safari Savana 2500 Savana 3500 Sierra 2500 Sierra 3500 Yukon XL Acadia Limited C2500 C3500 G2500 K2500 K3500 P3500 Savana 1500 Yukon XL 1500 C1500 Suburban C2500 Suburban G1500 G3500 K1500 Suburban K2500 Suburban P2500 R1500 R1500 Suburban R2500 R2500 Suburban R3500 Sierra 1500 Classic Sierra 1500 HD Sierra 1500 HD Classic Sierra 1500 Limited Sierra 2500 HD Classic Sierra 3500 Classic Sierra 3500 HD V1500 V1500 Suburban V2500 V2500 Suburban V3500 Yukon XL 2500