ChevyParts
My Garage
My Account
Cart
OEM Chevrolet Venture CV Joint
CV Joint Axle- Select Vehicle by Model
- Select Vehicle by VIN
Select Vehicle by Model
orMake
Model
Year
Select Vehicle by VIN
For the most accurate results, select vehicle by your VIN (Vehicle Identification Number).
8 CV Joints found

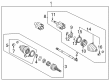
Chevrolet Venture CV Joints, Front Part Number: 26073382
Chevrolet Venture CV Joints, Front Part Number: 26073381

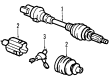
Chevrolet Venture Outer CV Joint Part Number: 26044410

Chevrolet Venture C.V. Joint, Outer Part Number: 19122437

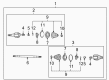
Chevrolet Venture Axle Assembly Part Number: 88967242

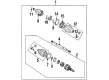

Chevrolet Venture CV Joints, Front Part Number: 26044412
Chevrolet Venture CV Joints, Front Part Number: 26044411
Chevrolet Venture CV Joint
Want to cut long-term maintenance and repair costs? Choose OEM CV Joint. Those parts deliver top durability you can trust. On our site, you'll find a huge catalog of genuine Chevrolet Venture parts. Prices are unbeatable, so you can keep more in your pocket. Every OEM Chevrolet Venture CV Joint includes a manufacturer's warranty. You can also get an easy return policy that keeps buying risk free. Fast delivery, get your car on the road quickly. It's simple to search, compare, and order. Stop guessing about quality or fit. Order today and save with parts that last.
Chevrolet Venture CV Joint is considered highly effective and necessary element with regard to context, which is responsible for reliable transfer of power from the transaxle to wheels of Chevrolet Venture cars. Since it is for the suspension movement and the steering aspect, the CV Joint provides a constant speed for rotation, especially in the FWD applications. Chevrolet Ventures employs different varieties of CV joints; Rzeppa joints at the outermost ends and plunging joints at the innermost ends, aside from promoting joint space, are designed to adjust to the fluctuating length of the CV shaft during the suspension's up and down movement. This is not only increases the general performance of the Chevrolet Venture but also increases the safety of the car by ensuring stability and good handling. Rubber boots which situated at the dust cover must checked for wear and damage since lost lubricant and joint failure can be its result; thus it is necessary to check the CV Joint often for its maintenance. It accommodates models from 1997 to 2005 and is designed for the Chevrolet Venture Base, LS, and LT since the CV Joint enhances this vehicle's design. Worthy of special attention is the Chevrolet Venture that has a smooth four-speed automatic transmission and is equipped with an option of 8 seats. The approach of Chevrolet Venture to reliability and high performance standards, safety of this vehicle and exceptional functionality of CV Joint makes Chevrolet Venture a preferred brand for minivan consumers.
Chevrolet Venture CV Joint Parts and Q&A
- Q: How to Replace the Rear Wheel Drive Shaft Outer CV Joint and Seal on Chevrolet Venture?A:To install a new wheel drive shaft outer joint and seal you will need these primary tools: Drivers must use both Drive Axle Seal Clamp Pliers (J 35566) and Drive Shaft Seal Clamp Pliers (J 42572). Drive Axle Seal Clamp Pliers (J 35566) and Drive Shaft Seal Clamp Pliers (J 42572). Using side cutters remove the small seal clamp from the wheel drive shaft bar before discarding it while protecting the wheel drive shaft tri-lobal tripot bushing. Remove the large tripot seal clamp from the joint using side cutters until ready for disposal. After removing both the wheel drive shaft outboard seal and the tri-lobal tripot bushing separation slide the seal down the wheel drive shaft bar. The housing and wheel drive shaft bar should be unpacked while keeping the correct 60-degree offset between tripot spiders maintained through pre-installation bar position markings. Use brass drifts along with a hammer tool to minimize the wheel drive shaft bar's barrel retaining ring before removing both the tripot spider and disposing of the barrel retaining ring through careful clockwise tapping along the tripot spider face. Check for damage or wear on the wheel drive shaft outboard seal along with the tripot joint spider assembly and housing and tri-lobal tripot bushing. Start assembly by putting the new small seal clamp onto the joint seal's small end before sliding both components onto the wheel drive shaft bar with the small end fitted into the joint seal groove. Press the Drive Shaft Seal Clamp Pliers (J 42572) onto the small seal retaining clamp and maintain it at a 136 Nm (100 ft. lbs.) torque. Position a fresh barrel retaining ring on the wheel drive shaft bar by keeping the 60-degree angled relationship in place. When assembling the device position the reference mark on the tripot spider so it points exactly toward the wheel drive shaft bar while both components remain centered by the beveled edge. When installing the tripot spider while pressing the barrel retaining ring with a flat-bladed tool make sure it has proper contact by trying to extract the tripot spider from the wheel drive shaft bar. Repack the housing with grease from the service kit until the tri-lobal tripot bushing fits flush against the housing face. Distribute the remaining grease to the wheel drive shaft outboard seal before filling the housing with more grease. Place the tri-lobal tripot bushing onto the housing before putting on the spring. Grease should be used to maintain the spring then add the guide to it. Position the larger new seal retaining clamp on the wheel drive shaft outboard seal and move the housing toward the tripot joint spider assembly. Place the wheel drive shaft outboard seal with its large diameter over the tri-lobal tripot bushing so the seal lip fits into the groove without warping. Check the seal shape for correct alignment followed by necessary adjustments. Place the joint components before positioning at the correct vehicle distance to ensure alignment between the wheel drive shaft outboard seal and tripot housing and large seal retaining clamp when completing the latching. Seal retention will be maintained by using Drive Axle Seal Clamp Pliers (J 35566) to fasten the large clamp while verifying complete engagement of latching tangs. The outer tripot housing needs to be rotated four to five times to spread grease throughout its spider bearings.
- Q: How to replace the front CV Joint inner joint and seal on Chevrolet Venture?A:To change the front wheel drive shaft inner joint and seal, the following tools will be needed: snap ring pliers-parallel jaw (J 8059), drive axle seal clamp pliers (J 35910), and drive axle swage ring clamp (J 41048). Start by removing the swage ring from the half shaft bar with a hand grinder while being careful not to ruin the half shaft bar. Trim off the large seal retaining clamp from the tripot joint with side cutters and throw it away. Disassemble the inboard seal from the tri-lobal tripot bushing on the large diameter and move the seal from the joint across the halfshaft bar. The housing need to be removed from the tripot joint spider and halfshaft bar followed with the spacer ring and spider assembly using the snap ring pliers-parallel jaw (J 8059) and dispose the boot and rings. Remove the rust from half shaft bar near boot mounting with wire brush and check the needle rollers and needle bearings with trunnion for wear or damage, if found replace quality parts with the kit. For installation, take the new small swage ring and slide it on the small end of the joint seal and allow both to slide to the halfshaft bar have the small end of the joint seal insert into the joint seal groove. Mount the drive axle swage ring clamp (J 41048) in a vise, align the inboard end of the halfshaft assembly in the tool, align the seal neck in the bottom die, and confirm no pinch points in the halfshaft inboard seal prior to inserting and tightening the bolts. Insert the halfshaft inboard seal, halfshaft bar, and swage ring, clamping the drive axle swage ring clamp (J 41048) with the bolts that are then tightened 180° at a time with a ratchet wrench. Mount the spacer ring into the groove of the halfshaft bar with the help of the snap ring pliers-parallel jaw (J 8059), slide the tripot joint spider assembly towards the spacer ring, and fit another spacer ring into the groove. Inject half of the detachable grease from the service kit in to the halfshaft inboard seal and the balance in to the housing retacking it so that the tri-lobal tripot bushing is flush to the housing face. Mount the new tri-lobal tripot bushing to the housing, install the bigger new seal retaining clamp on the halfshaft inboard seal, and slide housing over the tripot joint spider assembly. Make sure the halfshaft inboard seal is shaped correctly, and if needed, shape it, and put the joint assembly in the right vehicle dimension depending on the engine type with specific dimensions. Align the halfshaft inboard seal, tripot housing and large seal retaining clamp and crimp clamp to torque using the drive axle seal clamp pliers (J 35910), inspect the gap dimension of the clamp ear and tighten further if required. Lastly, thoroughly stroke the joint several times in order to spread the grease.


Related Chevrolet Venture Parts
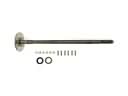 Chevrolet Venture Axle Shaft
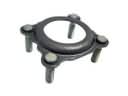 Chevrolet Venture Axle Shaft Retainer
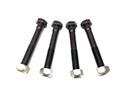 Chevrolet Venture Control Arm Bolt
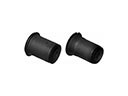 Chevrolet Venture Control Arm Bushing
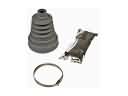 Chevrolet Venture CV Boot
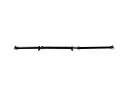 Chevrolet Venture Drive Shaft
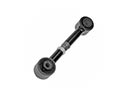 Chevrolet Venture Lateral Link
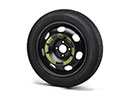 Chevrolet Venture Spare Wheel
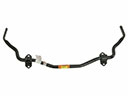 Chevrolet Venture Sway Bar Kit
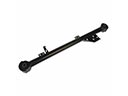 Chevrolet Venture Trailing Arm
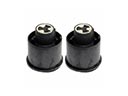 Chevrolet Venture Trailing Arm Bushing
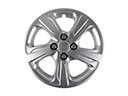 Chevrolet Venture Wheel Cover