ChevyParts
My Garage
My Account
Cart
OEM Chevrolet Metro Exhaust Manifold
Engine Exhaust Manifold- Select Vehicle by Model
- Select Vehicle by VIN
Select Vehicle by Model
orMake
Model
Year
Select Vehicle by VIN
For the most accurate results, select vehicle by your VIN (Vehicle Identification Number).
4 Exhaust Manifolds found

Chevrolet Metro Exhaust Manifold Part Number: 96069341
Chevrolet Metro Exhaust Manifold Part Number: 91176795

Chevrolet Metro Exhaust Manifold Part Number: 91176019

Chevrolet Metro Exhaust Manifold Part Number: 91171190
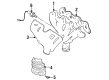
Chevrolet Metro Exhaust Manifold
Want to cut long-term maintenance and repair costs? Choose OEM Exhaust Manifold. Those parts deliver top durability you can trust. On our site, you'll find a huge catalog of genuine Chevrolet Metro parts. Prices are unbeatable, so you can keep more in your pocket. Every OEM Chevrolet Metro Exhaust Manifold includes a manufacturer's warranty. You can also get an easy return policy that keeps buying risk free. Fast delivery, get your car on the road quickly. It's simple to search, compare, and order. Stop guessing about quality or fit. Order today and save with parts that last.
Exhaust Manifold of Chevrolet Metro vehicles is a vital component that guides hot gases from the engine to the exhaust system hence, optimum engine and less emission of hazardous gases. Placed at diverse places on the engine, the manifold contains many tubes that gather exhaust coming from a variety of cylinders, often being a similar number to the cylinders on the engine. Different types of Chevrolet Metro exhaust manifolds have been made from raw materials such as cast iron or stainless steel with the available ones called as headers that are designed to help increase the car's performance by decreasing the amount of flow restriction. These headers enhance the rate through which exhaust gas passes through the engine hence enhancing efficiency. The construction and material used in both types of exhaust manifold have the potential to affect the performance of the vehicle especially when the exhaust manifold is harmed, and the air-to-fuel ratio becomes unequal and dangerous exhaust fumes that can have negative effects on health.
Chevrolet Metro Exhaust Manifold Parts and Q&A
- Q: How to service the exhaust manifold on Chevrolet Metro?A:Service of the Exhaust Manifold requires both cool exhaust system temperature prevention and negative Battery Cable disconnection. Raise and support the vehicle. A successful pup Catalytic Converter removal requires first removing the lower Exhaust Pipe by taking out its four bolts to split it away from the Exhaust Manifold and then detaching the Exhaust Manifold stiffener bracket. The service starts with disconnecting the oxygen sensor electric connector followed by unboltage of three bolts to detach the Exhaust Manifold heat shield from the rest of the system. The removal process of low side a/c line bracket demands careful handling of the a/c lines while the procedure continues. Extract the eight bolts joined with one nut from the Exhaust Manifold before pulling out the Exhaust Manifold together with the Exhaust Manifold Gasket from the Cylinder Head. Installation without a pup Catalytic Converter requires removal of the two bolts and front pipe/catalytic converter assembly from the Exhaust Manifold . Post that lower the vehicle and disconnect the oxygen sensor electric connector followed by removal of the four bolts and the Exhaust Manifold heat shield . To perform the replacement begin by separating the low side a/c line bracket and realigning the a/c lines. Then remove the five bolts and three nuts from the Exhaust Manifold followed by installation of the Exhaust Manifold and Exhaust Manifold Gasket onto the Cylinder Head. When using a pup Catalytic Converter for installation you must first apply the new Exhaust Manifold Gasket to the Cylinder Head surface before installing the Exhaust Manifold at eight points with one nut while tightening it to 32 nm (24 ft.lbs. Torque). The Exhaust Manifold heat shield needs installation and you should tighten its three bolts to 15 nm (11 ft. Lbs.). Place the low side a/c line bracket while tormenting its bolt to 15 nm (11 ft. Lbs.) torque. Support the vehicle's elevation then fasten the Exhaust Manifold stiffener bracket with two bolts at 50 nm (37 ft. Lbs.) torque. The front pipe assembly must be installed onto the Exhaust Manifold with a fresh seal using four bolts which should reach a torque of 50 nm (37 ft. Lbs.). Vehicle height should be lowered before connecting the oxygen sensor electrical connector and reconnecting the negative Battery Cable and conducting an exhaust gas leakage test. When using a pup Catalytic Converter is not possible, first fit the new Exhaust Manifold Gasket onto the Cylinder Head then attach the Exhaust Manifold while tightening five bolts and three nuts to 23 nm (17 ft. Lbs.). Fasten the Exhaust Manifold heat shield in position using four bolts which should be tightened to 15 nm (11 ft. Lbs.). Use one bolt to reinstall the low side a/c line bracket while tightening it to 15 nm (11 ft. Lbs.). Raise and support the vehicle before installing the front pipe/catalytic converter assembly to the Exhaust Manifold using new seals and securing the two bolts to 50 nm (37 ft. Lbs.). Lower the vehicle, connect the oxygen sensor electrical connector, reconnect the negative Battery Cable and perform exhaust gas leakage inspection.

Related Chevrolet Metro Parts
 Chevrolet Metro Catalytic Converter
 Chevrolet Metro EGR Filter
 Chevrolet Metro EGR Vacuum Solenoid
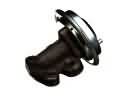 Chevrolet Metro EGR Valve
 Chevrolet Metro EGR Valve Gasket
 Chevrolet Metro Exhaust Flange Gasket
 Chevrolet Metro Exhaust Heat Shield
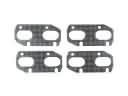 Chevrolet Metro Exhaust Manifold Gasket
 Chevrolet Metro Exhaust Pipe
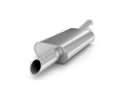 Chevrolet Metro Muffler
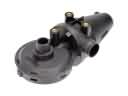 Chevrolet Metro PCV Valve
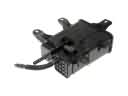 Chevrolet Metro Vapor Canister