ChevyParts
My Garage
My Account
Cart
OEM Cadillac SRX Fuel Rail
Engine Fuel Rail- Select Vehicle by Model
- Select Vehicle by VIN
Select Vehicle by Model
orMake
Model
Year
Select Vehicle by VIN
For the most accurate results, select vehicle by your VIN (Vehicle Identification Number).
5 Fuel Rails found


Cadillac SRX Fuel Rail Part Number: 12598329
$75.98 MSRP: $320.01You Save: $244.03 (77%)Ships in 1-2 Business Days


Cadillac SRX Fuel Rail Part Number: 12629929
$160.74 MSRP: $334.62You Save: $173.88 (52%)
Cadillac SRX Fuel Rail Part Number: 12701658
$166.60 MSRP: $337.92You Save: $171.32 (51%)Ships in 1-3 Business Days


Cadillac SRX Fuel Rail Part Number: 12580644

Cadillac SRX Fuel Rail Part Number: 12572886
Cadillac SRX Fuel Rail
Want to cut long-term maintenance and repair costs? Choose OEM Fuel Rail. Those parts deliver top durability you can trust. On our site, you'll find a huge catalog of genuine Cadillac SRX parts. Prices are unbeatable, so you can keep more in your pocket. Every OEM Cadillac SRX Fuel Rail includes a manufacturer's warranty. You can also get an easy return policy that keeps buying risk free. Fast delivery, get your car on the road quickly. It's simple to search, compare, and order. Stop guessing about quality or fit. Order today and save with parts that last.
Cadillac SRX Fuel Rail embodies Cadillac's dedication to both performance excellence and product reliability among key components of the vehicle. The Fuel Rail draws its purpose from delivering high-pressure fuel stream between the fuel pump and the injectors in order to optimize performance in various Cadillac SRX vehicles. The consistent fuel pressure creates an opportunity for the Powertrain Control Module (PCM) to utilize real-time engine data for adjusting fuel injection timing which optimizes operational efficiency and safety. The Cadillac SRX experienced sequential developments in its fuel injection technology through Throttle Body Injection (TBI), Port Fuel Injection and Gasoline Direct Injection (GDI) which refined engine performance as well as fuel combustion efficiency. The Fuel Rail remains vital throughout the two generations of SRX models which ran from 2003 to 2016. Luxury enthusiasts recognize the Cadillac SRX through its upscale cabin design and advanced safety features in addition to its swift 7 seconds for reaching 60 mph. The Fuel Rail serves as a key performance element because it enables the SRX to meet its benchmarks thereby becoming a major market presence. The Cadillac car Fuel Rail functions through robust design features to match multiple model models which protects the vehicle's trademark excellence because it delivers both performance capability and luxury driving experiences.
Cadillac SRX Fuel Rail Parts and Q&A
- Q: How to service and repair the fuel rail and fuel injectors on Cadillac SRX?A:A professional should start service and repair work on the Fuel Rail and Fuel Injectors by depressurizing the fuel system either with ch-48027 or without it when needed. The first service step requires removal of both the upper and lower Intake Manifolds. Separate the attaching clip for the fuel pipe while disconnecting the fuel feed pipe from its connection to the Fuel Injector rail. Destroy any debris inside the area through which fuel injectors enter the Intake Manifold by utilizing compressed air. Prior to removing Fuel Rail bolts the technician should protect the injector electrical connector terminals and spray tips then support the Fuel Rail throughout extraction. Apply caps on the fittings and use plugs to protect against contamination. First detach the Fuel Rail with all fuel injectors attached and eliminate its link to the Fuel Injector electrical connector mechanism through unlocking the connection and unplugging the wires. Use a new tool to remove both the Fuel Injector retainer clip as well as the Fuel Injector while discarding any old Fuel Injector seals. Install new Fuel Injector seals first then position the Fuel Injector together with its retainer clip. Connect the electrical connector of the Fuel Injector before making sure the lock moves into its placed position. The Fuel Rail installation requires attachment with fuel injectors plus bolt tightening to 10 nm (89 lb in). The fuel feed pipe should be installed to the Fuel Rail before securing it with the retaining clip. Reinstall the upper Intake Manifold as the last installation step.
- Q: How to replace the fuel injector and fuel rail on Cadillac SRX?A:The first step involves decompressing the fuel system pressure either with ch 48027 or without it then the cross vehicle brace needs removal. Spray cleaning solution gm x-30a or its equivalent allows cleaning of the fuel rail assembly but avoid excessive soaking. You must remove the fuel feed hose/pipe from the fuel rail and after that remove the positive crankcase ventilation (PCV) dirty air hose and finally disconnect the evaporative emission (EVAP) quick connect fitting . Under the right side rear of the engine section and the front of the dash, use retainers (1 and 2) to access the lines for positioning them out of the way. You must first disconnect the left and right fuel injector wiring harness connectors at the fuel injectors then remove the sight shield bracket and its attaching studs to handle the fuel rail assembly. Remove lower o-ring seals from each injector and discard them before taking out the retainers and fuel injectors from the fuel rail assembly by throwing out the o-ring seals. When installing fuel injectors users must apply engine oil to new o-ring seals before they attach them to the fuel injectors using new retainer clips which need to be mounted to the fuel rail with electrical connectors maintained at a 90-degree angle to the crankshaft centerline. Secure the new o-ring seals on each injector spray tip end with lubricating them with engine oil. Next install the fuel injectors and fuel rail to the Intake Manifold before seating the assembly by pressing it down. Start by installing both fuel rail attaching studs, which require 10 n.m torque setting. After that, secure the sight shield bracket nuts at 10 n.m also. The fuel injector electrical connectors should be joined to their respective fuel injector before installing fuel feed and evap lines through retaining clips (1 and 2). The purge valve will receive the evap quick connect fitting while the pcv dirty air hose returns to its original position. The fuel rail receives the fuel feed hose/pipe installation after fitting the cross vehicle brace and positive Battery Cable reinstallation. The final check benefits from turning on the ignition key for 2 seconds followed by 10 seconds of off time before another 2-second key turn while the engine remains off for leak detection before shield installation is performed.


Related Cadillac SRX Parts
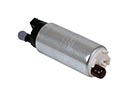 Cadillac SRX Fuel Pump
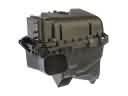 Cadillac SRX Air Filter Box
 Cadillac SRX Air Hose
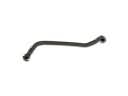 Cadillac SRX Crankcase Breather Hose
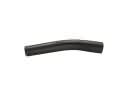 Cadillac SRX Fuel Filler Hose
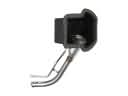 Cadillac SRX Fuel Filler Neck
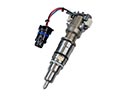 Cadillac SRX Fuel Injector
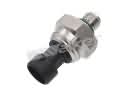 Cadillac SRX Fuel Pressure Sensor
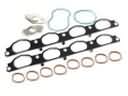 Cadillac SRX Intake Manifold Gasket
 Cadillac SRX PCV Hose
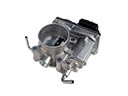 Cadillac SRX Throttle Body
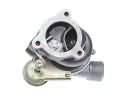 Cadillac SRX Turbocharger