ChevyParts
My Garage
My Account
Cart
OEM Buick Door Latch Assembly
Door Latch- Select Vehicle by Model
- Select Vehicle by VIN
Select Vehicle by Model
orMake
Model
Year
Select Vehicle by VIN
For the most accurate results, select vehicle by your VIN (Vehicle Identification Number).
225 Door Latch Assemblys found


Buick Lock Actuator Part Number: 13524683
$140.41 MSRP: $208.99You Save: $68.58 (33%)Ships in 1-2 Business DaysProduct Specifications- Other Name: Latch Assembly-Lift Gate; Tailgate Lock Actuator; Door Lock Actuator; Trunk Latch.
- Replaces: 13509599, 13585478, 13581023, 13587646


Buick Lock Actuator, Front Passenger Side Part Number: 13579523
$147.27 MSRP: $222.18You Save: $74.91 (34%)Ships in 1-2 Business DaysProduct Specifications- Other Name: Lock, Front Side Door; Door Lock Actuator Motor; Door Latch Assembly; Door Lock Actuator; Door Lock; Lock Assembly; Lock; Latch; Latch, Front Side Door
- Position: Passenger Side
- Replaces: 13503814, 13503802, 13577984


Buick Lock Part Number: 88981045
$117.15 MSRP: $183.37You Save: $66.22 (37%)Ships in 1-3 Business DaysProduct Specifications- Other Name: Lock, Front Side Door; Door Lock; Lock, Door Lock
- Position: Driver Side
- Replaces: 16636575


Buick Lock Actuator, Front Passenger Side Part Number: 13579491
$158.23 MSRP: $247.67You Save: $89.44 (37%)Ships in 1-3 Business DaysProduct Specifications- Other Name: Lock, Front Side Door; Door Lock Actuator Motor; Door Latch Assembly; Door Lock Actuator; Door Lock; Lock; Latch; Latch, Front Side Door
- Position: Passenger Side
- Replaces: 13503752


Buick Lock Actuator, Rear Driver Side Part Number: 13579545
$137.05 MSRP: $206.76You Save: $69.71 (34%)Ships in 1-2 Business DaysProduct Specifications- Other Name: Latch, Rear Side Door; Door Lock Actuator Motor; Door Latch Assembly; Door Lock Actuator; Door Lock; Latch
- Position: Driver Side


Buick Lock Actuator, Rear Passenger Side Part Number: 13579546
$138.18 MSRP: $208.46You Save: $70.28 (34%)Ships in 1-2 Business DaysProduct Specifications- Other Name: Latch, Rear Side Door; Door Lock Actuator Motor; Door Latch Assembly; Door Lock Actuator; Door Lock; Latch
- Position: Passenger Side


Buick Lock Actuator, Rear Driver Side Part Number: 20790499
$139.94 MSRP: $211.11You Save: $71.17 (34%)Ships in 1-3 Business DaysProduct Specifications- Other Name: Lock, Rear Side Door; Door Lock Actuator Motor; Door Lock; Lock
- Position: Driver Side
- Replaces: 15891978, 25876455


Buick Lock, Front Driver Side Part Number: 13579564
$147.40 MSRP: $222.36You Save: $74.96 (34%)Ships in 1-2 Business DaysProduct Specifications- Other Name: Latch Assembly-Front Side Door; Door Latch Assembly; Door Lock; Latch; Latch, Front Side Door
- Position: Driver Side


Buick Lock Actuator, Front Driver Side Part Number: 13579522
$152.91 MSRP: $230.68You Save: $77.77 (34%)Ships in 1-2 Business DaysProduct Specifications- Other Name: Lock, Front Side Door; Door Lock Actuator Motor; Door Latch Assembly; Door Lock Actuator; Door Lock; Lock Assembly; Lock; Latch; Latch, Front Side Door
- Position: Driver Side
- Replaces: 13503801, 13577983, 13503819


Buick Lock Actuator, Rear Driver Side Part Number: 13579551
$152.92 MSRP: $230.70You Save: $77.78 (34%)Ships in 1-3 Business DaysProduct Specifications- Other Name: Lock, Rear Side Door; Door Lock Actuator Motor; Door Latch Assembly; Door Lock; Lock; Latch; Latch, Rear Side Door
- Position: Driver Side
- Replaces: 13503783, 13578018, 13503807


Buick Lock Actuator, Rear Driver Side Part Number: 13579557
$154.55 MSRP: $233.15You Save: $78.60 (34%)Ships in 1-2 Business DaysProduct Specifications- Other Name: Latch, Rear Side Door; Door Lock Actuator Motor; Door Latch Assembly; Door Lock; Lock; Latch
- Position: Driver Side


Buick Lock Assembly, Passenger Side Part Number: 15111446
$154.90 MSRP: $233.68You Save: $78.78 (34%)Ships in 1-2 Business DaysProduct Specifications- Other Name: Latch, Door Lock; Door Lock Actuator Motor; Door Lock Actuator; Lock; Door Lock
- Position: Passenger Side
- Replaces: 15066137, 16631792


Buick Lock Actuator, Front Driver Side Part Number: 13579497
$166.16 MSRP: $250.67You Save: $84.51 (34%)Ships in 1-2 Business DaysProduct Specifications- Other Name: Lock, Front Side Door; Door Lock Actuator Motor; Door Latch Assembly; Door Lock Actuator; Door Lock; Lock; Latch; Latch, Front Side Door
- Position: Driver Side
- Replaces: 13503738, 13577966


Buick Lock Actuator, Rear Driver Side Part Number: 25948724
$172.00 MSRP: $259.49You Save: $87.49 (34%)Ships in 1-3 Business DaysProduct Specifications- Other Name: Lock, Rear Side Door; Door Lock Actuator Motor; Door Latch Assembly; Door Lock; Lock Assembly; Lock; Lock, Door Lock
- Position: Driver Side
- Replaces: 15076334, 15079228, 15110509


Buick Lock Actuator Part Number: 13584872
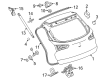
$187.22 MSRP: $282.44You Save: $95.22 (34%)Ships in 1-2 Business DaysProduct Specifications- Other Name: Latch Assembly-Lift Gate; Tailgate Lock Actuator; Door Lock Actuator; Trunk Latch; Trunk Lock.
- Replaces: 13501871, 13502697, 13581406, 15887967, 15858590, 15780269


Buick Lock Actuator, Rear Driver Side Part Number: 22820696
$194.48 MSRP: $293.39You Save: $98.91 (34%)Ships in 1-2 Business DaysProduct Specifications- Other Name: Latch Assembly-Rear Side Door; Door Lock Actuator Motor; Door Latch Assembly; Door Lock; Lock; Latch; Latch, Door Lock
- Position: Driver Side
- Replaces: 20839790, 25973135, 20940244


Buick Lock Actuator, Rear Passenger Side Part Number: 13579552
$205.74 MSRP: $310.38You Save: $104.64 (34%)Ships in 1-3 Business DaysProduct Specifications- Other Name: Latch, Rear Side Door; Door Lock Actuator Motor; Door Latch Assembly; Door Lock; Lock; Latch
- Position: Passenger Side
- Replaces: 13503784, 13578019, 13503808


Buick Lock Assembly, Front Driver Side Part Number: 15110641
$208.51 MSRP: $314.56You Save: $106.05 (34%)Ships in 1-2 Business DaysProduct Specifications- Other Name: Lock, Front Side Door; Door Latch Assembly; Door Lock; Lock; Latch; Lock, Door Lock
- Position: Driver Side
- Replaces: 15068497, 16637881, 16637319, 25765990, 25732592


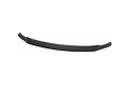
Buick Lower Cover Part Number: 84243380
$291.60 MSRP: $434.02You Save: $142.42 (33%)Product Specifications- Other Name: Latch Assembly-Lift Gate; Trunk Latch; Door Lock
- Position: Lower
- Replaces: 13501872, 13581405, 15779874, 15839037, 13502698, 13503467


Buick Lock Actuator, Rear Passenger Side Part Number: 20790498
$139.17 MSRP: $209.96You Save: $70.79 (34%)Ships in 1-2 Business DaysProduct Specifications- Other Name: Lock, Rear Side Door; Door Lock Actuator Motor; Door Lock; Lock
- Position: Passenger Side
- Replaces: 15891977, 25876454
| Page 1 of 12 |Next >
1-20 of 225 Results
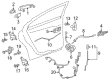
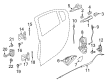
Buick Door Latch Assembly
Choose OEM Door Latch Assembly, you're making the optimal decision for superior quality and perfect performance. You can feel confident because each component goes through stringent quality checks. Every part is carefully built to comply with Buick's factory specifications. You'll enjoy a smooth, worry-free installation that fits just right. At ChevyPartsDeal.com, you'll find it easy to get top-quality OEM Buick Door Latch Assembly. You can shop at highly competitive prices and protect your budget. All our genuine Buick parts include a dependable manufacturer's warranty. You'll also appreciate our straightforward return policy and swift delivery services for extra convenience.
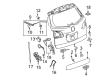
Buick Door Latch Assembly holds each door tighter and thieves off, mile after mile. Buick has its reputation to make and a pillow-soft ride and steering that really listens. The company has been pursuing the pure cabin since 1903 with tricks such as insulation tricks and equal engine mounts. Drivers have the pleasure of taking long highway routes without vibration rattle or wind buffering jerking up the playlist. Buick is looking at guts that are heavy electric and the Wildcat EV concept demonstrates that the Wildcat EV is wrapped in the same clean lines the people are applied to. The combination of tradition and new technology makes the badge remain relevant to teens, commuters, and retirees. The choice is fast because of long warranty periods and affordable price tags. The QuietTuning technology absorbs road noise and allows conversation at 70. By pulling a handle or pushing a button, the Door Latch Assembly forces two steel pawls into fixed keepers, clamping the striker loop, and sending a signal to the electronics in just one fluid movement that does not pry, rattle, or freeze in the cold. With time, grime, salt, or crooked handle in the outer part may clog the mechanism compelling its replacement. Regular inspections identify sticky springs at an early stage and maintain the door action. New Door Latch Assembly will restore the smooth, solid, and true calm on each ride.
Buick Door Latch Assembly Parts and Q&A
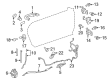
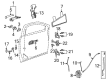
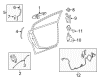
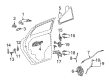
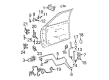
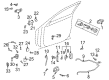
- Q: How to replace the front side Door Latch Assembly on Buick LeSabre?A:The first step for front side door latch replacement includes placing the window at full up and removing door trim panel, door module, inside Door Handle and water deflector. To access the electrical cables the lock rod as well as the outside Door Handle rod requires the opening of a clip. Begin by removing the door latch fasteners followed by the window run channel fastener and position the window run channel to the side. The door latch removal procedure includes extracting the inside Door Handle and lock rods attached to the door latch after which the handle and rods need to be detached from the door latch. Putting the door latch together with attached inside Door Handle and lock rods requires following the fastener notice in service precautions then installing the door latch into the door. Attach the door latch fasteners up to 10 n.m (89 lb in) while inserting the outside Door Handle rod into the latch clip and pushing the clip shut. The lock cylinder rod needs to be installed inside the door latch after which the window run channel fastener requires a tightening torque of 9 n.m (80 lb in). The inside Door Handle needs to be reinstalled followed by electrical connector wiring before checking Door Handle and lock cylinder function which serves as a prerequisite for door trim panel and water deflector installation. Installation of the water deflector must be followed by the door module placement and then the door trim panel.
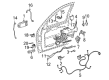
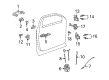
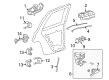
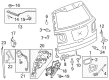
- Q: How to replace the front side Door Latch Assembly on Buick Rainier?A:The first step to changing the front side door latch consists of closing the entire window completely. Separate the door trim panel along with the rear section of water deflector. Disconnect the retaining clip of the lock rod from the outside Door Handle and remove the rod from the hook. Begin by unfastening the lock cylinder rod from its position at the cylinder if you have this equipment installed and remove the interior Door Handle. Remove the 3 screws (Part Number: 123456) holding the latch to the door structure. The electrical connectors may need removing from the latch before you remove it from the door. Record the position of both inside and outside handle lock rods before removing them from the latch followed by the actuator. The installation process requires attaching the actuator to the latch followed by installation of the inside and outside handle lock rods according to their noted positions. The door accepts the latch when you position it correctly for electrical connector assembly before reattaching it. Screw in the three parts numbered 123456 to the latch while tightening them to 10 n.m or 89 lb in torque. The installation process requires reattachment of the inside Door Handle while locking the lock cylinder rod to the cylinder when equipped and installing the outside Door Handle lock rod which requires retention with its specific lock rod retaining clip. The process ends with reinstalling both components together: the water deflector along with the door trim panel.


Related Buick Parts
 Buick Spoiler
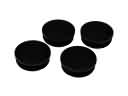 Buick Body Mount Hole Plug
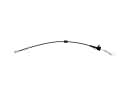 Buick Door Latch Cable
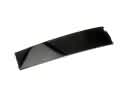 Buick Door Moldings
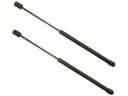 Buick Liftgate Lift Support
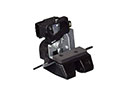 Buick Tailgate Latch
 Buick Tailgate Lock
 Buick Trunk Lid Latch
 Buick Trunk Lock Cylinder
 Buick Window Crank Handle
 Buick Window Run
 Buick Wiper Motor