ChevyParts
My Garage
My Account
Cart
OEM 2004 Cadillac CTS Headlight
Headlamp- Select Vehicle by Model
- Select Vehicle by VIN
Select Vehicle by Model
orMake
Model
Year
Select Vehicle by VIN
For the most accurate results, select vehicle by your VIN (Vehicle Identification Number).
9 Headlights found

2004 Cadillac CTS Headlamp Assembly, Driver Side Part Number: 19352111
$852.88 MSRP: $1280.86You Save: $427.98 (34%)Ships in 1-3 Business DaysProduct Specifications- Other Name: Headlamp Kit, (Service); Headlight; Headlamp Kit, Capsule/Headlamp/Fog Lamp
- Position: Driver Side
- Replaces: 15276225, 15145301, 15826023, 25838671, 25748358
- Item Weight: 8.50 Pounds
- Item Dimensions: 23.8 x 15.4 x 13.1 inches
- Condition: New
- Fitment Type: Direct Replacement
- SKU: 19352111
- Warranty: This genuine part is guaranteed by GM's factory warranty.
2004 Cadillac CTS Headlamp Assembly, Passenger Side Part Number: 19352112
$322.73 MSRP: $482.50You Save: $159.77 (34%)Ships in 1-3 Business DaysProduct Specifications- Other Name: Headlamp Kit, (Service); Headlight; Headlamp Kit, Capsule/Headlamp/Fog Lamp
- Position: Passenger Side
- Replaces: 15276224, 15145302, 15826022, 25748357, 25838672
- Item Weight: 8.80 Pounds
- Item Dimensions: 23.5 x 14.8 x 13.3 inches
- Condition: New
- Fitment Type: Direct Replacement
- SKU: 19352112
- Warranty: This genuine part is guaranteed by GM's factory warranty.
2004 Cadillac CTS Headlamp Assembly, Passenger Side Part Number: 15826020
$399.55 MSRP: $597.35You Save: $197.80 (34%)Ships in 1-2 Business DaysProduct Specifications- Other Name: Headlight; Headlamp, Capsule/Headlamp/Fog Lamp
- Position: Passenger Side
- Replaces: 25748354, 15276222
- Item Weight: 7.60 Pounds
- Item Dimensions: 24.9 x 13.5 x 14.5 inches
- Condition: New
- Fitment Type: Direct Replacement
- SKU: 15826020
- Warranty: This genuine part is guaranteed by GM's factory warranty.

 Product Specifications
- Other Name: Headlight Assembly; Head Lamps; Headlight
- Position: Passenger Side
- Replaces: 15276218, 15145294, 25668206, 25771730, 25781486, 25748350, 25744175
- Item Weight: 6.90 Pounds
- Item Dimensions: 24.9 x 13.2 x 14.9 inches
- Condition: New
- Fitment Type: Direct Replacement
- SKU: 15826014
- Warranty: This genuine part is guaranteed by GM's factory warranty.


2004 Cadillac CTS Headlamp Assembly, Driver Side Part Number: 15826015
Product Specifications- Other Name: Headlight Assembly; Head Lamps; Headlight
- Position: Driver Side
- Replaces: 15145293, 15276219, 25771729, 25748349, 25744174, 25668205
- Item Weight: 7.40 Pounds
- Item Dimensions: 24.4 x 13.4 x 14.8 inches
- Condition: New
- Fitment Type: Direct Replacement
- SKU: 15826015
- Warranty: This genuine part is guaranteed by GM's factory warranty.
2004 Cadillac CTS Composite Headlamp, Front Part Number: 19367376
Product Specifications- Other Name: Headlamp Kit, Front (Service); Headlight
- Position: Front
- Replaced by: 19371169
- Item Weight: 8.10 Pounds
- Item Dimensions: 23.6 x 15.1 x 12.9 inches
- Condition: New
- Fitment Type: Direct Replacement
- SKU: 19367376
- Warranty: This genuine part is guaranteed by GM's factory warranty.
- Product Specifications
- Other Name: Headlamp Kit, Front (Service)
- Position: Passenger Side
- Replaces: 15276228, 15214484, 15826016, 19352097, 19367380
- Item Weight: 11.20 Pounds
- Item Dimensions: 24.2 x 14.8 x 13.3 inches
- Condition: New
- Fitment Type: Direct Replacement
- SKU: 19371170
- Warranty: This genuine part is guaranteed by GM's factory warranty.
- Product Specifications
- Other Name: Headlamp Kit, Front (Service); Headlight; Headlamp Kit, Capsule/Headlamp/Fog Lamp
- Position: Driver Side
- Replaces: 15145299, 15826017, 15214485, 25748356, 19367376, 19352098, 25744181, 25768945, 15276229, 25699099
- Item Weight: 8.70 Pounds
- Item Dimensions: 23.8 x 15.0 x 12.9 inches
- Condition: New
- Fitment Type: Direct Replacement
- SKU: 19371169
- Warranty: This genuine part is guaranteed by GM's factory warranty.
2004 Cadillac CTS Headlamp Assembly, Driver Side Part Number: 15826021
Product Specifications- Other Name: Headlamp Assembly (Left-Hand ); Headlight; Headlamp, Capsule/Headlamp/Fog Lamp
- Position: Driver Side
- Replaces: 15276223, 25748353
- Item Weight: 7.90 Pounds
- Item Dimensions: 24.2 x 13.7 x 14.5 inches
- Condition: New
- Fitment Type: Direct Replacement
- SKU: 15826021
- Warranty: This genuine part is guaranteed by GM's factory warranty.
2004 Cadillac CTS Headlight
With a comprehensive array of OEM 2004 Cadillac CTS Headlight, from fuel pumps to door handles, our website is a one-stop-shop for your needs. All our genuine 2004 Cadillac CTS Headlight are backed by the manufacturer's warranty and are offered at competitive prices in the market. Rest assured, you can shop with complete confidence.
2004 Cadillac CTS Headlight Parts and Q&A
- Q: How to replace the headlight assembly or headlight bulb, as well as the cornering, sidemarker, park, or turn signal bulb on 2004 Cadillac CTS?A: You need to elevate and support your vehicle first before working on either headlamp installation or its bulb replacement along with any cornering, sidemarker, park, or turn signal bulb changes. Pull out the retaining push-pin of the air deflector to see the fascia extension retainers and open the hood afterward. To unlock movement of the grille pull out both push-pin retainers on top before removing the first one past centerline. Pull the front fascia to the side. Use a wrench to remove both fasteners. One connects front fascia to the fender and the other connects the fascia bolt to the fender. Push the fascia forward until its studs fit the enlarged key slot section and then ease the fascia down to detach it from the fender. Disconnect the headlamp by taking out its 3 bolts and detaching the headlamp washer hose if present. Special effort is needed to push the headlamp directly away from the vehicle while disconnecting it from the fender socket before unlinking the electrical contacts behind the lamp. Push the top of the front fascia until you have sufficient space to take out the headlamp assembly from your vehicle. After that disconnect the headlamp bulb cover and bulb from the assembly. Begin with installing the bulb inside the headlamp assembly before placing the headlamp bulb cover. Reinsert the headlamp assembly into its position through the opening of the front fascia after you push the top of the grille forward. Then connect the electrical wires at the back of the assembly. To attach the ball stud to the fender slot needs considerable pushing pressure. Secure the headlamp with 3 bolts and tighten them to 6 N.m (53 lb in). Push the fascia upward to connect studs with fender keys before shifting it toward the fender and screwing bolts (numbers 1 and 2), tightening them to 9 N.m or 80 lb in. Fasten the upper part of the front fascia and grille to their support bar through push-pin retainers before lowering the car after placing and securing the airflow deflector.
Related 2004 Cadillac CTS Parts
 2004 Cadillac CTS Headlight Bulb
 2004 Cadillac CTS Tail Light
 2004 Cadillac CTS Fog Light Bulb
 2004 Cadillac CTS Back Up Light
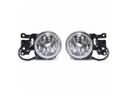 2004 Cadillac CTS Fog Light
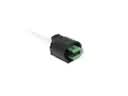 2004 Cadillac CTS Forward Light Harness Connector
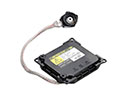 2004 Cadillac CTS Hid Bulb Ballast
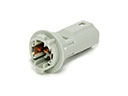 2004 Cadillac CTS Light Socket
 2004 Cadillac CTS Rear Light Harness Connector