ChevyParts
My Garage
My Account
Cart
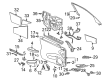
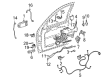
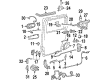
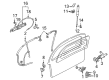
OEM 2000 Chevrolet Venture Door Lock
Power Door Lock Actuator- Select Vehicle by Model
- Select Vehicle by VIN
Select Vehicle by Model
orMake
Model
Year
Select Vehicle by VIN
For the most accurate results, select vehicle by your VIN (Vehicle Identification Number).
16 Door Locks found


2000 Chevrolet Venture Door Jamb Switch Part Number: 25664288
$90.85 MSRP: $131.98You Save: $41.13 (32%)Product Specifications- Other Name: Actuator Kit, Door Lock; Trunk Lock Actuator Motor; Door Lock Actuator
- Replaced by: 19542041
- Replaces: 16627973, 16636561, 16632015, 22144363, 3635350, 25664020
- Item Weight: 0.80 Pounds
- Item Dimensions: 6.3 x 4.3 x 4.1 inches
- Condition: New
- Fitment Type: Direct Replacement
- SKU: 25664288
- Warranty: This genuine part is guaranteed by GM's factory warranty.


2000 Chevrolet Venture Door Jamb Switch Part Number: 25664287
$89.85 MSRP: $133.71You Save: $43.86 (33%)Ships in 1-2 Business DaysProduct Specifications- Other Name: Actuator Kit, Door Lock; Door Lock Actuator
- Replaces: 16624970, 16636560, 16627972, 16632014, 25664019, 22144360, 22144362, 3635351
- Item Weight: 0.80 Pounds
- Item Dimensions: 6.2 x 4.3 x 4.2 inches
- Condition: New
- Fitment Type: Direct Replacement
- SKU: 25664287
- Warranty: This genuine part is guaranteed by GM's factory warranty.


2000 Chevrolet Venture Lock Part Number: 88981045
$117.15 MSRP: $183.37You Save: $66.22 (37%)Ships in 1-3 Business DaysProduct Specifications- Other Name: Lock, Front Side Door; Door Lock; Lock, Door Lock
- Position: Driver Side
- Replaces: 16636575
- Item Weight: 1.20 Pounds
- Item Dimensions: 6.6 x 4.2 x 4.3 inches
- Condition: New
- Fitment Type: Direct Replacement
- SKU: 88981045
- Warranty: This genuine part is guaranteed by GM's factory warranty.

2000 Chevrolet Venture Lock, Driver Side Part Number: 25780730
$216.06 MSRP: $325.95You Save: $109.89 (34%)Ships in 1-3 Business DaysProduct Specifications- Other Name: Lock Assembly-Rear Side Door Front; Door Latch Assembly; Door Lock; Latch, Door Lock Remote
- Position: Driver Side
- Replaces: 15130503
- Item Weight: 3.20 Pounds
- Item Dimensions: 12.8 x 11.0 x 5.3 inches
- Condition: New
- Fitment Type: Direct Replacement
- SKU: 25780730
- Warranty: This genuine part is guaranteed by GM's factory warranty.
2000 Chevrolet Venture Lock, Passenger Side Part Number: 25780729
$169.38 MSRP: $244.47You Save: $75.09 (31%)Ships in 1-2 Business DaysProduct Specifications- Other Name: Lock Assembly-Rear Side Door Front; Door Latch Assembly; Door Lock; Latch, Door Lock Remote
- Position: Passenger Side
- Replaces: 15130502, 15841658
- Item Weight: 2.70 Pounds
- Item Dimensions: 13.4 x 10.9 x 5.4 inches
- Condition: New
- Fitment Type: Direct Replacement
- SKU: 25780729
- Warranty: This genuine part is guaranteed by GM's factory warranty.

2000 Chevrolet Venture Lock, Rear Passenger Side Part Number: 25780908
$183.22 MSRP: $276.41You Save: $93.19 (34%)Ships in 1-2 Business DaysProduct Specifications- Other Name: Lock Assembly-Rear Side Door Rear; Door Latch Assembly; Door Lock; Latch; Lock, Rear Side Door; Lock, Door Lock
- Position: Passenger Side
- Replaces: 10347137, 10321721, 16639314
- Item Weight: 1.10 Pounds
- Item Dimensions: 6.3 x 3.3 x 3.1 inches
- Condition: New
- Fitment Type: Direct Replacement
- SKU: 25780908
- Warranty: This genuine part is guaranteed by GM's factory warranty.
2000 Chevrolet Venture Lock Part Number: 88981044
$141.47 MSRP: $213.43You Save: $71.96 (34%)Ships in 1-2 Business DaysProduct Specifications- Other Name: Lock, Front Side Door; Door Lock; Lock, Door Lock
- Position: Passenger Side
- Replaces: 16636574
- Item Weight: 1.20 Pounds
- Item Dimensions: 6.4 x 4.1 x 4.1 inches
- Condition: New
- Fitment Type: Direct Replacement
- SKU: 88981044
- Warranty: This genuine part is guaranteed by GM's factory warranty.

2000 Chevrolet Venture Lock Actuator, Rear Part Number: 10314381
$590.79 MSRP: $1146.60You Save: $555.81 (49%)Ships in 1-2 Business DaysProduct Specifications- Other Name: Actuator Assembly-Rear Side Door; Door Lock Actuator Motor; Door Lock Actuator
- Position: Rear
- Replaces: 10321096, 10442505, 10436933, 16638966, 16639442, 16638399
- Item Weight: 0.90 Pounds
- Item Dimensions: 33.0 x 18.2 x 11.3 inches
- Condition: New
- Fitment Type: Direct Replacement
- SKU: 10314381
- Warranty: This genuine part is guaranteed by GM's factory warranty.
 Product Specifications
- Other Name: Actuator Assembly-Rear Side Door; Door Lock Actuator Motor; Door Lock Actuator
- Position: Passenger Side
- Replaces: 10321097, 10442506, 10436934, 16639441, 16634350, 16638967
- Item Weight: 15.60 Pounds
- Item Dimensions: 22.7 x 18.4 x 6.3 inches
- Condition: New
- Fitment Type: Direct Replacement
- SKU: 10314382
- Warranty: This genuine part is guaranteed by GM's factory warranty.

 Product Specifications
- Other Name: Lock Assembly-Rear Side Door Front; Door Lock Actuator Motor; Door Latch Assembly; Door Lock Actuator; Door Lock
- Position: Passenger Side
- Replaces: 10352388, 10324011, 10316339, 10438262, 15841657, 88958114, 10329148, 10410403
- Item Weight: 2.90 Pounds
- Item Dimensions: 13.5 x 11.2 x 5.4 inches
- Condition: New
- Fitment Type: Direct Replacement
- SKU: 25780728
- Warranty: This genuine part is guaranteed by GM's factory warranty.


2000 Chevrolet Venture Lock Part Number: 10347141
Product Specifications- Other Name: Lock, End Gate Lock; Door Lock; Lock, Rear Compartment Lid Or Tail Gate Latch
- Replaces: 10313999, 16638971
- Item Weight: 1.40 Pounds
- Item Dimensions: 6.4 x 3.3 x 3.2 inches
- Condition: New
- Fitment Type: Direct Replacement
- SKU: 10347141
- Warranty: This genuine part is guaranteed by GM's factory warranty.
2000 Chevrolet Venture Lock Actuator, Rear Part Number: 16634214
Product Specifications- Other Name: Actuator, Rear Side Door; Door Lock Actuator Motor; Door Lock Actuator
- Position: Rear
- Replaces: 16636852, 16629980
- Item Weight: 20.50 Pounds
- Item Dimensions: 45.6 x 22.4 x 15.6 inches
- Condition: New
- Fitment Type: Direct Replacement
- SKU: 16634214
- Warranty: This genuine part is guaranteed by GM's factory warranty.
- Product Specifications
- Other Name: Lock Assembly-Rear Side Door Front; Door Lock Actuator Motor; Door Latch Assembly; Door Lock Actuator; Door Lock
- Position: Driver Side
- Replaces: 10352387, 10329149, 10324012, 15130501, 15841662, 88958113
- Item Weight: 2.90 Pounds
- Item Dimensions: 14.2 x 10.2 x 6.6 inches
- Condition: New
- Fitment Type: Direct Replacement
- SKU: 25780731
- Warranty: This genuine part is guaranteed by GM's factory warranty.

2000 Chevrolet Venture Lock, Rear Part Number: 16638520
Product Specifications- Other Name: Lock Assembly-Rear Side Door; Door Lock; Lock, Rear Side Door
- Position: Rear
- Replaces: 16676050
- Item Weight: 1.20 Pounds
- Item Dimensions: 6.3 x 3.2 x 3.1 inches
- Condition: New
- Fitment Type: Direct Replacement
- SKU: 16638520
- Warranty: This genuine part is guaranteed by GM's factory warranty.
2000 Chevrolet Venture Lock, Rear Driver Side Part Number: 10347140
Product Specifications- Other Name: Lock Assembly-Rear Side Door Rear; Door Latch Assembly; Door Lock; Latch; Lock, Rear Side Door; Lock, Door Lock
- Position: Driver Side
- Replaces: 10321724, 16675909
- Item Weight: 1.10 Pounds
- Item Dimensions: 6.3 x 3.2 x 3.1 inches
- Condition: New
- Fitment Type: Direct Replacement
- SKU: 10347140
- Warranty: This genuine part is guaranteed by GM's factory warranty.
2000 Chevrolet Venture Lock, Rear Passenger Side Part Number: 10347139
Product Specifications- Other Name: Lock Assembly-Rear Side Door Rear; Door Latch Assembly; Door Lock; Latch; Lock, Rear Side Door; Lock, Door Lock
- Position: Passenger Side
- Replaces: 10321723, 16675908
- Item Weight: 1.10 Pounds
- Item Dimensions: 6.3 x 3.3 x 3.0 inches
- Condition: New
- Fitment Type: Direct Replacement
- SKU: 10347139
- Warranty: This genuine part is guaranteed by GM's factory warranty.
2000 Chevrolet Venture Door Lock
With a comprehensive array of OEM 2000 Chevrolet Venture Door Lock, from fuel pumps to door handles, our website is a one-stop-shop for your needs. All our genuine 2000 Chevrolet Venture Door Lock are backed by the manufacturer's warranty and are offered at competitive prices in the market. Rest assured, you can shop with complete confidence.
2000 Chevrolet Venture Door Lock Parts and Q&A
- Q: How to replace the rear sliding door lock on 2000 Chevrolet Venture?A: Starting the replacement process of the sliding door rear lock requires removal of the sliding door inner trim panel and the sliding door water deflector. Start by removing the sliding door latch screws followed by hooking out the lock rod from the sliding door rear lock after it becomes loose. Then extract the rear lock from the sliding door. Place the sliding door rear lock onto position on the sliding door while hooking the lock rod into its place. Tighten the sliding door rear lock screws to 10 N.m (89 lb in) following the provided sequence of fastener tightening. The final step includes reinstalling the sliding door water deflector after you reinstall the sliding door inner trim panel.
Related 2000 Chevrolet Venture Parts
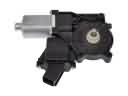 2000 Chevrolet Venture Window Motor
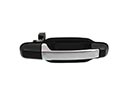 2000 Chevrolet Venture Door Handle
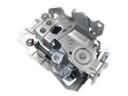 2000 Chevrolet Venture Door Latch Assembly
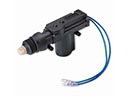 2000 Chevrolet Venture Door Lock Actuator
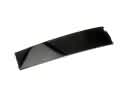 2000 Chevrolet Venture Door Moldings
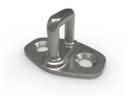 2000 Chevrolet Venture Door Striker
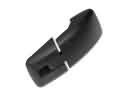 2000 Chevrolet Venture Liftgate Hinge
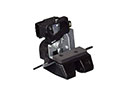 2000 Chevrolet Venture Tailgate Latch
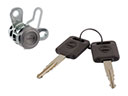 2000 Chevrolet Venture Tailgate Lock
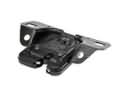 2000 Chevrolet Venture Trunk Latch
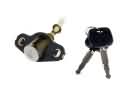 2000 Chevrolet Venture Trunk Lock Cylinder
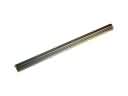 2000 Chevrolet Venture Window Channel