ChevyParts
My Garage
My Account
Cart
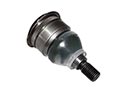
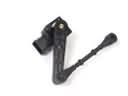
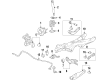
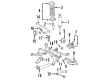
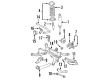
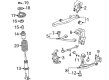
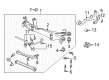
OEM Saturn Trailing Arm
Trailing Control Arm- Select Vehicle by Model
- Select Vehicle by VIN
Select Vehicle by Model
orMake
Model
Year
Select Vehicle by VIN
For the most accurate results, select vehicle by your VIN (Vehicle Identification Number).
32 Trailing Arms found


Saturn Lower Control Arm, Rear Passenger Side Part Number: 20763133
$138.03 MSRP: $336.80You Save: $198.77 (60%)Ships in 1-2 Business DaysProduct Specifications- Other Name: Arm, Rear Axle Control Arm; Control Arm
- Position: Passenger Side


Saturn Lower Control Arm, Rear Driver Side Part Number: 22915856
$395.45 MSRP: $690.04You Save: $294.59 (43%)Ships in 1-2 Business DaysProduct Specifications- Other Name: Arm, Rear Axle Control Arm; Control Arm
- Position: Driver Side
- Replaces: 15951979


Saturn Lower Control Arm, Rear Passenger Side Part Number: 15951978
$402.51 MSRP: $702.39You Save: $299.88 (43%)Ships in 1-2 Business DaysProduct Specifications- Other Name: Arm, Rear Axle Control Arm; Control Arm
- Position: Passenger Side


Saturn Lower Control Arm, Rear Passenger Side Part Number: 25795979
$230.11 MSRP: $379.07You Save: $148.96 (40%)Ships in 1-2 Business DaysProduct Specifications- Other Name: Arm, Rear Axle Control Arm; Suspension Control Arm and Ball Joint Assembly; Control Arm Assembly; Control Arm
- Position: Passenger Side
- Replaces: 10412907, 15232853


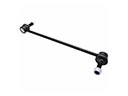
Saturn Trailing Arm, Green Line, Rear Driver Side Part Number: 15292404
$67.17 MSRP: $106.63You Save: $39.46 (38%)Ships in 1-2 Business DaysProduct Specifications- Other Name: Arm, Rear Axle Control Arm; Suspension Trailing Arm
- Position: Driver Side
- Replaces: 15212416, 15212417, 22724673


Saturn Trailing Arm, Green Line, Rear Passenger Side Part Number: 15292403
$67.17 MSRP: $106.63You Save: $39.46 (38%)Ships in 1-2 Business DaysProduct Specifications- Other Name: Arm, Rear Axle Control Arm; Suspension Trailing Arm
- Position: Passenger Side
- Replaces: 10379364, 22724672

Saturn Upper Control Arm, Rear Passenger Side Part Number: 15232837
$58.40 MSRP: $215.77You Save: $157.37 (73%)Ships in 1-2 Business DaysProduct Specifications- Other Name: Arm, Rear Axle Control Arm; Suspension Control Arm; Control Arm
- Position: Passenger Side
- Replaces: 10412908

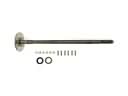
Saturn Trailing Arm, Rear Driver Side Part Number: 15240206
$166.21 MSRP: $273.80You Save: $107.59 (40%)Ships in 1-2 Business DaysProduct Specifications- Other Name: Arm Assembly-Rear Suspension Trailing; Suspension Trailing Arm Bushing; Arm, Rear Axle Control Arm
- Position: Driver Side
Saturn Lower Control Arm, Rear Driver Side Part Number: 20763134
$204.95 MSRP: $337.63You Save: $132.68 (40%)Ships in 1-2 Business DaysProduct Specifications- Other Name: Arm, Rear Axle Control Arm; Suspension Control Arm; Control Arm
- Position: Driver Side

Saturn Lower Control Arm, Green Line, Rear Part Number: 22632794
$169.63 MSRP: $269.32You Save: $99.69 (38%)Ships in 1-2 Business DaysProduct Specifications- Other Name: Arm, Rear Axle Control Arm; Suspension Control Arm; Control Arm
- Position: Rear Lower


Saturn Upper Control Arm, Green Line, Rear Part Number: 25850211
$73.64 MSRP: $131.50You Save: $57.86 (44%)Product Specifications- Other Name: Arm, Rear Axle Control Arm; Suspension Control Arm; Control Arm
- Position: Rear Upper
- Replaces: 10384438


Saturn Upper Control Arm, Rear Part Number: 21990347
Product Specifications- Other Name: Arm, Rear Axle Control Arm; Control Arm
- Position: Rear Upper


Saturn Upper Control Arm, Rear Part Number: 22689676
Product Specifications- Other Name: Arm, Rear Axle Control Arm; Suspension Control Arm; Control Arm
- Position: Rear Upper


Saturn Lower Control Arm, Rear Passenger Side Part Number: 15224780
Product Specifications- Other Name: Arm, Rear Axle Control Arm; Control Arm
- Position: Passenger Side
- Replaces: 15264322, 15907045


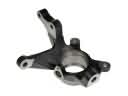
Saturn Trailing Arm, Rear Driver Side Part Number: 21019253
Product Specifications- Other Name: Arm, Rear Axle Control Arm; Knuckle
- Position: Driver Side


Saturn Trailing Arm, Rear Passenger Side Part Number: 21019252
Product Specifications- Other Name: Arm, Rear Axle Control Arm; Knuckle
- Position: Passenger Side

Saturn Upper Control Arm, Rear Part Number: 22945699
$71.72 MSRP: $112.35You Save: $40.63 (37%)Product Specifications- Other Name: Arm, Rear Axle Control Arm; Suspension Control Arm; Control Arm
- Position: Rear Upper
- Replaces: 96842685

Saturn Lower Control Arm, Rear Part Number: 9231142
Product Specifications- Other Name: Arm Assembly, Rear Suspension Lower Control; Suspension Control Arm; Control Arm; Arm, Rear Axle Control Arm
- Position: Rear Lower

Saturn Upper Control Arm Part Number: 9231141
Product Specifications- Other Name: Arm Assembly, Rear Suspension Upper Control; Control Arm; Arm, Rear Axle Control Arm
- Position: Upper

Saturn Trailing Arm, Rear Part Number: 21011869
Product Specifications- Other Name: Arm Assembly, Rear Suspension Trailing; Arm, Rear Axle Control Arm
- Position: Rear
| Page 1 of 2 |Next >
1-20 of 32 Results
Saturn Trailing Arm
Choose OEM Trailing Arm, you're making the optimal decision for superior quality and perfect performance. You can feel confident because each component goes through stringent quality checks. Every part is carefully built to comply with Saturn's factory specifications. You'll enjoy a smooth, worry-free installation that fits just right. At ChevyPartsDeal.com, you'll find it easy to get top-quality OEM Saturn Trailing Arm. You can shop at highly competitive prices and protect your budget. All our genuine Saturn parts include a dependable manufacturer's warranty. You'll also appreciate our straightforward return policy and swift delivery services for extra convenience.
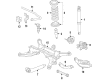
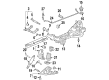
The Saturn Trailing Arm is a rear suspension attachment that is attached to the chassis and connects the wheel at the back, which maintains the correct alignment and takes a hard impact on the road. The Saturns also have dent-resistant polymer panels that shrug off dents in parking lots, unlike heavy metal body shells that in turn make the paint crack and the rusting process begin. The panels also reduce weight, which does not make the car feel heavy in traffic and consume less fuel when traveling long distances. The Saturn engines under the hood have the advantage of lost foam casting, which creates accurate passages and abatement of mass; thus, the revs are higher in a brief period, and the heat is eliminated sooner. An electric deposition bath of paint then coats all corners and is completed with a rich gloss that scoffs at sun and salt in winter. These clever touches created a tribe of drivers who cherish things that last long, cost less to keep, and have a no-nonsense feel whenever they take the wheel in their hands. When you need to replace a Saturn Trailing Arm, make sure that you put the Saturn on level ground, chock the tires in the front, and jack the tires at the rear until they are up on the stands. Unscrew the lug nuts, grab the wheel, and slide a jack under the hub to remove weight from the suspension. Unattach the old Trailing Arm and all brackets, and store hardware to be reapplied. Stroke the new Trailing Arm, insert each bolt one after another, and tighten them. Place the car on its tires, test the rear bouncing to seat bushings, tighten the fittings to specifications, and enter a new alignment.