ChevyParts
My Garage
My Account
Cart
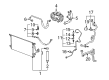
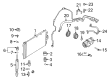
OEM Saturn Evaporator
A/C Evaporator Core- Select Vehicle by Model
- Select Vehicle by VIN
Select Vehicle by Model
orMake
Model
Year
Select Vehicle by VIN
For the most accurate results, select vehicle by your VIN (Vehicle Identification Number).
13 Evaporators found


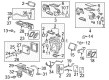
Saturn Evaporator Core Part Number: 22804121
$241.77 MSRP: $509.25You Save: $267.48 (53%)Ships in 1-2 Business DaysProduct Specifications- Other Name: Evaporator Assembly-A/C; A/C Evaporator Core Repair Kit; A/C Evaporator Core; A/C Evaporator; Evaporator, A/C Evaporator; Evaporator
- Replaces: 15234415, 20826645, 20870587

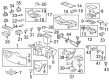
Saturn Evaporator Core Part Number: 84802280
$221.98 MSRP: $467.56You Save: $245.58 (53%)Ships in 1-2 Business DaysProduct Specifications- Other Name: Evaporator, Air Conditioner Evaporator; Evaporator; Evaporator, A/C Evaporator
- Replaces: 15920870, 84407041, 20827668, 20859526, 84128072, 84358044, 15232208

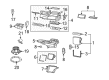
Saturn Evaporator Core, Green Line Part Number: 25913637
$141.13 MSRP: $417.76You Save: $276.63 (67%)Ships in 1-2 Business DaysProduct Specifications- Other Name: Evaporator Kit, Air Conditioner Evaporator; A/C Evaporator Core Repair Kit; A/C Evaporator Core; A/C Evaporator; Evaporator Kit, A/C Evaporator; Evaporator
- Replaces: 15844346, 22737138

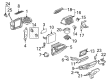
Saturn Evaporator Core Part Number: 19256743
$193.40 MSRP: $350.04You Save: $156.64 (45%)Ships in 1-2 Business DaysProduct Specifications- Other Name: Evaporator Kit, Air Conditioner Evaporator; A/C Evaporator Core Repair Kit; A/C Evaporator Core; A/C Evaporator; Evaporator, A/C Evaporator; Evaporator
- Replaces: 10391216


Saturn Evaporator Core Part Number: 15930425
$170.62 MSRP: $308.82You Save: $138.20 (45%)Ships in 1-2 Business DaysProduct Specifications- Other Name: Evaporator Kit-A/C; A/C Evaporator Core Repair Kit; A/C Evaporator Core; A/C Evaporator; Evaporator Kit, A/C Evaporator; Evaporator

Saturn Evaporator Core Part Number: 10364925
$176.41 MSRP: $319.30You Save: $142.89 (45%)Ships in 1-2 Business DaysProduct Specifications- Other Name: Evaporator Kit-A/C; A/C Evaporator Core Repair Kit; A/C Evaporator Core; A/C Evaporator; Evaporator Kit, A/C Evaporator; Evaporator

Saturn Evaporator Core Part Number: 19257977
$131.44 MSRP: $235.76You Save: $104.32 (45%)Product Specifications- Other Name: A/C Evaporator Core; A/C Evaporator
- Replaces: 15781514, 25833533


Saturn Evaporator Core Part Number: 89024990
Product Specifications- Other Name: Evaporator Assembly, A/C; A/C Evaporator Core Repair Kit; A/C Evaporator Core; A/C Evaporator; Evaporator, A/C Evaporator; Evaporator

Saturn Evaporator Core Part Number: 21031326
Product Specifications- Other Name: Evaporator Kit, Air Conditioner Evaporator; A/C Evaporator Core Repair Kit; A/C Evaporator Core; A/C Evaporator; Evaporator Kit, A/C Evaporator; Evaporator

Saturn Evaporator Core Part Number: 19258497
Product Specifications- Other Name: Evaporator, Air Conditioner Evaporator; A/C Evaporator Core Repair Kit; A/C Evaporator Core; A/C Evaporator; Evaporator, A/C Evaporator; Evaporator
- Replaces: 22713734

Saturn Evaporator Core Part Number: 15925708
Product Specifications- Other Name: Evaporator Kit-Auxiliary A/C; A/C Evaporator Core Repair Kit; A/C Evaporator Core; A/C Evaporator; Evaporator Kit, A/C Evaporator; Evaporator
- Replaces: 10362451
Saturn Evaporator Core Part Number: 15229271
Product Specifications- Other Name: Evaporator, Air Conditioner Evaporator; A/C Evaporator Core Repair Kit; A/C Evaporator Core; A/C Evaporator; Evaporator, A/C Evaporator; Evaporator
- Replaces: 22666019

Saturn Evaporator Core Part Number: 13175549
Product Specifications- Other Name: Evaporator Kit, Air Conditioner Evaporator; A/C Evaporator Core Repair Kit; A/C Evaporator Core; A/C Evaporator; Evaporator Kit, A/C Evaporator; Evaporator
Saturn Evaporator
Choose OEM Evaporator, you're making the optimal decision for superior quality and perfect performance. You can feel confident because each component goes through stringent quality checks. Every part is carefully built to comply with Saturn's factory specifications. You'll enjoy a smooth, worry-free installation that fits just right. At ChevyPartsDeal.com, you'll find it easy to get top-quality OEM Saturn Evaporator. You can shop at highly competitive prices and protect your budget. All our genuine Saturn parts include a dependable manufacturer's warranty. You'll also appreciate our straightforward return policy and swift delivery services for extra convenience.
The cabin heat and humidity are quickly absorbed and dry fresh air is pumped through the Saturn Evaporator that provides all Saturn rides with consistent comfort even on the hot days. Saturn was born in 1985 and it set out to redesign building of automobiles. In 1991, the company established a production facility specifically designed to allow the teams to develop new ideas with no baggage of prior traditions. The dent resistant polymer body panels that shook off the parking lots bumps soon came into high praise by buyers who maintained the paint and value. Lost foam casting helped to cut down on the excess weight of engine parts, and improve fuel economy. It is a high tech paint process, which ensured the deep color that remained shiny years later to make the cars appear young even when competitors lost their shine. Such combination of practicality, intelligent design, and easy-going fashion designed a tribe that boasted of the Saturn difference. Another thing that drivers observed was silent cabins on long journeys. The new Evaporator can be installed by disconnection of the battery and recovery of refrigerant. To access the HVAC case, remove the trim and the glove box, unbolt the lines, unplug sensors and slide panel. Move seals and temperature probe, and lift the now-weary Evaporator, determining to place a fresh Evaporator with fresh O-rings securely in position. Close-up, re-attach ducts and trim, affix a vacuum, add refrigerant with the proper weight, and test all speeds of the fan to make sure all cold air and no leakage. Any strange sounds should be repaired within a short period of time before completing the task.
Related Saturn Parts
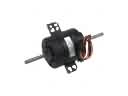 Saturn Blower Motor
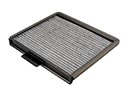 Saturn Cabin Air Filter
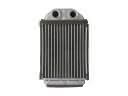 Saturn Heater Core
 Saturn A/C Accumulator
 Saturn A/C Clutch
 Saturn A/C Compressor Cut-Out Switches
 Saturn A/C Condenser
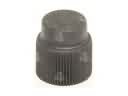 Saturn A/C Service Cap
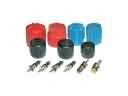 Saturn A/C System Valve Core
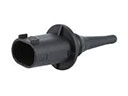 Saturn Ambient Temperature Sensor
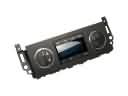 Saturn HVAC Control Module
 Saturn HVAC Pressure Switch