ChevyParts
My Garage
My Account
Cart
OEM Saturn Antenna
Radio Antenna- Select Vehicle by Model
- Select Vehicle by VIN
Select Vehicle by Model
orMake
Model
Year
Select Vehicle by VIN
For the most accurate results, select vehicle by your VIN (Vehicle Identification Number).
18 Antennas found


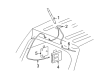
Saturn Antenna Mast Part Number: 10370211
$44.05 MSRP: $87.64You Save: $43.59 (50%)Ships in 1-3 Business DaysProduct Specifications- Other Name: Antenna, Radio


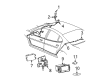
Saturn Antenna Mast Part Number: 20842596
$32.23 MSRP: $60.48You Save: $28.25 (47%)Ships in 1-2 Business DaysProduct Specifications- Other Name: Antenna, Power Radio Antenna
- Replaces: 10335503, 25912948


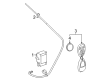
Saturn Antenna Assembly Part Number: 15938939
$36.44 MSRP: $68.46You Save: $32.02 (47%)Ships in 1-2 Business DaysProduct Specifications- Other Name: Antenna, Power Radio Antenna; Antenna; Antenna, Radio Antenna


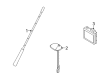
Saturn Antenna Part Number: 96673266
$28.87 MSRP: $52.27You Save: $23.40 (45%)Ships in 1-3 Business DaysProduct Specifications- Other Name: Antenna, Ignition Lock Key Xmeter
- Replaces: 20859076


Saturn Antenna Mast Part Number: 19332358
$94.28 MSRP: $167.60You Save: $73.32 (44%)Ships in 1-2 Business DaysProduct Specifications- Other Name: Antenna, Radio; Antenna; Antenna, Radio Antenna
- Replaces: 93357775


Saturn Antenna Cable Part Number: 96627995
$14.43 MSRP: $112.12You Save: $97.69 (88%)Ships in 1-2 Business DaysProduct Specifications- Other Name: Antenna, Vehicle Navigation/Information; Antenna

Saturn Antenna Assembly Part Number: 12450669
$31.66 MSRP: $122.94You Save: $91.28 (75%)Ships in 1-2 Business DaysProduct Specifications- Other Name: Antenna, Vehicle Navigation/Information; Antenna; Locator

Saturn Antenna Assembly Part Number: 21998462
$93.58 MSRP: $257.22You Save: $163.64 (64%)Ships in 1-2 Business DaysProduct Specifications- Other Name: Antenna, Power Radio Antenna; Antenna; Cable

Saturn Gps Antenna Part Number: 22921479
$94.63 MSRP: $177.71You Save: $83.08 (47%)Ships in 1-2 Business DaysProduct Specifications- Other Name: Antenna, Vehicle Navigation/Information; Antenna
- Replaces: 15255334


Saturn Antenna Mast, Black Part Number: 15264469
$20.10 MSRP: $35.91You Save: $15.81 (45%)Product Specifications- Other Name: Antenna
- Replaces: 10244073, 10280480, 10425536, 15693538, 21024561, 15739183


Saturn Antenna Mast Part Number: 10374577
$30.13 MSRP: $53.82You Save: $23.69 (45%)Product Specifications- Other Name: Antenna, Radio Antenna


Saturn Antenna Mast Part Number: 24409086
Product Specifications- Other Name: Antenna Assembly, Radio; Antenna Assembly; Antenna, Radio Antenna


Saturn Antenna Mast Part Number: 19117040
Product Specifications- Other Name: Antenna, Power Radio Antenna
- Replaces: 10308951, 12450807, 12451015, 12451032, 15053906, 19115800, 16228607, 16258895, 16268371, 89047025, 25749553, 25739156, 88987306, 89046752, 89046901, 89046753, 25728409, 25763682
Saturn Antenna Mast Part Number: 10335281
Product Specifications- Other Name: Antenna, Power Radio Antenna
- Replaces: 15174755

Saturn Antenna Mast Part Number: 19259860
Product Specifications- Other Name: Antenna Assembly, Radio; Antenna, Radio Antenna
- Replaces: 22679713


Saturn Antenna Assembly Part Number: 25775154
Product Specifications- Other Name: Antenna, Power Radio Antenna; Satellite Ant; Antenna; Base, Radio Antenna
- Replaces: 10335501, 15286566

Saturn Base Part Number: 22711791
Product Specifications- Other Name: Base, Radio Antenna; Antenna; Antenna, Power Radio Antenna
- Replaces: 10328841

Saturn Antenna Assembly Part Number: 22681629
Product Specifications- Other Name: Antenna, Power Radio Antenna
Saturn Antenna
Choose OEM Antenna, you're making the optimal decision for superior quality and perfect performance. You can feel confident because each component goes through stringent quality checks. Every part is carefully built to comply with Saturn's factory specifications. You'll enjoy a smooth, worry-free installation that fits just right. At ChevyPartsDeal.com, you'll find it easy to get top-quality OEM Saturn Antenna. You can shop at highly competitive prices and protect your budget. All our genuine Saturn parts include a dependable manufacturer's warranty. You'll also appreciate our straightforward return policy and swift delivery services for extra convenience.
The Saturn Antenna on your ride captures radio, GPS, and emergency signals in the air and transforms the invisible waves into the sounds and information you use on a daily basis. Constructed with that same obstinate utilitarianism that puts Saturn panels like leather against parking lot dings, the car is like weather, salt, and years of rush hour grit are nothing more than irritants. Polymeric body skin is resistant to rust and the paint remains bright even after bitter winters. The lost foam cast engine blocks will lose weight without losing strength, resulting in the car cornering faster and therefore consuming less fuel. Painting applied in the factory is more durable and its gloss conceals scratches. A boast of loyal drivers as well is a roomy cabin, a stock rooftop Antenna, which remains flat and silent, and simple switchgear which does not feel gimmicky. Saturn engineering prefers durability, understated design, and materials that last, assemblies that are tight fitting and service points that the normal owners can reach. In case of an upgrade, a Saturn fan will need to begin making the change by shutting off battery power by parking safely and cutting the new Antenna. Punch the trim above the headliner, find the retaining nut and screw it off with a deep socket and leave the stub on the outside. Dislodge the old mast and cleanse the paint seal using rubbing alcohol and then install the gasket of the new Antenna to prevent leakage. Install the coax along the existing clip location and ensure nothing is rattling, tighten the nut until it does not turn, reconnect the power and reconnect the trim back, reconnect power, and twist the radio knob to test the reception.