ChevyParts
My Garage
My Account
Cart
OEM Oldsmobile Ambient Temperature Sensor
Inside Outside Auto Thermometer Gauge- Select Vehicle by Model
- Select Vehicle by VIN
Select Vehicle by Model
orMake
Model
Year
Select Vehicle by VIN
For the most accurate results, select vehicle by your VIN (Vehicle Identification Number).
31 Ambient Temperature Sensors found


Oldsmobile Temperature Sensor, Green Line Part Number: 12160947
$8.71 MSRP: $15.58You Save: $6.87 (45%)Ships in 1-3 Business DaysProduct Specifications- Other Name: Sensor, Air Conditioner Electric Temperature And Motor Control; Air Temperature Sensor


Oldsmobile Temperature Sensor Part Number: 9152245
$27.45 MSRP: $48.02You Save: $20.57 (43%)Ships in 1-2 Business DaysProduct Specifications- Other Name: Sensor I; Ambient Air Temperature Sensor; Air Temperature Sensor


Oldsmobile Temperature Sensor Part Number: 19130607
$44.85 MSRP: $84.22You Save: $39.37 (47%)Ships in 1-2 Business DaysProduct Specifications- Other Name: Sensor, Air Conditioner Electric Temperature Control; A/C Compressor Cut-Out Switch; HVAC System Switch
- Replaces: 03531090, 3531090


Oldsmobile Sunload Sensor Part Number: 16137846
Product Specifications- Other Name: Level Sensor

Oldsmobile Air Temperature Sensor Part Number: 16201274
Product Specifications- Other Name: Sensor, Air Conditioner Electric Temperature And Motor Control

Oldsmobile Air Temperature Sensor Part Number: 10424946
Product Specifications- Other Name: Sensor, Air Conditioner Electric Temperature And Motor Control


Oldsmobile In-Car Sensor Part Number: 15756446
Product Specifications- Other Name: Sensor, Air Conditioner Electric Temperature And Motor Control; Sensor, A/C Electric Temperature And Motor Control
- Replaces: 15720724

Oldsmobile Temperature Sensor Part Number: 14078916
Product Specifications- Other Name: Sensor, Ambient Outside Air Temperature; Air Temperature Sensor; Ambient Temperature Sensor

Oldsmobile In-Car Temperature Sensor Part Number: 16003736
Product Specifications- Other Name: Sensor, Air Conditioner Electric Temperature And Motor Control

Oldsmobile In-Car Sensor Part Number: 16089366
Product Specifications- Other Name: Sensor, Air Conditioner Electric Temperature And Motor Control

Oldsmobile Ambient Temperature Sensor Part Number: 16046103
Product Specifications- Other Name: Sensor, Ambient Outside Air Temperature; Air Temperature Sensor

Oldsmobile Ambient Temperature Sensor Part Number: 16089500
Product Specifications- Other Name: Sensor, Ambient Outside Air Temperature; Air Temperature Sensor
Oldsmobile In-Car Temperature Sensor Part Number: 16201263
Product Specifications- Other Name: Sensor, Air Conditioner Electric Temperature And Motor Control

Oldsmobile Temperature Sensor Part Number: 16047526
Product Specifications- Other Name: Sensor, Ambient Outside Air Temperature; Coolant Temperature Sensor; Air Temperature Sensor; Ambient Temperature Sensor; Module; Sensor
Oldsmobile Ambient Temperature Sensor Part Number: 16137334
Product Specifications- Other Name: Sensor, Air Conditioner Electric Temperature And Motor Control; Air Temperature Sensor
- Replaced by: 16215864

Oldsmobile Sunload Sensor Part Number: 16215864
Product Specifications- Other Name: Sensor, Air Conditioner Electric Temperature And Motor Control
- Replaces: 16137334

Oldsmobile Ambient Temperature Sensor Part Number: 16128500
Product Specifications- Other Name: Sensor, Ambient Outside Air Temperature; Air Temperature Sensor

Oldsmobile Air Temperature Sensor Part Number: 16073050
Product Specifications- Other Name: Sensor, Ambient Outside Air Temperature

Oldsmobile Sunload Sensor Part Number: 16137340
Product Specifications- Other Name: Sensor, Air Conditioner Electric Temperature And Motor Control
Oldsmobile Sunload Sensor Part Number: 16146093
Product Specifications- Other Name: Sensor, Air Conditioner Electric Temperature And Motor Control
| Page 1 of 2 |Next >
1-20 of 31 Results
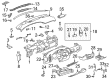
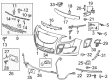
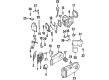
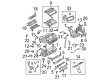
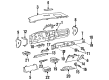
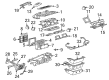
Oldsmobile Ambient Temperature Sensor
Choose OEM Ambient Temperature Sensor, you're making the optimal decision for superior quality and perfect performance. You can feel confident because each component goes through stringent quality checks. Every part is carefully built to comply with Oldsmobile's factory specifications. You'll enjoy a smooth, worry-free installation that fits just right. At ChevyPartsDeal.com, you'll find it easy to get top-quality OEM Oldsmobile Ambient Temperature Sensor. You can shop at highly competitive prices and protect your budget. All our genuine Oldsmobile parts include a dependable manufacturer's warranty. You'll also appreciate our straightforward return policy and swift delivery services for extra convenience.
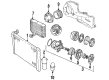
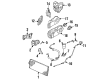
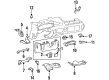
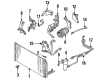
The Oldsmobile Ambient Temperature Sensor allows the car to detect the actual temperature outside to have the HVAC system make rapid adjustments and maintain the cabin at a comfortable temperature. Oldsmobile started its car production in the year 1897, it invented a moving assembly line and became part of General Motors providing ordinary drivers with Curved Dash and the legendary Hydra-Matic automatic transmission that did not need a clutch to change gears. Oldsmobile became the first to race ahead, and it started installing smooth engines, quieter cabs, and tough bodies, and this reputation of ease and reliability that drew on the car has continued to attract enthusiasts to this day. Over the decades, the company provided sophisticated suspensions, sporty design, and spacious interiors, which served to find out that development could be luxurious and still affordable to ordinary families. The correct Ambient Temperature Sensor cannot be a better fit to this legacy. The Ambient Temperature Sensor alone is a small thermistor, which translates outside air heat into information to the dash display and engine controls to keep the readings honest in any season. To install an Oldsmobile Ambient Temperature Sensor, one should park on a flat surface, turn off the ignition and take the battery out to avoid damaging the electronics. The second step is to locate the old unit, located close to the front grille or mirror, unpopulate any clips then unplug the connector. Test and compare the new sensor to ensure that it is of the same shape, screw or connect it into the bracket and lay off the wiring where it will not be bumped or moved. Install the trim pieces again, reconnect the battery, start the engine and observe the temperature display settling after a short drive, which demonstrates that the new sensor is functioning correctly.
Related Oldsmobile Parts
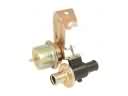 Oldsmobile Heater Control Valve
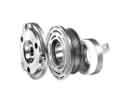 Oldsmobile A/C Clutch
 Oldsmobile A/C Hose
 Oldsmobile A/C Idler Pulley
 Oldsmobile A/C Service Cap
 Oldsmobile Air Temperature Sensor
 Oldsmobile Blend Door Actuator
 Oldsmobile Blower Control Switches
 Oldsmobile Cabin Air Filter
 Oldsmobile HVAC Control Module
 Oldsmobile HVAC Pressure Switch
 Oldsmobile Power Steering Pressure Switch