ChevyParts
My Garage
My Account
Cart
OEM GMC Terrain Cam Gear
Camshaft Gear- Select Vehicle by Model
- Select Vehicle by VIN
Select Vehicle by Model
orMake
Model
Year
Select Vehicle by VIN
For the most accurate results, select vehicle by your VIN (Vehicle Identification Number).
10 Cam Gears found


GMC Terrain Camshaft Gear, Green Line Part Number: 12578515
$170.41 MSRP: $268.12You Save: $97.71 (37%)Ships in 1-2 Business Days


GMC Terrain Camshaft Gear Part Number: 12684831
$99.56 MSRP: $173.74You Save: $74.18 (43%)Ships in 1-3 Business Days

GMC Terrain Camshaft Gear Part Number: 12684830
$107.21 MSRP: $187.07You Save: $79.86 (43%)Ships in 1-3 Business Days


GMC Terrain Actuator Part Number: 12684832
$108.71 MSRP: $189.70You Save: $80.99 (43%)


GMC Terrain Camshaft Gear Part Number: 12621505
$128.26 MSRP: $223.84You Save: $95.58 (43%)
GMC Terrain Actuator Part Number: 12701510
$147.89 MSRP: $258.07You Save: $110.18 (43%)Ships in 1-2 Business Days
GMC Terrain Actuator Part Number: 12668038
$132.64 MSRP: $210.60You Save: $77.96 (38%)Ships in 1-2 Business Days
GMC Terrain Actuator Part Number: 25203205
$133.78 MSRP: $233.45You Save: $99.67 (43%)Ships in 1-2 Business Days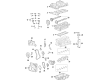
GMC Terrain Camshaft Gear Part Number: 55571672
$20.63 MSRP: $33.99You Save: $13.36 (40%)Ships in 1-3 Business DaysGMC Terrain Actuator Part Number: 25203207
$146.70 MSRP: $232.92You Save: $86.22 (38%)Ships in 1-3 Business Days
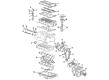
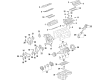
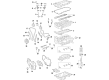
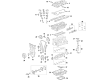
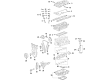
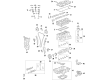
GMC Terrain Cam Gear
Want to cut long-term maintenance and repair costs? Choose OEM Cam Gear. Those parts deliver top durability you can trust. On our site, you'll find a huge catalog of genuine GMC Terrain parts. Prices are unbeatable, so you can keep more in your pocket. Every OEM GMC Terrain Cam Gear includes a manufacturer's warranty. You can also get an easy return policy that keeps buying risk free. Fast delivery, get your car on the road quickly. It's simple to search, compare, and order. Stop guessing about quality or fit. Order today and save with parts that last.
Cam Gear is an important part build in GMC Terrain vehicles that is installed to be linked with the camshaft in main function to control the valve operations. This sort of adjustment has huge functions for increasing more torque horsepower of the car through either advancing or retarding the timing. Through the continued application of different kinds of Cam Gear, GMC Terrain has been able to reap gains on different aspects of the vehicle. Some of the differences between these cam Gears may be in design or functionality that affects the extent to which they enhance the operation of the engine.
GMC Terrain Cam Gear Parts and Q&A
- Q: How to replace the Cam Gear on the Camshaft Position Exhaust Actuator on GMC Terrain?A:The starting point to replace the camshaft position exhaust actuator starts with removal of the camshaft cover along with the Spark Plugs. Set the Crankshaft to receive clockwise rotation and put in the en-48953 (Camshaft Actuator Locking Tool) retention tool. The camshaft retainer bolts receive a final torque of 10 nm (89 lb in) and you should then unscrew the exhaust camshaft actuator bolt while keeping the bolt in place. Clean the Timing Chain with solvent while also labeling both the Timing Chain and camshaft position actuators for assembling the correct positions. Mark both intake and exhaust camshaft actuators on the Timing Chain before unbolting its upper guide as well as the Timing Chain Tensioner. Place the en-48749 (Timing Chain Retention Tool Kit) retention tool on the exhaust Timing Chain side before you remove both the exhaust camshaft actuator bolt and the exhaust camshaft actuator which must be discarded after separating it from the Timing Chain. Install the Timing Chain in the proper position onto the exhaust camshaft actuator after aligning its intake camshaft actuator alignment mark with the Timing Chain mark. Secure the intake camshaft actuator onto the camshaft by aligning its mark with the Timing Chain mark then tighten it using a new exhaust camshaft actuator bolt until undergoes adequate tightening. Use a retention tool en-48749 to remove from the exhaust Timing Chain location and install the tensioner along with resetting it followed by retainer installation of the intake camshaft actuator then tighten bolts to 10 nm (89 lb in). Use en-45059 (Angle Meter) to torque the new camshaft actuator bolt to 30 nm (22 lb ft) while additionally rotating it by 100 degrees. You should torque the Crankshaft balancer bolt counterclockwise at 45 nm (33 lb ft) to release the tensioner after removing the en-48953 retention tool. The last step is to install both upper Timing Chain Guide assemblies with 10 nm (89 lb in) torque. Next install the camshaft cover and spark plugs.

Related GMC Terrain Parts
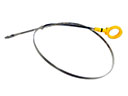 GMC Terrain Dipstick
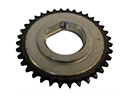 GMC Terrain Balance Shaft Gear
 GMC Terrain Belt Tensioner Bolt
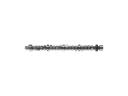 GMC Terrain Camshaft
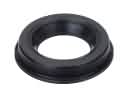 GMC Terrain Camshaft Seal
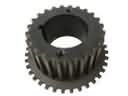 GMC Terrain Crankshaft Gear
 GMC Terrain Lash Adjuster
 GMC Terrain Oil Filler Cap
 GMC Terrain Oil Pan
 GMC Terrain Piston
 GMC Terrain Timing Cover
 GMC Terrain Timing Cover Gasket