ChevyParts
My Garage
My Account
Cart
OEM GMC Jimmy CV Boot
Axle Boot- Select Vehicle by Model
- Select Vehicle by VIN
Select Vehicle by Model
orMake
Model
Year
Select Vehicle by VIN
For the most accurate results, select vehicle by your VIN (Vehicle Identification Number).
4 CV Boots found


GMC Jimmy Boot Kit, Front Part Number: 26059671
$36.90 MSRP: $57.80You Save: $20.90 (37%)

GMC Jimmy Boot Kit, Front Part Number: 26059675


GMC Jimmy Outer Boot, Front Part Number: 26028006

GMC Jimmy Inner Boot, Front Part Number: 26027964
GMC Jimmy CV Boot
Want to cut long-term maintenance and repair costs? Choose OEM CV Boot. Those parts deliver top durability you can trust. On our site, you'll find a huge catalog of genuine GMC Jimmy parts. Prices are unbeatable, so you can keep more in your pocket. Every OEM GMC Jimmy CV Boot includes a manufacturer's warranty. You can also get an easy return policy that keeps buying risk free. Fast delivery, get your car on the road quickly. It's simple to search, compare, and order. Stop guessing about quality or fit. Order today and save with parts that last.
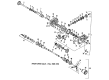
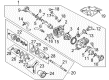
The CV Boot in GMC Jimmy vehicles is one of these components that provide a cover for the Constant Velocity (CV) Joint where power from the transaxle gets to the wheels. The main variants of CV Joints that can be installed at various positions of the car include the fixed joints at the outboard end, and the plunging joints at the inboard end. The CV Boot houses grease for the joints and protects it with the objective of avoiding quick wearing and failure. It is recommended that the CV Boot be checked periodically for signs of wear or damage with cracks or tears so that it and the CV Joint can perform functionally for the vehicle.
GMC Jimmy CV Boot Parts and Q&A
- Q: How to service and repair the front drive axle's CV Boot and CV Joint on GMC Jimmy?A:To service and repair the front drive axle's drive shaft inner joint and boot, you need to collect the following tools required; snap ring pliers (J8059), swage clamp tool (J41048), and large seal retaining clamp tool (J35566). Begin disassembly by uncoupling the clamps from the boot by means of side cutters, in the process making sure that the tripot housing is not damaged. Using a hand grinder, cut the swage ring in two, and then get rid of the tripot housing and tripot trilobal bushing from the halfshaft bar. Then clean the tripot assembly roller bearings and housing, degreasers and with 320 grit 3m cloth to get rid of any corrosion on the transmission sealing surface. Let the components dry before assembly, and correctly handle the tripot spider assembly to avoid separation of the tripot balls and needle rollers. Compress the tripot boot onto the halfshaft bar and use the snap ring pliers (J8059) to open the spacer rings for spider assembly removal. If the halfshaft bar and needle rollers, needle bearings, and trunnion show signs of distress, replace the defective parts. Clean the halfshaft bar. To assemble, slide in the new small swage clamp and boot into place on the huflshaft bar, fit the swage clamp in unaswaged and loading the boot neck into its groove. Swaging clamp using swage clamp tool (J41048), ensuring there are no pinch points prior to the tightening of bolts with hands. Align the boot, housing and swage clamp, while tighten every bolt in 180 degrees by using ratchet wrench. In case of deformity on the swage clamp, roll it in again using the tool. Install the convolute retainer over the boot and ensure that it engages with four convolutions and then install the spacer ring and spider assembly on the halfshaft bar after which install the other spacer ring. Pack the boot & housing with the pre-measured grease from the kit, put the big retaining clamp on the boot & put the housing & tripot trilobal bushing on the spider [assembly]. Finally, use large seal retaining clamp tool (J35566); secure the large retaining clamp and boot to the housing and remove the convolute retainer of the boot .
- Q: How to replace the outer CV Boot and CV Joint on the wheel drive shaft on GMC Jimmy?A:Start the wheel drive shaft outer joint and boot replacement process by preparing these tools: seal clamp tool (J35910), swage clamp tool (J41048), snap ring pliers (J8059). Manufacturers have specified three essential tools for the process: seal clamp tool (J35910), swage clamp tool (J41048), and snap ring pliers (J8059). Make sure to place the halfshaft in a vise while using protective covers on the jaws before taking off the outer cv joint seal clamp protectors. Use side cutters to remove clamps from the seal then utilize a grinding tool to pass through the swage ring without harming the outer race. Separate the seal from the cv joint's outer race while cleaning every trace of grease from the face of the cv joint. After identifying the halfshaft retaining snap ring within the inner race you should employ snap ring pliers (J8059) to expand the snap ring contractions before extracting the cv joint from the halfshaft. The old seal requires disposal after which a brass drift should feed the cage until it frees all balls. The cv joint parts must be extensively cleaned free of grease before the technician applies a thin coating into both race grooves. Fit the inner race into the cage correctly while placing both the cage and inner race into the outer race. Install all balls through cage tilting while using a brass drift. The cv joint assembly requires pre-measured grease from the kit so pack the cv joint seal before you position the new small swage clamp onto the cv joint seal and the large retaining clamp on the seal. Synchronize the small end of the cv joint seal while helping it fit into the joint seal groove of the halfshaft bar then position the outboard end into the swage clamp tool (J41048). Tighten swage clamp bolts only when the alignment between the seal and the housing appears proper. Use a ratchet wrench to tug and turn each bolt 180 degrees until both ends have dropped into place. Release the bolts to remove the dies from the assembly. Swage clamp tool (J41048) requires the clamp to remain if it shows signs of deformity. Before inserting the retaining snap ring into the cv joint inner race position the retaining ring side toward the halfshaft bar until the snap ring clicks when fully seated. The cv joint goes onto the halfshaft bar before performing engagement verification through cv joint pulling action followed by large diameter positioning of the cv joint seal over the cv joint outer race. Tighten the large retaining clamp to 176 nm (130 ft. Lbs.) using a seal clamp tool (J35910), a torque wrench, a breaker bar, and the housing at the specified measurement points. Pair and check a final gap measurement on the clamp ear before installing any seal clamp protectors if present.


Related GMC Jimmy Parts
 GMC Jimmy Axle Beam Mount
 GMC Jimmy Axle Shaft Retainer
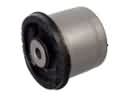
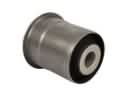 GMC Jimmy Axle Support Bushings
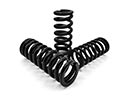 GMC Jimmy Coil Springs
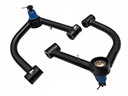 GMC Jimmy Control Arm
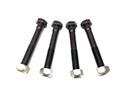 GMC Jimmy Control Arm Bolt
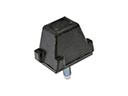 GMC Jimmy Control Arm Bumper
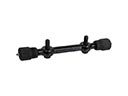 GMC Jimmy Control Arm Shaft Kit
 GMC Jimmy CV Joint
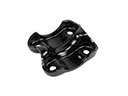 GMC Jimmy Leaf Spring Plate
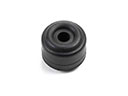 GMC Jimmy Sway Bar Link Bushing
 GMC Jimmy Wheel Cover