ChevyParts
My Garage
My Account
Cart
OEM GMC Envoy Harmonic Balancer
Engine Harmonic Balancer- Select Vehicle by Model
- Select Vehicle by VIN
Select Vehicle by Model
orMake
Model
Year
Select Vehicle by VIN
For the most accurate results, select vehicle by your VIN (Vehicle Identification Number).
3 Harmonic Balancers found


GMC Envoy Vibration Damper Part Number: 12634105
$108.01 MSRP: $169.19You Save: $61.18 (37%)


GMC Envoy Vibration Damper Part Number: 12578069
$118.42 MSRP: $186.33You Save: $67.91 (37%)GMC Envoy Vibration Damper Part Number: 12571619
$118.42 MSRP: $186.33You Save: $67.91 (37%)
GMC Envoy Harmonic Balancer
Want to cut long-term maintenance and repair costs? Choose OEM Harmonic Balancer. Those parts deliver top durability you can trust. On our site, you'll find a huge catalog of genuine GMC Envoy parts. Prices are unbeatable, so you can keep more in your pocket. Every OEM GMC Envoy Harmonic Balancer includes a manufacturer's warranty. You can also get an easy return policy that keeps buying risk free. Fast delivery, get your car on the road quickly. It's simple to search, compare, and order. Stop guessing about quality or fit. Order today and save with parts that last.
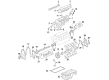
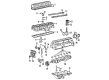
The Harmonic Balancer is an add on part which increases the dependability of GMC Envoy vehicles. This critical part is intended to put out the engine and restrain the torsional twist and oscillation in the crankshaft for smooth working. The GMC Envoy was manufactured between 1998 and 2009 and widely recognized for its solid build; the car has been honored as Motor Trend Magazine's Sport/Utility of the Year in 2002. The Harmonic Balancer can be a metal hub, an inertia ring and a rubber ring which eventually wear out because of heat and oil, within the engine harm. The Harmonic Balancer suits the first generation (1998-2000) and second generation (2002-2009) Envoys which have engines such as 4.2 L Inline 6 cylinder and 5.3 L V-8 cylinder. This component is crucial in boosting the performance as well as safety of the GMC Envoy by minimizing vibrations that in turn impact the operation of the engine. However, harmonic balancers for performance is also available for the modified engines in order to give extra protection against enhanced vibration and changes in RPM levels. The Harmonic Balancer in the market has received lot of appreciation for the long lasting nature and accuracy that enhance the functions of GMC Envoy vehicles.
GMC Envoy Harmonic Balancer Parts and Q&A
- Q: How to replace the harmonic balancer on GMC Envoy?A:Begin the crankshaft balancer replacement by removing the cooling fan together with the shroud after the Drive Belt has been removed. Slots and removes the balancer bolt while you insert the crankshaft end protector (J 41816-2) into the crankshaft's final position with a warning to avoid pulling on the balancer's outer edge. A 3 jaw puller should be used to detach the crankshaft balancer and afterward remove both the puller and j 41816-2. The crankshaft balancer shim should be taken off of the crankshaft snout for cleaning before performing an inspection of the crankshaft balancer. After raising the vehicle you must remove the torque converter access plug from the dry region of the Oil Pan. The torque converter holding tool from the crankshaft balancer remover/holder (J 44226) kit enables secure torque converter attachment when tightening the crankshaft balancer. Insert the new crankshaft balancer shim gm p/n 12573950 over the crankshaft snout to face the Crankshaft Gear. Afterwards, install and seat the crankshaft balancer using the crankshaft front oil seal installer (J 41478). The installer should hold the Flywheel steady before installing the balancer washer and bolt. Tighten the crankshaft balancer bolt to 150 n.m (110 lb ft) while subsequently using the torque angle meter (J 36660-A) to finish with an additional 180 degrees of bolt torque. The last step involves discarding the torque converter holding tool before reinstalling the torque converter access plug back into the Oil Pan. The vehicle needs to be lowered afterward which requires installing both the Drive Belt and cooling fan and shroud.

Related GMC Envoy Parts
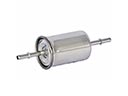 GMC Envoy Fuel Filter
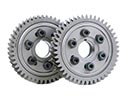 GMC Envoy Cam Gear
 GMC Envoy Crankshaft
 GMC Envoy Crankshaft Pulley
 GMC Envoy Crankshaft Thrust Washer Set
 GMC Envoy Lash Adjuster
 GMC Envoy Motor And Transmission Mount
 GMC Envoy Piston Ring
 GMC Envoy Pushrod
 GMC Envoy Rod Bearing
 GMC Envoy Timing Belt Tensioner
 GMC Envoy Timing Cover