ChevyParts
My Garage
My Account
Cart
OEM Chevrolet Tracker Brake Master Cylinder
- Select Vehicle by Model
- Select Vehicle by VIN
Select Vehicle by Model
orMake
Model
Year
Select Vehicle by VIN
For the most accurate results, select vehicle by your VIN (Vehicle Identification Number).
5 Brake Master Cylinders found

Chevrolet Tracker Master Cylinder Part Number: 91174780

Chevrolet Tracker Master Cylinder Part Number: 91172675
Chevrolet Tracker Master Cylinder Part Number: 91174778
Chevrolet Tracker Master Cylinder Part Number: 91174779
Chevrolet Tracker Master Cylinder Part Number: 91172908
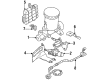
Chevrolet Tracker Brake Master Cylinder
Want to cut long-term maintenance and repair costs? Choose OEM Brake Master Cylinder. Those parts deliver top durability you can trust. On our site, you'll find a huge catalog of genuine Chevrolet Tracker parts. Prices are unbeatable, so you can keep more in your pocket. Every OEM Chevrolet Tracker Brake Master Cylinder includes a manufacturer's warranty. You can also get an easy return policy that keeps buying risk free. Fast delivery, get your car on the road quickly. It's simple to search, compare, and order. Stop guessing about quality or fit. Order today and save with parts that last.
The BMC or Brake Master Cylinder in Chevrolet Tracker vehicles is a vital part of the vehicles' braking system by which brake system's slave cylinders are controlled through hydraulic force via the foot pressure of the driver. This mechanism works under a pressure of hydraulic fluid to activate either calipers or drum brake, the friction required in stopping a car. This specific model of Chevrolet Tracker contains usually dual circuit master cylinders meaning that if one of the cylinders' circuits is broken, the other one possesses enough force to solve the braking problem. Chevrolet Tracker Brake Master Cylinders may differ depending on the design and some cars have the built-in fluid reservoir while others have nylon or a plastic one. The differences are primarily due to the way the reservoir is built and affixed to the system which can be related to the ease of maintenance and areas which are prone to leaks. In general, the Brake Master Cylinder plays the crucial role in the proper functioning of the Chevrolet Tracker's brakes while saving time and effort during different types of driving situations.
Chevrolet Tracker Brake Master Cylinder Parts and Q&A
- Q: How to Overhaul the Brake Master Cylinder (1.6L Non-ABS) on Chevrolet Tracker?A:To overhaul the master cylinder (1.6L Non-ABS), start by wearing safety glasses when lest your eyes get harmed and be careful of brake fluid irritants. Turn off the ignition switch and pop the hood. Discharge the pressure by releasing the brake fluid from the calipers, since the brake lines in both front and back brakes are pressurized. Remove the snap ring and the plate, and take out the Piston guide with the o-rings, and Piston stopper. Carefully remove the primary Piston assembly from the master cylinder so that there will be no damage to the cylinder wall and remove the primary Piston cup as well as the Piston stopper bolt and washer. Do not stick fingers in front of Piston when providing compressed air to prevent serious injury, and do not use lubricated compressed air on parts of the brake to prevent the damage of rubber parts. Blow compressed air into the stopper bolt hole to displace the secondary Piston assembly then remove Piston cup, secondary Piston pressure cup o-ring & spring. Screen all items for wear or destruction, replacing them if required and do not re-use Piston cups. Clean disassembled parts on brake fluid inspecting master cylinder bore for scoring or corrosion and replacing it in poor conditions. Wash the cylinder in clear brake fluid and shake out the remaining drop using a piece of cloth. When it comes to assembly, the o-ring should be fitted to the master cylinder, and respectively, the spring, secondary Piston assembly, new Piston cup, and new secondary Piston pressure cup are to be used. Then you install the main Piston and the new main Piston cup, then the new Piston stopper, Piston guide, and o-rings, and then the plate itself. Depress and install the snap ring, and install the Piston stopper bolt into the pistons with the latter fully inside the cylinder, tightening it to 10 nm (88.5 inch lbs). Reconnect the master cylinder to the booster, put a thin layer of brake fluid on the grommets (new one), and mount the reservoir to the master cylinder (finally, the reservoir).
- Q: How to replace the brake master cylinder on Chevrolet Tracker?A:First remove the fluid level connector of the reservoir and wash the reservoir and the master cylinder. First take out the reservoir then disconnect brake pipes (1,4) from abs proportioning valve and separate brake lines from the master cylinder if abs is present. Take out the master cylinder retaining nuts that attach it to the Brake Booster. When replacing brakes take off the Brake Booster master cylinder for vehicles without abs or remove the combo of master cylinder and proportioning valve for vehicles with abs. Disconnect the proportioning valve from the master cylinder only if it needs separation. Perform all necessary steps to fix and examine the master cylinder parts during replacement. Set the booster piston rod position afterwards empty the fluid from the master cylinder. Put the proportioning valve on the master cylinder when the vehicle has abs. After placing the master cylinder in position, use 2 nuts to fasten it onto the Brake Booster unit and tighten the nuts to 13 nm force (115 inch lbs.). Secure the brake pipes by disturbing nuts with 16 nm torque setting (12.0 ft. Lbs.). Insert the reservoir device while linking the fluid level connector and refilling the reservoir. Test for brake hydraulic leaks while performing the brake system drainage. The mechanic should check the brake pedal depth and drive the vehicle to validate brake performance.

Related Chevrolet Tracker Parts
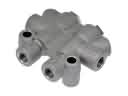 Chevrolet Tracker Brake Proportioning Valve
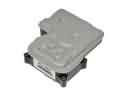 Chevrolet Tracker ABS Control Module
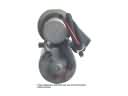 Chevrolet Tracker ABS Pump And Motor Assembly
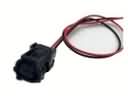 Chevrolet Tracker ABS Wheel Speed Sensor Connector
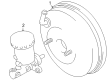
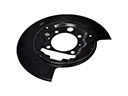 Chevrolet Tracker Backing Plate
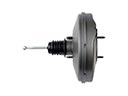 Chevrolet Tracker Brake Booster
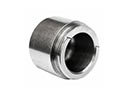 Chevrolet Tracker Brake Caliper Piston
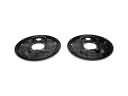 Chevrolet Tracker Brake Dust Shields
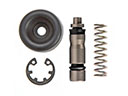 Chevrolet Tracker Brake Master Cylinder Repair Kit
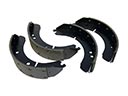 Chevrolet Tracker Brake Shoe Set
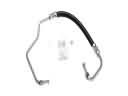 Chevrolet Tracker Hydraulic Hose
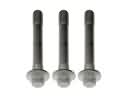 Chevrolet Tracker Wheel Hub Bolt