ChevyParts
My Garage
My Account
Cart
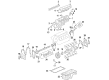
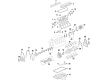
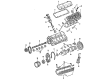
OEM Chevrolet Suburban 2500 Rocker Arm
Engine Rocker Arm- Select Vehicle by Model
- Select Vehicle by VIN
Select Vehicle by Model
orMake
Model
Year
Select Vehicle by VIN
For the most accurate results, select vehicle by your VIN (Vehicle Identification Number).
3 Rocker Arms found


Chevrolet Suburban 2500 Rocker Arms Part Number: 10214664
$14.80 MSRP: $24.39You Save: $9.59 (40%)Ships in 1-2 Business Days
Chevrolet Suburban 2500 Rocker Arms Part Number: 12696105
$13.98 MSRP: $23.03You Save: $9.05 (40%)Ships in 1-2 Business Days
Chevrolet Suburban 2500 Rocker Arms Part Number: 12556298
$27.35 MSRP: $45.07You Save: $17.72 (40%)Ships in 1-2 Business Days
Chevrolet Suburban 2500 Rocker Arm
Want to cut long-term maintenance and repair costs? Choose OEM Rocker Arm. Those parts deliver top durability you can trust. On our site, you'll find a huge catalog of genuine Chevrolet Suburban 2500 parts. Prices are unbeatable, so you can keep more in your pocket. Every OEM Chevrolet Suburban 2500 Rocker Arm includes a manufacturer's warranty. You can also get an easy return policy that keeps buying risk free. Fast delivery, get your car on the road quickly. It's simple to search, compare, and order. Stop guessing about quality or fit. Order today and save with parts that last.
Chevrolet Suburban 2500 Rocker Arm Parts and Q&A
- Q: How to replace the valve rocker arm and push rods on Chevrolet Suburban 2500?A:The first step to replace valve rocker arms and push rods requires marking all Cylinder Head parts before sorting them properly to establish correct installation sequence. Commence the replacement process by taking off the valve Rocker Arm cover and proceeding to extract the valve Rocker Arm nuts along with valve Rocker Arm balls and finally removing the valve rocker arms. Pay attention since exhaust valve Pushrods exceed the length of intake valve pushrods. The replacement process starts with removing valve pushrods then the valve Rocker Arm studs and Pushrod guides before cleaning and inspecting valve rocker arms and pushrods. You should treat the threads of the valve Rocker Arm stud-to-cylinder head with gm U.S. P/N 12346004, canada P/N 10953480 or equivalent sealant before using the Pushrod guides and valve Rocker Arm studs. The torque should be set at 50 nm (37 ft. Lbs.). Check that exhaust pushrods exceed intake pushrods in length before valve Pushrod installation. Apply gm u.s P/N 12345501, canada P/N 992704 or equivalent lubricant over the valve Rocker Arm along with its ball bearing surfaces before installing all components and gently tightening valve Rocker Arm nuts to 25 nm (18 ft-lbs) through valve guides. Installation of the valve Rocker Arm cover should be the last step in the assembly process.

Related Chevrolet Suburban 2500 Parts
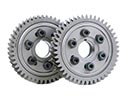 Chevrolet Suburban 2500 Cam Gear
 Chevrolet Suburban 2500 Crankshaft Seal
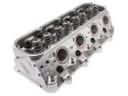 Chevrolet Suburban 2500 Cylinder Head
 Chevrolet Suburban 2500 Exhaust Valve
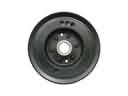 Chevrolet Suburban 2500 Harmonic Balancer
 Chevrolet Suburban 2500 Lash Adjuster
 Chevrolet Suburban 2500 Oil Pan
 Chevrolet Suburban 2500 Piston Ring Set
 Chevrolet Suburban 2500 Timing Cover
 Chevrolet Suburban 2500 Timing Cover Gasket
 Chevrolet Suburban 2500 Valve Cover Gasket
 Chevrolet Suburban 2500 Valve Cover Grommet