ChevyParts
My Garage
My Account
Cart
OEM Chevrolet Cavalier Control Arm Bushing
Suspension Arm Bushing- Select Vehicle by Model
- Select Vehicle by VIN
Select Vehicle by Model
orMake
Model
Year
Select Vehicle by VIN
For the most accurate results, select vehicle by your VIN (Vehicle Identification Number).
10 Control Arm Bushings found


Chevrolet Cavalier Axle Bushing, Yellow, Rear Part Number: 22597998
$35.61 MSRP: $36.25You Save: $0.64 (2%)Ships in 1-2 Business Days
Chevrolet Cavalier Axle Bushing, Green, Rear Part Number: 10150338
$17.48 MSRP: $35.74You Save: $18.26 (52%)Ships in 1-2 Business Days
Chevrolet Cavalier Lower Control Arm Bushing, Front Part Number: 22610297
$3.05 MSRP: $4.83You Save: $1.78 (37%)Ships in 1-2 Business DaysChevrolet Cavalier Lower Control Arm Bushing, Front Part Number: 22645684
$18.81 MSRP: $37.76You Save: $18.95 (51%)
Chevrolet Cavalier Lower Control Arm Bushing, Front Part Number: 22637808
$13.11 MSRP: $23.72You Save: $10.61 (45%)
Chevrolet Cavalier Control Arm Bushing, Lower Part Number: 22534006
$13.11 MSRP: $20.34You Save: $7.23 (36%)
Chevrolet Cavalier Control Arm Bushing, Lower Part Number: 14026628
$14.34 MSRP: $28.78You Save: $14.44 (51%)

Chevrolet Cavalier Lower Control Arm Bushing Part Number: 22613956
Chevrolet Cavalier Axle Bushing, Blue, Rear Part Number: 10150339
Chevrolet Cavalier Control Arm Bushing
Want to cut long-term maintenance and repair costs? Choose OEM Control Arm Bushing. Those parts deliver top durability you can trust. On our site, you'll find a huge catalog of genuine Chevrolet Cavalier parts. Prices are unbeatable, so you can keep more in your pocket. Every OEM Chevrolet Cavalier Control Arm Bushing includes a manufacturer's warranty. You can also get an easy return policy that keeps buying risk free. Fast delivery, get your car on the road quickly. It's simple to search, compare, and order. Stop guessing about quality or fit. Order today and save with parts that last.
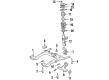
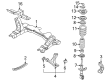
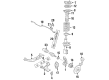
Chevrolet Cavalier Control Arm Bushing is a part of the Chevrolet Cavalier vehicles' suspension that broadly functions to provide reliability and performance. This bushing soaks up any nasty motions and also reduces the level of rubbing force between the control arm and the vehicle frame to regulate the movement of the control arm to the road condition and the steering action. The Chevrolet Cavalier existed through generations and was manufactured between 1982 and 2005 in North America, the model has undergone changes oriented to improvement in efficiency and safety. The function of the control arm bushes is very significant because it helps in adjusting the wheel alignment as well as stability to provide remarkable handling on the Chevrolet cavalier car. Due to these features, the Chevrolet Cavalier Control Arm Bushing has at one time used Rubber, polyurethane and synthetic elastomers all which have their individual advantages in the field as far as as durability and performance is concerned. This area is exploited depending on the specifications of the factory, whereby plastic types will be used that meet factory requirements or high performance types. Thus, adding to the Chevrolet Cavalier's positive characteristics of being a reliable car, one has to mention the quality of Control Arm Bushing in the automotive market because this part can significantly improve the vehicle's performance and safety at the same time. Applicable with different Cavalier models, the Control Arm Bushing is a clear indication of Chevrolet's dedication to providing car owners with reliable and effective automobiles; therefore, it is an essential part of any Chevrolet Cavalier that is to be successfully preserved and run efficiently.
Chevrolet Cavalier Control Arm Bushing Parts and Q&A
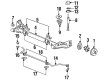
- Q: How to replace the rear control arm bushing on Chevrolet Cavalier?A:First raise and support the vehicle before removing the tire assemblies and wheel from the rear of the vehicle. First disconnect brake hoses from the axle then remove wheel speed sensor harness retainers from the axle. Start by removing bolts, washers, and nuts from the Control Arm. Then rotate the Control Arm downward to reach the bushings. Mount the rear Control Arm Bushing adapter (J 29376-95) onto the rear Control Arm before connecting the coupling from the rear Control Arm Bushing service set (J 29376-A) to this adapter. The necessary bushing removal tools consist of the 3/8 inch bolt (J 21474-19), the remover from the rear Control Arm Bushing service set (J 29376-A), the Pressure Plate from the rear Control Arm Bushing service set (J 29376-A), and the 3/8 inch nut (J 21474-18). After tightening the 3/8 inch bolt (J 21474-19) it should pull the bushing away from the Control Arm. Disassemble the bushing removal tools. To begin installation place a thin layer of grease on the exterior of the new bushing before you insert it into the Control Arm. Afterward gather your installation tools which consist of the 3/8 inch bolt (J 21474-19), the Pressure Plate from the rear Control Arm Bushing service set (J 29376-A), the installer from the rear Control Arm Bushing service set (J 29376-A), and the 3/8 inch nut (J 21474-18). Use the 3/8 inch bolt (J 21474-19) to tighten it while the bushing fully seats inside the Control Arm, afterward remove the bushing installation tools. After fitting the bolts together with washers and nuts tighten each nut by hand then ensure the wheel speed sensor harness and brake hoses connect to the rear axle. After completing rest of the installation place the tire and wheel assemblies then lower the vehicle before finishing with 120 n.m (52 lb ft) of torque on the Control Arm nuts.
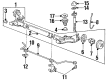
- Q: What tools are required to service and repair the control arm bushing in the front suspension on Chevrolet Cavalier?A:To service and repair the Control Arm Bushing in the front suspension, we need the following tools: nut (J 21474-4), nut (J 21474-18), bolt (J 21474-19), ht high pressure lubricant (J 23444-A), lower front Control Arm vertical bushing set (J 41211), and Lower Control Arm Bushings Remover/Installer (J 41397). Start by removing the lower arm control and mounting it on a vice. Put on the high pressure lubricant (J 23444-A) on the threads of the bolt (J 21474-19). Prepare the bushing removal tools consisting of the bolt (J 21474-19), the remover/installer from the lower Control Arm bushings remover/installer (J 41397), the receiver from the lower Control Arm bushings remover/installer (J 41397), and nut (J 21474-18). There is no need to remove the rear bush as there has been no mention of a task related to it. Next, reach out to the bushing removal tools set with the following: nut (J 21474-27), the remover/installer from the lower front Control Arm vertical bushing set (J 41211); the receiver from the lower front Control Arm vertical bushing set (J 41211); and nut (J 21474-4). Tighten the nut (J 21474-27) to remove the rear bushing from the Control Arm, and then tear down the tools. Install the rear bushing into the Control Arm, be sure to apply the high pressure lubricant (J 23444-A) on the threads of the nut (J 21474-27). Put together the bushing installation tools with nut (J 21474-27), the receiver/installer from the lower front Control Arm vertical bushing set (J 41211), the receiver from the lower front Control Arm vertical bushing set (J 41211), and nut (J 21474-4). If there is a rear bushing, tighten the nut (J 21474-4) to have the rear bushing seated in the Control Arm to disassemble the tools. Lubricate the outer casing of the front bushing and install it to the Control Arm, and install and put the nut (J 21474-19) into the assembly to the bushing installation tool, the receiver from the lower Control Arm bushings remover/installer (J 41397), the remover/installer of the lower Control Arm bushings (J 41397), and nut (J 21474-18) on the behalf of the final external casing. Tighten the nut (J 21474-19) until the Control Arm seats the front bushing, after that, disassemble the tools. Lastly, put in the lower Control Arm.


Related Chevrolet Cavalier Parts
 Chevrolet Cavalier Axle Pivot Bushing
 Chevrolet Cavalier Axle Support Bushings
 Chevrolet Cavalier Ball Joint
 Chevrolet Cavalier Coil Spring Insulator
 Chevrolet Cavalier Control Arm
 Chevrolet Cavalier Shock Absorber
 Chevrolet Cavalier Steering Knuckle
 Chevrolet Cavalier Sway Bar Bracket
 Chevrolet Cavalier Sway Bar Bushing
 Chevrolet Cavalier Sway Bar Link
 Chevrolet Cavalier Trailing Arm Bushing
 Chevrolet Cavalier Wheel Seal