ChevyParts
My Garage
My Account
Cart
OEM Cadillac Catera Oil Pan
Oil Drain Pan- Select Vehicle by Model
- Select Vehicle by VIN
Select Vehicle by Model
orMake
Model
Year
Select Vehicle by VIN
For the most accurate results, select vehicle by your VIN (Vehicle Identification Number).
3 Oil Pans found


Cadillac Catera Oil Pan Part Number: 9158421


Cadillac Catera Oil Pan Part Number: 9129502

Cadillac Catera Oil Pan Part Number: 96041522
Cadillac Catera Oil Pan
Want to cut long-term maintenance and repair costs? Choose OEM Oil Pan. Those parts deliver top durability you can trust. On our site, you'll find a huge catalog of genuine Cadillac Catera parts. Prices are unbeatable, so you can keep more in your pocket. Every OEM Cadillac Catera Oil Pan includes a manufacturer's warranty. You can also get an easy return policy that keeps buying risk free. Fast delivery, get your car on the road quickly. It's simple to search, compare, and order. Stop guessing about quality or fit. Order today and save with parts that last.
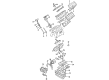
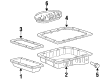
The Cadillac Catera Oil Pan is one of the Cadillac luxury sedan's significant components that speak of its reliability as well as performance. The oil pan is a critical component because it stores the engine oil that is vital in lubricating moving parts of the engine for efficiency, and to enhance safety. This oil pan is intended for Cadillac Catera models manufactured from 1996 to 2001 so it can be installed in different Catera variations and can support its RWD setup. Techically, the oil pan that is usually manufactured from cast aluminum features an advanced design that makes it resistant to movements that are characteristic of dynamic driving and incapable of allowing oil to slosh around. This feature is especially valuable for the drivers who need powerful and at the same time reliable Cadillac Catera. Another ancillary component is the oil pan with the responsibility of maintaining the fluid within the engine at suitable temperatures to improve its efficiency as far as operation is concerned. Also, the Cadillac Catera Oil Pan fits the height of this engine; it hence boosts the performance of the car. Catera Oil Pan is a perfect combination of Luxury and Engineering pleasant to customers and aesthetic to marketers showing Cadillac's quality work. In summary, elements such as the oil pan are not simply part of a car, they ARE Cadillac and they continue to exemplify the drive to build cars that can handle high octane performance, while at the same time, providing drivers with the safety they need.
Cadillac Catera Oil Pan Parts and Q&A
- Q: How to replace the upper oil pan on Cadillac Catera?A:Start by removing the lower Oil Pan and the engine mount lower nuts from the frame bracket while tracking the alignment tab position. Begin by removing the four transmission bolts and the a/c compressor hose strap bolt from the front of the upper Oil Pan and continue with the removal of all bolts except for the four corner upper Oil Pan bolts. Mark the propeller shaft for accurate position and detach the bolts to slowly slide the propeller shaft in backward direction. Secure the propeller shaft and continue by removing hanger bolts from the bracket and Exhaust Manifold nuts from the catalytic converter. Finally lower the converter unit by securing it with mechanic wire. Lower the vehicle after extracting the idler arm bolts from the frame and moving the relay rod out of the way. You need to employ the engine support fixture (J 28467-A) together with its engine support fixture adapter (J28467-450) and lift brackets (J 36857) to safely lift the engine up for removing the upper Oil Pan. Following the vehicle's lift to proper height, remove all upper Oil Pan bolts together with oil intake pipe bolts after which remove the pipe while carefully moving the pan toward the vehicle's front position without damaging aluminum mating surfaces. Take away the rubber seal and remove all rtv sealant from both the Oil Pan housing and engine block. Then clean these surfaces thoroughly. A 10 mm bead of silicone sealing compound (GM P/N 12346286 or equivalent) needs to be applied to the lower portion of the upper Oil Pan groove while leaving clearance of at least 10 mm from bolt holes. After applying the new rubber seal, proceed with installation. Use a 3 mm bead of silicone sealant to cover the outside border of the seal in front position and inside border in rear position on the upper Oil Pan within ten minutes. The oil intake pipe and its bolts require an 8 nm torque setting before the upper Oil Pan receives installation through the vehicle front toward the crossmember. Fit the four corner bolts on the upper Oil Pan to hold it in position while lowering the vehicle until the engine drops into place naturally. Finish the process by checking that motor mounts are properly aligned. After removing the engine support fixture (J 28467-A), engine support fixture adapter (J28467-450), and lift brackets (J 36857), the technician should support the vehicle again. The remaining upper Oil Pan bolts receive a 15 nm torque setting before the four transmission bolts to the upper Oil Pan receive their 40 nm tightening. Raise the relay rod before implementing idler arm bolt installation at 60 nm torque. Finally, place and install the catalytic converters while tightening nuts to 25 nm specifications. Position the propeller shaft correctly by lining it up with scribe lines from before then bolt it into place and tighten the bolts to 95 nm. The a/c compressor hose strap bolt needs to be installed to the upper Oil Pan before torquing it to 8 nm while the engine mount lower nuts require a torque of 55 nm. Install the Oil Pan and splash shield before putting on splash shield bolts that receive tight torque until they settle. Next lower the vehicle while refilling the engine oil.

Related Cadillac Catera Parts
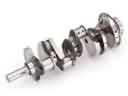 Cadillac Catera Crankshaft
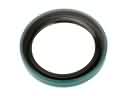 Cadillac Catera Crankshaft Seal
 Cadillac Catera Dipstick Tube
 Cadillac Catera Engine Mount Bracket
 Cadillac Catera Intake Valve
 Cadillac Catera Oil Pan Gasket
 Cadillac Catera Oil Pump Gasket
 Cadillac Catera Piston Ring
 Cadillac Catera Rocker Shaft Spring Kit
 Cadillac Catera Rod Bearing
 Cadillac Catera Timing Belt
 Cadillac Catera Valve Cover Gasket