ChevyParts
My Garage
My Account
Cart
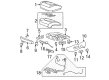
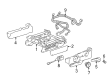
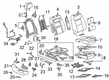
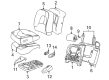
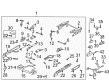
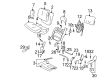
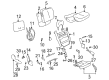
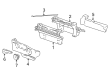
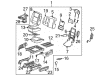
OEM Buick Seat Switch Panel
Seat Cushion Side Panel- Select Vehicle by Model
- Select Vehicle by VIN
Select Vehicle by Model
orMake
Model
Year
Select Vehicle by VIN
For the most accurate results, select vehicle by your VIN (Vehicle Identification Number).
128 Seat Switch Panels found


Buick Side Panel, Black, Front Driver Side Part Number: 20952809
$55.59 MSRP: $82.72You Save: $27.13 (33%)Product Specifications- Other Name: Panel, Front Seat Cushion Side; Seat Switch Panel; Side Trim
- Position: Driver Side
- Replaces: 15216196

Buick Inner Cover Part Number: 89022305
$35.94 MSRP: $53.48You Save: $17.54 (33%)Ships in 1-3 Business DaysProduct Specifications- Other Name: Panel Assembly, Driver Seat Cushion Inner Finish *Neutral; Panel, Front Seat Cushion Side
- Position: Driver Side

Buick Switch Bezel, Jet Black, Passenger Side Part Number: 84795445
$7.01 MSRP: $10.44You Save: $3.43 (33%)Ships in 1-3 Business DaysProduct Specifications- Other Name: Bezel-Front Seat Adjuster Switch *Jet Black
- Position: Passenger Side

Buick Outer Cover, Oak Part Number: 88948801
$63.91 MSRP: $95.11You Save: $31.20 (33%)Ships in 1-3 Business DaysProduct Specifications- Other Name: Panel, Front Seat Cushion Side
- Position: Driver Side


Buick Switch Bezel, Blue, Driver Side Part Number: 12533811
Product Specifications- Other Name: Bezel, Driver Seat Adjuster Switch *Blue E; Bezel, Front Seat Adjuster
- Position: Driver Side

 Product Specifications
- Other Name: Bezel, Front Seat Adjuster
- Position: Passenger Side

Buick Side Panel, Charcoal, Driver Side Part Number: 16817495
Product Specifications- Other Name: Panel; Seat Switch Panel; Inner Side Panel; Panel, Front Seat Cushion Side
- Position: Driver Side
Buick Side Panel, Blue, Driver Side Part Number: 16817497
Product Specifications- Other Name: Panel; Seat Switch Panel; Inner Side Panel; Panel, Front Seat Cushion Side
- Position: Driver Side
Buick Switch Bezel, Red, Passenger Side Part Number: 16819766
Product Specifications- Other Name: Bezel; Bezel, Front Seat Adjuster
- Position: Passenger Side
Buick Switch Bezel, Gray, Passenger Side Part Number: 16819768
Product Specifications- Other Name: Bezel; Bezel, Front Seat Adjuster
- Position: Passenger Side
Buick Switch Bezel, Gray, Driver Side Part Number: 16819769
Product Specifications- Other Name: Bezel; Bezel, Front Seat Adjuster
- Position: Driver Side

Buick Outer Side Panel Part Number: 88993182
Product Specifications- Other Name: Panel; Panel, Front Seat Cushion Side
- Position: Passenger Side

Buick Outer Cover, Gray Part Number: 88948780
Product Specifications- Other Name: Panel, Seat Back Cushion; Panel, Front Seat Cushion Side
- Position: Passenger Side
Buick Inner Cover, Oak, Front Driver Side Part Number: 88899779
Product Specifications- Other Name: Panel, Front Seat Cushion Side
- Position: Driver Side
Buick Inner Cover, Gray, Front Driver Side Part Number: 88899778
Product Specifications- Other Name: Panel, Front Seat Cushion Side
- Position: Driver Side
Buick Inner Cover Part Number: 89039872
Product Specifications- Other Name: Panel, Front Seat Cushion Side
- Position: Passenger Side
Buick Inner Cover, Gray Part Number: 88948782
Product Specifications- Other Name: Panel, Front Seat Cushion Side
- Position: Passenger Side
Buick Outer Cover, Oak Part Number: 88948781
Product Specifications- Other Name: Panel Assembly, Passenger Seat Cushion Outer Finish *Oak; Panel, Front Seat Cushion Side
- Position: Passenger Side
Buick Switch Bezel, Red, Front Part Number: 12531370
Product Specifications- Other Name: Bezel, Front Seat Adjuster
- Position: Front

Buick Outer Cover, Driver Side Part Number: 88894978
Product Specifications- Other Name: Panel Assembly, Driver Seat Cushion Outer Finish *Ebony
- Position: Driver Side
| Page 1 of 7 |Next >
1-20 of 128 Results
Buick Seat Switch Panel
Choose OEM Seat Switch Panel, you're making the optimal decision for superior quality and perfect performance. You can feel confident because each component goes through stringent quality checks. Every part is carefully built to comply with Buick's factory specifications. You'll enjoy a smooth, worry-free installation that fits just right. At ChevyPartsDeal.com, you'll find it easy to get top-quality OEM Buick Seat Switch Panel. You can shop at highly competitive prices and protect your budget. All our genuine Buick parts include a dependable manufacturer's warranty. You'll also appreciate our straightforward return policy and swift delivery services for extra convenience.
The Buick Seat Switch Panel will allow drivers to precisely adjust the comfort of the seat using a fingertip, an option that can be considered to be reflected in the long tradition of combining both tradition and modern comfort within the brand. Each year Buick has a history of developing smooth rides, quiet cabins and future concepts such as QuietTuning that silence wind and road noise. The company is striking a balance between traditional curves and smart technology and the Wildcat EV concept, a bold indicator of all electric future, retains the elegant nature that the loyal owners are fond of. Large interiors, conscientious design and driver friendly specifications make every ride effortless and luxurious, and this is why the brand continues to be a pillar of motor. A Seat Switch Panel refers to the small side mounted panel that is housing the seat height, tilt, lumbar, and memory button, which sends the definite signals to the seat control module to achieve a quick and accurate movement. The process of installation of a new panel requires simple equipment and precautions. The first thing that can be done is to unplug the battery and push the seat back to get a workspace. Unscrew the seat side trim, unscrew retaining clips, and pull out the wiring harness. Take off the old panel, take off any mounting clips on the panel and then snap in the new one and then make sure that the harness is plugged in. Test all the switches before closing them so that each motor has been started in the right way. Re-mount the trim, fasteners, re-attach the battery, and do a final check of the functioning to complete the job with confidence.
Related Buick Parts
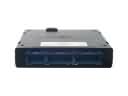 Buick Body Control Module
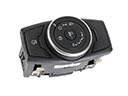 Buick Headlight Switch
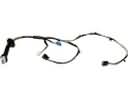 Buick Door Harness Connector
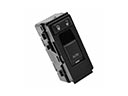 Buick Door Lock Switch
 Buick Engine Control Module
 Buick Interior Light Bulb
 Buick Mirror Switch
 Buick Occupant Detection Sensor
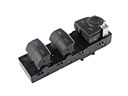 Buick Power Window Switch
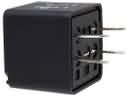 Buick Relay
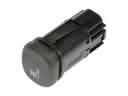 Buick Seat Heater Switch
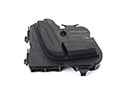 Buick Seat Switch