ChevyParts
My Garage
My Account
Cart
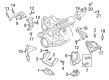
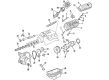
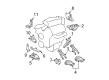
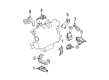
OEM 2006 Buick LaCrosse Engine Mount
Engine Motor Mount- Select Vehicle by Model
- Select Vehicle by VIN
Select Vehicle by Model
orMake
Model
Year
Select Vehicle by VIN
For the most accurate results, select vehicle by your VIN (Vehicle Identification Number).
10 Engine Mounts found


2006 Buick LaCrosse Strut Mount Part Number: 10271462
$205.18 MSRP: $325.75You Save: $120.57 (38%)Ships in 1-2 Business DaysProduct Specifications- Other Name: Bracket, Engine Mounting; Engine Mount Torque Strut; Engine Torque Strut Mount; Engine Mount Bracket; Motor Mount; Strut Bracket; Lower Bracket; Strut Front Bracket
- Item Weight: 2.40 Pounds
- Item Dimensions: 7.6 x 6.9 x 3.1 inches
- Condition: New
- Fitment Type: Direct Replacement
- SKU: 10271462
- Warranty: This genuine part is guaranteed by GM's factory warranty.


2006 Buick LaCrosse Motor Mount Part Number: 10448575
$69.62 MSRP: $118.53You Save: $48.91 (42%)Ships in 1-3 Business DaysProduct Specifications- Other Name: Mount, Engine Mount Dampening; Engine Mount Torque Strut; Engine Mount Bracket; Spring Insulator; Lower Mount; Mount Insulator; Mount; Mount, Engine Mounting; Engine Mount
- Replaces: 17998813, 22113282, 22178657, 22146018, 22175206, 10340740, 10448574, 10448576, 22146466
- Item Weight: 4.20 Pounds
- Item Dimensions: 11.6 x 5.1 x 5.2 inches
- Condition: New
- Fitment Type: Direct Replacement
- SKU: 10448575
- Warranty: This genuine part is guaranteed by GM's factory warranty.

2006 Buick LaCrosse Mount Bracket, Driver Side Part Number: 15250907
$11.48 MSRP: $48.93You Save: $37.45 (77%)Ships in 1-2 Business DaysProduct Specifications- Other Name: Bracket, Engine Mounting; Engine Mount Bracket; Motor Mount; Upper Bracket
- Position: Driver Side
- Replaces: 10312091
- Item Weight: 3.10 Pounds
- Item Dimensions: 8.6 x 8.5 x 4.5 inches
- Condition: New
- Fitment Type: Direct Replacement
- SKU: 15250907
- Warranty: This genuine part is guaranteed by GM's factory warranty.


2006 Buick LaCrosse Strut Bracket, Driver Side Part Number: 24503458
Product Specifications- Other Name: Bracket, Engine Lift; Engine Mount Bracket; Transmission Mount; Motor Mount; Engine Bracket; Lift Bracket; Upper Bracket; Strut Front Bracket; Bracket; Bracket, Engine Mounting
- Position: Driver Side
- Item Weight: 2.30 Pounds
- Item Dimensions: 9.0 x 6.2 x 3.2 inches
- Condition: New
- Fitment Type: Direct Replacement
- SKU: 24503458
- Warranty: This genuine part is guaranteed by GM's factory warranty.


2006 Buick LaCrosse Mount Bracket Part Number: 10345562
Product Specifications- Other Name: Bracket, Engine Mounting; Engine Mount Bracket; Motor Mount
- Item Weight: 1.30 Pounds
- Item Dimensions: 8.9 x 2.9 x 1.8 inches
- Condition: New
- Fitment Type: Direct Replacement
- SKU: 10345562
- Warranty: This genuine part is guaranteed by GM's factory warranty.


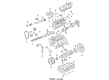
2006 Buick LaCrosse Strut Mount Part Number: 10230877
$4.05 MSRP: $6.35You Save: $2.30 (37%)Product Specifications- Other Name: Strut, Engine Mounting; Engine Mount Torque Strut; Engine Mount Bracket; Engine Torque Strut; Motor Mount; Torque Strut; Strut; Strut, Engine Mount Dampening
- Item Weight: 1.30 Pounds
- Item Dimensions: 8.3 x 3.2 x 3.1 inches
- Condition: New
- Fitment Type: Direct Replacement
- SKU: 10230877
- Warranty: This genuine part is guaranteed by GM's factory warranty.
 Product Specifications
- Other Name: Bracket, Engine Mounting; Engine Mount Bracket; Motor Mount; Engine Bracket; Upper Bracket
- Position: Passenger Side
- Item Weight: 2.10 Pounds
- Item Dimensions: 6.2 x 5.7 x 3.1 inches
- Condition: New
- Fitment Type: Direct Replacement
- SKU: 24506488
- Warranty: This genuine part is guaranteed by GM's factory warranty.
 Product Specifications
- Other Name: Bracket-Engine Mount Strut Engine Side; Engine Mount Bracket; Motor Mount; Upper Bracket; Bracket, Engine Mounting
- Position: Passenger Side
- Item Weight: 2.10 Pounds
- Item Dimensions: 10.0 x 6.6 x 3.6 inches
- Condition: New
- Fitment Type: Direct Replacement
- SKU: 10303681
- Warranty: This genuine part is guaranteed by GM's factory warranty.

2006 Buick LaCrosse Mount Bracket Part Number: 10334474
Product Specifications- Other Name: Bracket-Engine Mount; Engine Mount Bracket; Motor Mount; Lower Bracket; Bracket, Engine Mounting
- Item Weight: 1.80 Pounds
- Item Dimensions: 10.8 x 4.9 x 2.1 inches
- Condition: New
- Fitment Type: Direct Replacement
- SKU: 10334474
- Warranty: This genuine part is guaranteed by GM's factory warranty.
 Product Specifications
- Other Name: Bracket, Engine Mounting; Engine Mount Bracket; Motor Mount; Engine Bracket; Lower Brace
- Position: Passenger Side
- Item Weight: 1.50 Pounds
- Item Dimensions: 5.9 x 4.2 x 2.0 inches
- Condition: New
- Fitment Type: Direct Replacement
- SKU: 24506489
- Warranty: This genuine part is guaranteed by GM's factory warranty.
2006 Buick LaCrosse Engine Mount
With a comprehensive array of OEM 2006 Buick LaCrosse Engine Mount, from fuel pumps to door handles, our website is a one-stop-shop for your needs. All our genuine 2006 Buick LaCrosse Engine Mount are backed by the manufacturer's warranty and are offered at competitive prices in the market. Rest assured, you can shop with complete confidence.
2006 Buick LaCrosse Engine Mount Parts and Q&A
- Q: How to Perform an Engine Mount Replacement on 2006 Buick LaCrosse?A: Start by taking off the negative cable from the battery then remove the air inlet duct of the throttle body before beginning the right Engine Mount replacement. Proceed to take out the Engine Mount struts and then securely position the vehicle. The work begins with extraction of the three-way catalytic converter pipe from the engine right side Exhaust Manifold and subsequent removal of the right front wheel and tire and right engine splash shield. After removing the lower Engine Mount nuts you should place a wooden block between the Oil Pan and the jack support to avoid damage. You need to use both a utility stand with a wooden block to lift the engine before you take out the brackets connecting the Engine Mount to the Oil Pan and to the Engine Mount to the engine. Succeeding the removal of the Engine Mount bracket follows the extraction of the Engine Mount from its bracket, then you should take out the Engine Mount upper nuts. Placement of the Engine Mount on the Engine Mount bracket begins the installation process before tightening the Engine Mount upper nuts to 53 nm (39 ft. Lbs.). Use your hands to initially fasten all Engine Mount bracket bolts that connect the mount bracket to the Oil Pan before tightening them properly. Position the Engine Mount bracket bolt then fasten it to 58 nm torque (43 ft. Lbs.) before using a utility stand to lower the engine. Next install the lower Engine Mount nuts to 47 nm (35 ft. Lbs.) torque specification while installing the right engine splash shield and then the right front wheel with tire. Reconnect the three-way catalytic converter pipe to the engine right side Exhaust Manifold then lower the vehicle. After that, reinstall the Engine Mount struts and finally attach the throttle body air inlet duct before reconnecting the battery ground (negative) cable.
Related 2006 Buick LaCrosse Parts
 2006 Buick LaCrosse Camshaft Bearing
 2006 Buick LaCrosse Coolant Filter
 2006 Buick LaCrosse Dipstick Tube
 2006 Buick LaCrosse Engine Mount Bracket
 2006 Buick LaCrosse Exhaust Valve
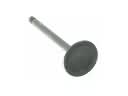 2006 Buick LaCrosse Intake Valve
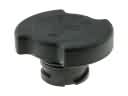 2006 Buick LaCrosse Oil Filler Cap
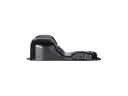 2006 Buick LaCrosse Oil Pan
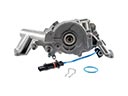 2006 Buick LaCrosse Oil Pump
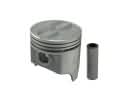 2006 Buick LaCrosse Piston
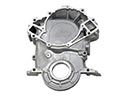 2006 Buick LaCrosse Timing Cover
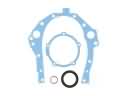 2006 Buick LaCrosse Timing Cover Gasket